Prep time: 15 minutes
Cook time: 40 minutes
Total time: 55 minutes
Servings: 12
Indulging in a slice of rich, creamy cheesecake can be one of life’s simplest pleasures. However, during the bustling holiday season, it’s essential to have a dessert that is not only delightful but also straightforward to prepare. Enter the Easter Lemon Cheesecake Bars. These bars are perfect for celebrating springtime gatherings, Easter brunches, or even as a simple weeknight treat. You may be wondering what makes this recipe so special. The vibrant zest of lemon, combined with the smoothness of the cheesecake, creates a taste that feels both refreshing and indulgent. In this recipe, you will learn the key ingredients to use, easy steps to follow, as well as creative variations to try.
What Is Easter Lemon Cheesecake Bars?
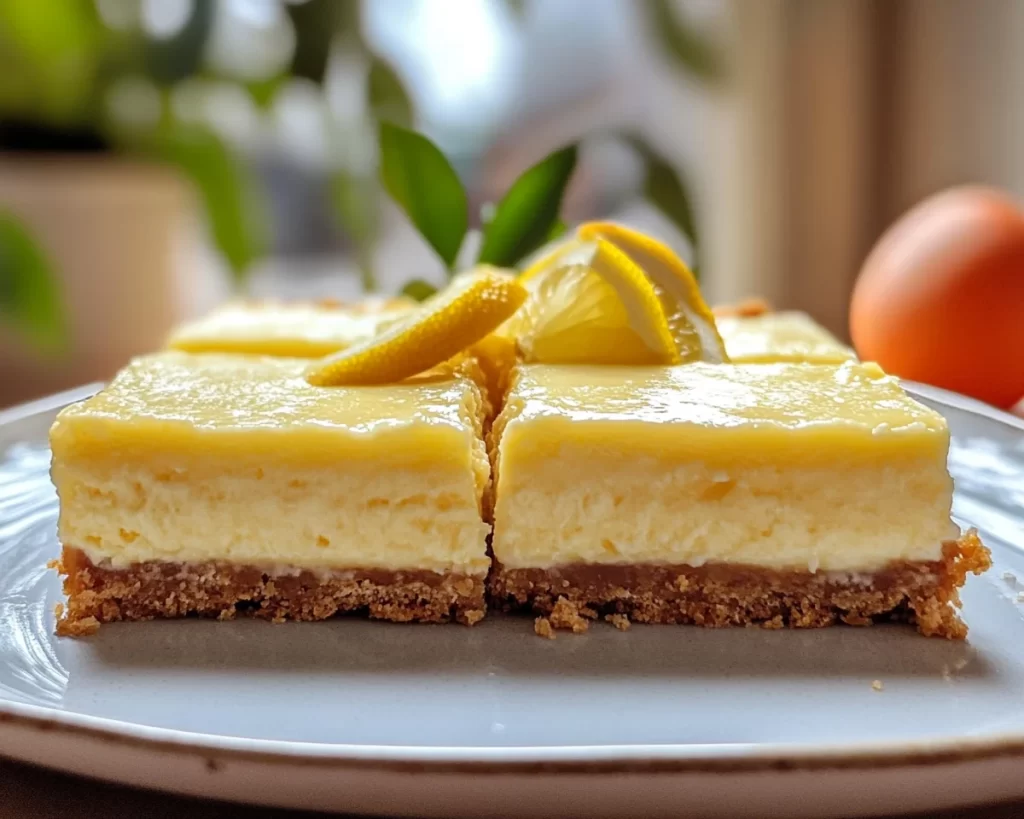
Easter Lemon Cheesecake Bars are a delightful twist on the classic cheesecake, encapsulating both the bright flavors of spring and the rich creaminess expected of cheesecakes. Traditionally, cheesecakes are round and often take a lot of time to prepare, requiring special pans and sometimes water baths to prevent cracking. However, these bars simplify the process dramatically and yield perfectly sized portions that are both visually appealing and practical for serving at gatherings.
The key ingredient in this recipe is the fresh lemon juice and zest, which elevate the overall flavor profile by offering a zesty sharpness that balances the sweet creaminess of the cheesecake mixture. You’ll also find that the buttery graham cracker crust adds a delectable crunch, creating a lovely contrast with the velvety filling. The combination of these elements results in a dessert that is not just a treat for the taste buds but also a feast for the eyes.
Why You’ll Love This
You will absolutely adore these Easter Lemon Cheesecake Bars for many reasons. Firstly, the texture is divine. The smooth, creamy filling paired with the crunch of the graham cracker crust creates a perfect harmony. Moreover, the bright lemon flavor is incredibly festive, making it an ideal spring dessert that everyone will enjoy. Given that this recipe requires minimal ingredients, it is both economical and accessible for busy parents or beginner cooks.
Additionally, these cheesecake bars allow for customization. If you want to swap the lemon for another citrus or add a layer of fruit on top, the possibilities are endless! While many cheesecakes can come off as heavy and overly rich, these bars are lightened up by the acidic lemon, making each bite feel refreshing. This recipe effectively eliminates the misconception that cheesecake is a complicated dessert. With a little bit of preparation, you will have a stunning dessert ready to impress even the most discerning guests.
Ingredients You’ll Need
- Graham cracker crumbs: 1 ½ cups – These serve as the backbone of the crust. Opt for finely crushed crumbs to ensure a smooth base. You can substitute with digestive biscuits or even gluten-free crumbs for a gluten-free version.
- Unsalted butter: ½ cup – Melted butter binds the crust together while adding flavor. If you want a dairy-free option, try coconut oil instead.
- Granulated sugar: ½ cup and ¾ cup – Sugar sweetens both the crust and the filling. You can replace granulated sugar with coconut sugar for a slightly healthier alternative.
- Cream cheese: 16 ounces – This is a key operation for achieving that creamy texture. Make sure it is at room temperature for easy blending.
- Fresh lemon juice: ¼ cup – Brightens the flavor of the cheesecake. Always opt for fresh lemon juice instead of bottled for a stronger, fresher taste.
- Lemon zest: 1 tablespoon – Adds an intense lemon flavor. Be sure to use a microplane to get the finest zest without the bitterness from the white pith.
- Vanilla extract: 1 teaspoon – This enhances the overall flavor of the dessert. Choose pure vanilla extract for the best taste.
- Eggs: 2 large – Creating a smooth filling and helping the bars set properly. If you need a vegan option, consider using flax eggs as a substitute.
- Powdered sugar: for dusting (optional) – Adds a finishing touch; it’s not mandatory but gives a lovely appearance.
How to Make
- Start by preheating your oven to 350°F (175°C). Prepare your baking pan by lining it with parchment paper; this will make it easier to lift the bars out once they are baked.
- In a mixing bowl, combine the graham cracker crumbs and granulated sugar. Pour in the melted butter and mix until the crumbs are well coated and the mixture resembles wet sand. Press this mixture firmly into the bottom of the prepared pan to form an even layer. Bake for about 10 minutes until lightly golden, then set aside to cool.
- In another large mixing bowl, beat the cream cheese until it is smooth and creamy, which should take about 2-3 minutes. Make sure it’s free of any lumps; this can be achieved best with room temperature cream cheese.
- Once the cream cheese is smooth, add the granulated sugar, lemon juice, lemon zest, and vanilla extract. Beat until fully incorporated, then scrape down the sides of the bowl to ensure even mixing.
- Next, add the eggs one at a time, mixing well after each addition until the batter is fully combined and smooth. Be careful not to overbeat, as this can lead to cracks during baking.
- Pour the cheesecake filling over the cooled crust, spreading it evenly with a spatula. Tap the pan gently to release any air bubbles that may have formed.
- Bake in the preheated oven for 30-35 minutes or until the edges are set and the center has a slight jiggle. Remember, the filling will continue to cook slightly as it cools, so take care not to overbake.
- Once done, remove the cheesecake bars from the oven and let them cool in the pan at room temperature. Once at room temperature, refrigerate for at least 4 hours or overnight to set completely.
- When ready to serve, gently lift the bars out of the pan using the edges of the parchment paper. Cut into squares and dust with powdered sugar if desired.
Variations & Substitutions
Coconut Lemon Cheesecake Bars: If you’re a fan of tropical flavors, consider adding shredded coconut into the crust or as a topping. This will give your bars an exotic flair that pairs beautifully with the lemon. Additionally, using coconut cream in place of some or all of the cream cheese creates an even creamier texture that makes each bite richer.
Berry-Topped Lemon Cheesecake Bars: Adding fresh berries on top of your cheesecake can elevate not only the flavor but also the presentation. Try raspberries or blueberries, which complement the lemon evenly. You can even create a simple berry compote to drizzle over the bars for an added burst of flavor.
Chocolate Lemon Cheesecake Bars: If you’re looking for an indulgent twist, swirl in some melted dark chocolate into the cheesecake filling before baking. The contrast between chocolate and lemon creates a decadent dessert that will impress anyone. You can also use chocolate cookie crumbs instead of graham crackers for a unique crust.
Gluten-Free Version: For those who need to follow a gluten-free diet, you can easily make these cheesecake bars gluten-free by using gluten-free graham cracker crumbs for the crust. This small change allows you to enjoy this delightful treat without any compromise on taste or texture.
Common Mistakes to Avoid
A common mistake when making cheesecake is not allowing the ingredients to come to room temperature. This step is crucial for achieving a smooth batter. Cold cream cheese can result in lumps that will lead to uneven baking. Furthermore, be cautious about overbaking. An overbaked cheesecake can have an unappetizing texture and develop undesirable cracks on the surface. If your cheesecake does crack, don’t worry! You can cover it with a layer of whipped cream or a fruit compote for a beautiful presentation.
Another mistake many people make is not chilling the cheesecake long enough. Refrigeration helps to solidify the filling properly, ensuring that you achieve the right consistency. Patience will definitely pay off here. Aim for at least 4 hours of chill time, but overnight is often better to deepen the flavors.
Storage, Freezing & Reheating Tips
These Easter Lemon Cheesecake Bars can be stored in an airtight container in the refrigerator for up to 5 days. Make sure to keep them covered to maintain their texture and flavor. If you wish to keep them longer, you can freeze the bars. To freeze, wrap each bar tightly in plastic wrap and then place them in a freezer-safe container. They can be kept frozen for up to 3 months.
When ready to enjoy, thaw them in the refrigerator overnight. Avoid using a microwave for reheating as this can alter the texture; the cheesecake may become rubbery. Instead, simply allow the bars to sit at room temperature for about 20-30 minutes before enjoying.
Frequently Asked Questions
Can I use a different type of cheese instead of cream cheese? Yes, you can experiment with different cheese options like mascarpone or ricotta to create variations in texture and flavor. These cheeses may lend a lighter or different creaminess to the dish, enhancing the overall taste.
Is it necessary to use fresh lemon juice? While bottled lemon juice can be convenient, fresh lemon juice provides more flavor and zest. The freshness elevates the taste of the cheesecake significantly, so it is highly recommended for optimal results.
Can I prepare these cheesecake bars in advance? Absolutely! In fact, these bars are best made a day or two ahead of time. The flavors meld together beautifully after chilling, making them even more delicious as they sit.
What’s the best way to cut the cheesecake bars? For clean cuts, use a sharp knife and dip it in warm water before slicing. Wipe the knife clean between cuts for perfectly neat edges. This enhances the presentation for serving guests.
Can I add other flavors to the cheesecake? Yes! You can infuse different flavors such as almond or coconut extract, or even mix in chocolate chips or nuts for added texture. The options are virtually limitless, allowing you to get creative and make this recipe your own.
Conclusion:
The Easter Lemon Cheesecake Bars are not just a dessert; they are an experience—a celebration of taste, texture, and the joy of sharing with loved ones. From the zingy lemon to the creamy filling, each bite is a reminder of spring’s brightness and warmth. I encourage you to give this recipe a try, adding your own personal touch or variation. Share your creations with friends and family, and relish the smiles you bring to their faces. Happy baking!


