Prep time: 15 minutes
Cook time: 20 minutes
Total time: 35 minutes
Servings: 12 servings
Now, let’s talk about a snack that everyone loves: a delicious, crunchy cheese stick. This Easy Cheese Sticks Recipe is your go-to option when you’re hosting a party or simply craving something cheesy at home. If you’ve ever been invited to a gathering and found yourself eyeing the snack table, only to see those irresistible cheese sticks, then you know just how popular they are! Not only are they delightful to eat, but they are also incredibly simple to make. This homemade version will elevate your snack game, impressing your guests and satisfying your cravings.
In this recipe, you will learn how to prepare the perfect cheese sticks that will have everyone coming back for more. These cheese sticks feature a crispy coating and a gooey interior, lending themselves to a variety of dipping sauces. Whether you are a busy parent needing a quick snack for your kids or a beginner in the kitchen aiming to impress at your next get-together, this recipe is made just for you. Throughout this article, I will guide you through the steps, share some cooking tips, suggest variations, and answer common questions. Prepare to become a cheese stick pro!
What Is Easy Cheese Sticks Recipe – Best Homemade Snack for Parties?
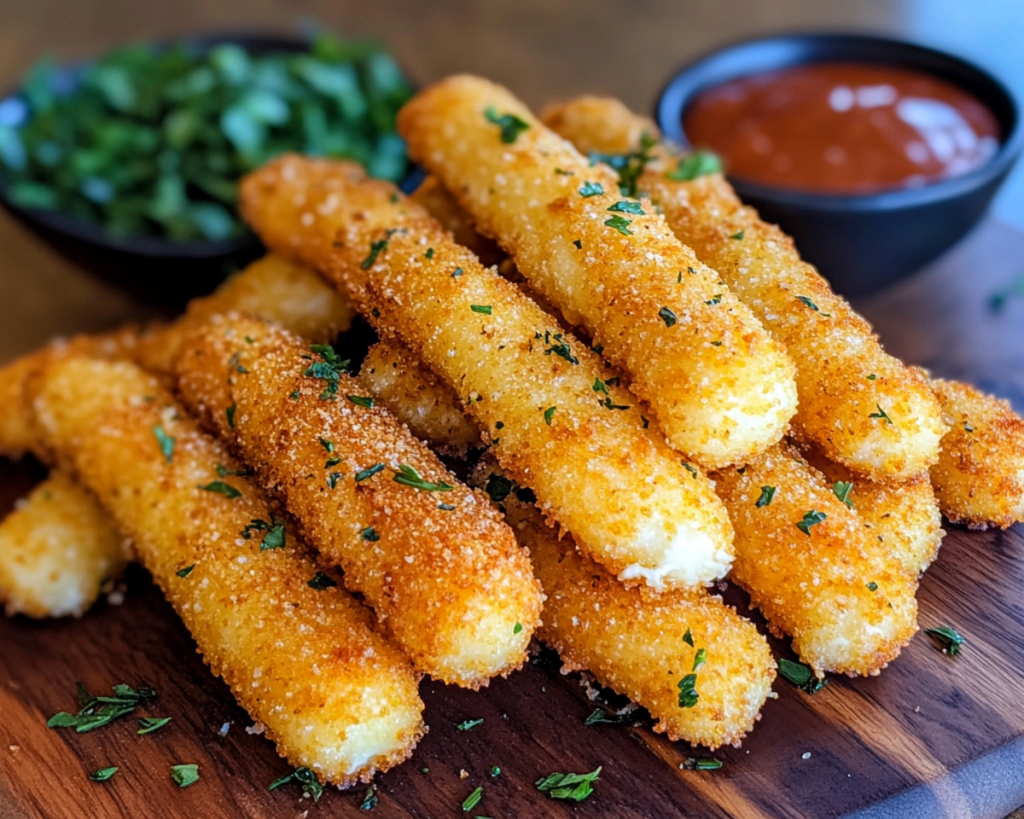
The Easy Cheese Sticks Recipe is a delightful snack that has roots in both Italian and American cuisine. Most likely inspired from the classic mozzarella sticks often served at pizzerias, this dish has evolved into a versatile crowd-pleaser. The key component is, of course, cheese—preferably mozzarella—recognized for its meltability and rich flavor. The sticks are coated in a crunchy breading, making them visually appealing and genuinely satisfying to eat.
When you sink your teeth into one of these golden-brown cheese sticks, you are met with a satisfying *crunch* on the outside followed by a mouthwatering, stretchy cheese filling. The contrast in texture makes the experience of eating them extremely enjoyable. You can dip them in marinara sauce, ranch dressing, or even a spicy aioli to suit your taste preferences. It’s hard to find a snack more universally adored than this. The recipe is simple to follow and yields fantastic results, ensuring you will have a delicious treat ready in no time.
Why You’ll Love This
There are numerous reasons to fall in love with this Easy Cheese Sticks Recipe. First and foremost, the taste is simply out of this world. You get that satisfying crunch followed by melted cheese, creating a taste sensation that is incredibly addictive. Additionally, preparing these cheese sticks is easy, making them perfect for busy parents or those new to cooking. You will be surprised at how quickly you can prepare a batch.
Another benefit is the cost-effectiveness of making your own cheese sticks. Store-bought options might burn a hole in your pocket, especially when you’re entertaining guests. Homemade versions allow you to customize the ingredients, ensuring you get the freshest taste while saving money. This recipe is also versatile in that you can easily adjust it for various dietary needs. If someone in your circle prefers gluten-free options or has dairy sensitivities, you can make adjustments without sacrificing flavor.
A common misconception about cheese sticks is that they are difficult to prepare. While some may struggle with frying techniques or achieving the perfect crispy exterior, this recipe breaks everything down into simple steps, making it accessible for even the most novice cooks. With straightforward instructions and a few tips, you’ll feel confident whipping up a batch of cheese sticks that will impress everyone!
Ingredients You’ll Need
To prepare these delicious easy cheese sticks, you will need the following ingredients:
- 12 Mozzarella Cheese Sticks: These are the stars of the dish, providing that melty, gooey texture.
- 1 cup All-Purpose Flour: Flour acts as the first layer of coating, helping to hold the breading together.
- 2 large Eggs: Beaten eggs serve as a binder for the breadcrumbs, ensuring that they adhere well to the cheese.
- 2 cups Breadcrumbs: Opt for Italian-seasoned breadcrumbs for added flavor. You can also use panko for extra crunch.
- 1 teaspoon Garlic Powder: This adds a hint of flavor to the overall snack.
- 1 teaspoon Italian Seasoning: Optional, but it enhances the flavor profile of the cheese sticks.
- Salt and Pepper: Essential for seasoning the flour and breadcrumb mixture.
- Oil for Frying: Canola or vegetable oil works best for frying; it has a high smoke point for crispiness.
Each ingredient serves a crucial role in creating this dish. The mozzarella cheese provides that beloved stretch while the breadcrumbs give it a satisfying crunch. Feel free to substitute gluten-free flour and breadcrumbs if you’re catering to gluten-sensitive guests. Similarly, you can use different types of cheese, such as pepper jack for a bit of heat, or cheddar for a sharper flavor.
How to Make
Now that you have your ingredients, it’s time to dive into the preparation process! Follow these step-by-step instructions for perfectly crispy cheese sticks:
- Prepare the Cheese Sticks: Begin by unwrapping the mozzarella cheese sticks. If you desire longer sticks, consider slicing them in half. This not only makes them more manageable to dip and eat but also shortens cooking time.
- Set Up a Breading Station: In one shallow dish, place the all-purpose flour. In another dish, beat the two large eggs until well combined. Finally, in a third dish, combine the breadcrumbs, garlic powder, Italian seasoning, salt, and pepper. This setup allows for a smooth coating process.
- Coat the Cheese Sticks: Begin by dredging a cheese stick in the flour, ensuring it’s fully coated. Shake off any excess before dipping it into the egg wash. Finally, roll it in the breadcrumb mixture until it’s fully coated. Repeat this process for all cheese sticks.
- Chill the Cheese Sticks: After coating, place the cheese sticks on a parchment-lined baking sheet and put them in the freezer for about 15 minutes. This step is crucial, as chilling helps the cheese stick together during frying and prevents it from melting too quickly.
- Heat the Oil: While the cheese sticks are chilling, pour oil into a large, heavy-bottomed skillet so it’s about 1-2 inches deep. Heat the oil over medium-high heat. You want it to reach approximately 350°F (175°C). A good test to see if the oil is hot enough is to drop a small piece of bread into it; if it bubbles and begins to brown, it’s ready!
- Fry the Cheese Sticks: Carefully place a few cheese sticks in the hot oil, being sure not to overcrowd the skillet. Fry them for about 2-3 minutes, turning them occasionally, until they’re golden brown. Use a slotted spoon to remove them and transfer them to a plate lined with paper towels to absorb any excess oil.
- Serve Hot: Allow the cheese sticks to cool slightly before serving. Pair them with your favorite dipping sauces, such as marinara, ranch, or even a zesty dipping sauce for an added kick. Enjoy every cheesy bite!
Cooking tips include ensuring your oil is at the right temperature to avoid soggy cheese sticks. If the temperature is too low, the sticks will absorb too much oil and become greasy. Moreover, for extra crunch, consider double-coating the cheese sticks by dipping them into the egg and breadcrumbs a second time before frying.
Variations & Substitutions
Gluten-Free Cheese Sticks: If you or your guests are gluten-sensitive, don’t worry! You can easily substitute all-purpose flour and breadcrumbs with gluten-free alternatives. There are several brands available that make gluten-free flour blends and breadcrumbs, allowing you to enjoy cheese sticks without compromising flavor or texture.
Spicy Cheese Sticks: For those who crave a bit of heat, consider using spicy pepper jack cheese instead of traditional mozzarella. You can also mix in some cayenne pepper or chili powder into the breadcrumb mixture. This variation transforms your cheese sticks into a zesty, flavorful appetizer that will delight the taste buds of spice lovers.
Herbed Cheese Sticks: Change up the flavor profile by adding mixed dried herbs to your breadcrumb mixture. Incorporating herbs like thyme, oregano, or parsley can add a unique flair that elevates these cheese sticks to restaurant quality. This variation is perfect for those looking to impress their guests or simply enhance their own snack experience.
Vegetable Cheese Sticks: For a healthier version, consider stuffing your breaded mozzarella sticks with thin pieces of roasted peppers or spinach. This not only adds flavor but also introduces some nutritious elements into your snack. This variation can be great for kids reluctant to eat vegetables, as the cheesy goodness will surely entice them!
Common Mistakes to Avoid
When making cheese sticks, several common pitfalls can turn your snack from delicious to disastrous. A significant issue is **not freezing the cheese sticks before frying**. If you skip this step, the cheese might melt out of the crust, leaving you with a gooey mess rather than beautifully formed sticks.
Another mistake is overcrowding the frying pan. This can drop the oil temperature too much and result in cheese sticks that are greasy and undercooked. Frying in small batches ensures even cooking and maintains the temperature, resulting in ideal crispiness.
Finally, be careful with the **amount of oil** you’re using. If there’s not enough for proper frying, the sticks won’t crisp up. On the flip side, too much oil can lead to overly greasy cheese sticks. Aim for about 1-2 inches of oil for the best results!
Storage, Freezing & Reheating Tips
If you have leftover cheese sticks (which is a good problem to have!), make sure to store them properly. Allow them to cool completely and then place them in an airtight container in the refrigerator. They will typically last for about 3-4 days. For longer storage, you can freeze them before frying. Place the assembled, uncooked sticks on a baking sheet in a single layer and freeze until solid. Then transfer them to a resealable bag or airtight container and keep them for up to 2 months.
When you’re ready to enjoy them again, there’s no need to thaw. Simply deep-fry them straight from the freezer, but be sure to extend the cooking time by a minute or two. If reheating cooked cheese sticks, consider using an oven at 375°F (190°C) for about 10-15 minutes to restore some crispness. The microwave often results in a chewy texture, so the oven method is more effective in retaining that desirable crunch.
Frequently Asked Questions
Can I make cheese sticks ahead of time for a party?
Yes, absolutely! You can prepare the cheese sticks in advance, coat them, and freeze them until you are ready to fry. They can be made a few days ahead and stored in the freezer. When it’s time to serve, simply fry them straight from the freezer for fresh, crispy cheese sticks!
What other cheese can I use besides mozzarella?
While mozzarella is traditional due to its perfect melting properties, you can experiment with other cheeses like cheddar, gouda, or pepper jack. Each will provide a unique taste and texture, allowing you to customize your cheese sticks for any occasion.
Can I air fry cheese sticks instead of deep frying?
Yes, an air fryer is a great alternative for cooking cheese sticks! Preheat the air fryer to 375°F (190°C) and arrange the sticks in a single layer. Cook for about 10-12 minutes or until golden and crispy, flipping halfway through for even cooking.
Why are my cheese sticks leaking cheese when I fry them?
This typically happens when the cheese isn’t properly chilled before frying. Be sure to freeze the coated cheese sticks for at least 15 minutes before frying to prevent leakage. This will help the breading set and ensure the cheese stays intact.
What dips pair well with cheese sticks?
Many dips complement cheese sticks beautifully! Traditional choices include marinara sauce, ranch dressing, or garlic aioli. You can also get creative by offering spicy sriracha, honey mustard, or a tangy yogurt dip. The possibilities are endless!
Conclusion:
In summary, this Easy Cheese Sticks Recipe is not just a delicious snack but also a perfect choice for gatherings and family get-togethers. Whether you are making them for a casual game night or preparing appetizers for a lavish party, these cheese sticks will undoubtedly be a hit. The ability to customize them and make variations allows you to cater to different tastes and dietary needs easily. So gather your ingredients, follow the steps, and get ready to enjoy a delightful, cheesy treat that is sure to impress. Share your creations, and don’t hesitate to explore your twists on this classic dish!