**Meta Title: Easy Cherry Danish Pastry Recipe – Flaky & Irresistible!**
**Meta Description: Discover how to make this easy cherry Danish pastry that is flaky, fruity, and sweet. Perfect for breakfast, brunch, or a delightful snack!**
You know that feeling when you walk into a bakery and the sweet scent of freshly baked pastries wafts through the air, making your mouth water? For me, that intoxicating aroma always signals one thing: I’m destined to indulge in something delicious. There’s just something irresistibly charming about a cherry Danish pastry—its flaky layers, sweet fruit filling, and creamy glaze all combine to create a heavenly treat that feels equally suitable for breakfast or an afternoon coffee break.
In this article, we’re diving headfirst into the world of pastry-making with an easy cherry Danish pastry recipe that even novice bakers can master. By the end, you’ll not only know how to create your own flakily layered pastries filled with vibrant cherry filling, but you’ll also have the insider tips to elevate your baking game. So, tie on that apron, grab your ingredients, and let’s turn your kitchen into a mini bakery!
What is Easy Cherry Danish Pastry?
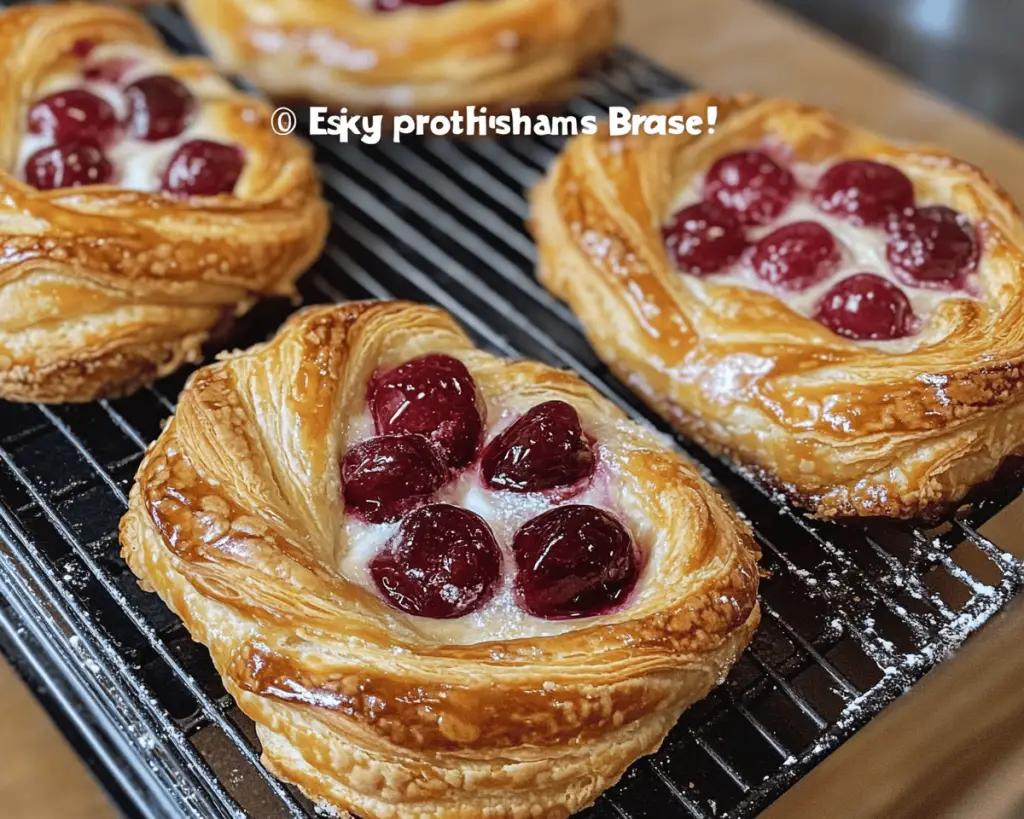
The cherry Danish pastry is a delightful pastry that hails from the tradition of Northern European baking, particularly Denmark. It’s a type of **Viennoiserie**, which refers to a kind of pastry made from a yeast-leavened dough, often enriched with butter and filled with appealing fillings. The Danish is loved for its beautiful golden-brown exterior, layers of buttery, flaky pastry, and delicious fillings that may include cream cheese, fruit preserves, or even chocolate.
What makes cherry Danishes stand out is their vibrant filling. Picture glistening cherries, either fresh or preserved, nestled in a rich, buttery blanket of pastry. The first bite offers a perfect balance of flaky texture and sweet, juicy fruit. It’s the kind of pastry that brings back memories of lazy weekend brunches and cozy afternoons over coffee, making it a special treat to look forward to.
Why You’ll Love This Easy Cherry Danish Pastry
This easy cherry Danish pastry recipe brings the bakery experience straight to your home kitchen. Here are just a few reasons why you’ll love it:
1. **Simplicity**: This recipe uses store-bought puff pastry, making it accessible even for baking novices. No need for complicated dough making!
2. **Flavorful Filling**: The natural sweetness and tartness of cherries shine in this recipe, complemented by a buttery pastry that melts in your mouth.
3. **Perfect for Any Occasion**: Whether you’re hosting brunch, celebrating a holiday, or just craving something sweet, these pastries can elevate any gathering.
4. **Customizable**: While this recipe features cherries, feel free to swap in your favorite fruit filling—apricots, blueberries, or even savory options like cheese.
5. **Impressive Presentation**: The pastries are not only delicious, but they also look beautiful on a platter, making them a real showstopper when entertaining guests.
Ingredients You’ll Need
Creating the perfect cherry Danish pastry requires just a handful of quality ingredients. Here’s what you’ll need:
– **Puff Pastry**: You can find this in the frozen section of your grocery store. Look for all-butter puff pastry for maximum flakiness. You can also make your own, but that’s a project for another day!
– **Cherry Filling**: You can use **fresh cherries**, **canned cherry pie filling**, or **frozen cherries**. If using fresh, make sure to pit and chop them finely.
– **Granulated Sugar**: This adds sweetness to the filling and enhances the overall flavor of the pastry.
– **Cornstarch**: A must for thickening the cherry filling; it prevents the pastry from becoming soggy.
– **Egg**: For an egg wash that lends a beautiful golden color to the pastry.
– **Cream Cheese (optional)**: For a rich filling, blend softened cream cheese with some sugar for a creamy layer that pairs perfectly with cherries.
– **Vanilla Extract**: A splash of vanilla gives additional depth to the cherry filling.
– **Powdered Sugar**: Mix with a bit of milk or cream to make a quick glaze for drizzling on top.
How to Make Easy Cherry Danish Pastry
Now, let’s roll up our sleeves and create these delicious pastries step-by-step!
1. **Thaw the Puff Pastry**: Start by placing your frozen puff pastry in the refrigerator to thaw overnight or at room temperature for about 30 minutes. It needs to be pliable but still cool to the touch.
2. **Prepare the Cherry Filling**: In a mixing bowl, combine your cherries (if fresh, chop them), granulated sugar, cornstarch, and vanilla extract. Stir until the cherries are well coated. If you’re using canned filling, simply pour it into a bowl and add a bit of cornstarch to thicken if necessary.
3. **Roll Out the Pastry**: Lightly flour a clean surface and gently roll out the pastry into a rectangle, about 1/8 inch thick. Use a sharp knife or pizza cutter to cut the dough into squares or rectangles, depending on your preference—around 4×4 inches works well.
4. **Form the Pastries**: Place a spoonful of the cherry filling in the center of each square. If you’re using cream cheese, spread a thin layer beside the filling before adding the cherries. Fold over each corner of the pastry towards the center to create a pinwheel or diamond shape, pressing the edges to seal. This is where creativity can shine—feel free to create different shapes!
5. **Egg Wash**: Beat the egg and brush a bit over each pastry. This egg wash will give your pastries that beautiful golden color once baked.
6. **Bake in the Oven**: Preheat your oven to 400°F (200°C). Place the pastries on a parchment-lined baking sheet and bake for about 15-20 minutes or until the tops are puffed and golden brown. Keep an eye on them—the aroma will be tempting!
7. **Cool and Glaze**: Once baked, let the pastries cool for a few minutes. Meanwhile, whisk together the powdered sugar and a splash of milk to create a glaze. Drizzle over each Danish for that sweet finishing touch.
Tips, Tricks & Variations
Here are some expert tips to help you ensure your cherry Danish turns out perfectly every time:
1. **Quality Puff Pastry**: Always use high-quality puff pastry for the best flavor and texture. Look for products labeled “all-butter” for that flaky richness.
2. **Do Not Overfill**: Avoid overfilling your pastries. A spoonful of filling is sufficient; otherwise, they may burst open during baking.
3. **Chill the Pastry**: If your pastry begins to warm up while you’re working with it, pop it back in the fridge for a few minutes. Keeping the dough cold ensures that it puffs up nicely in the oven.
4. **Make Ahead**: You can prepare and assemble the pastries a day in advance. Store them covered in the refrigerator and bake them just before serving.
5. **Creative Variations**: Experiment with different fruit fillings or even savory options like spinach and feta. Adding lemon zest or almond extract can also enhance the flavor profile beautifully.
What to Serve With Easy Cherry Danish Pastry
These cherry Danishes are truly versatile and can be enjoyed in various ways:
– **Coffee**: Pair with a hot cup of coffee or espresso. The bitterness complements the sweetness of the pastry wonderfully.
– **Tea**: A light herbal or black tea is a fantastic option for afternoon snacking.
– **Fresh Fruits**: Serve alongside fresh fruit salad for a refreshing contrast to the rich pastries.
– **Whipped Cream or Ice Cream**: For a decadent dessert, consider a dollop of whipped cream or a scoop of vanilla ice cream on the side.
– **Yogurt**: A side of Greek yogurt adds protein and a tangy touch to balance the sweetness of the pastries.
Nutrition & Health Benefits
While pastries are often considered indulgent, a homemade cherry Danish can provide some nutritional benefits thanks to the fruit. Cherries are rich in antioxidants and vitamins, particularly vitamin C, which is great for your immune system. However, keep in mind that pastries should be enjoyed in moderation due to their butter and sugar content.
A typical cherry Danish pastry contains approximately 250 calories, depending on portion size and filling. For more information on nutrition, you can read articles from Healthline and the USDA.
Frequently Asked Questions
**1. Can I make the cherry filling ahead of time?**
Absolutely! You can prepare the cherry filling a day or two in advance. Store it in an airtight container in the refrigerator. Just give it a good stir before using to ensure it’s well mixed.
**2. Can I freeze the pastries?**
Yes, these pastries freeze beautifully. You can freeze assembled (but unbaked) pastries. Place them on a baking sheet to freeze individually, then transfer them to a freezer bag. When you’re ready to bake, simply extend the bake time by a few minutes.
**3. Can I substitute the cherries for other fruits?**
Definitely! Apples, blueberries, and raspberries all make excellent fillings. Just adjust the sweetness according to the fruit’s natural sugars.
**4. What’s the best way to store leftovers?**
Store any leftover pastries in an airtight container at room temperature for 1-2 days. For longer storage, you can refrigerate them, but keep in mind they may lose a bit of their flakiness.
**5. How do I reheat leftover pastries?**
To reheat, preheat your oven to 350°F (175°C) and place the pastries on a baking sheet. Warm them for about 10 minutes, or until heated through. This method will help to restore some of that flaky texture.
In conclusion, this easy cherry Danish pastry recipe allows you to bring a slice of bakery magic into your home. Flaky, fruity, and sweetly irresistible, they’re perfect for any occasion. So why not treat yourself and your loved ones? Bake a batch tonight, and immerse yourself in the warm, comforting aroma of homemade pastries. I can hardly wait for you to experience that first delightful bite! If you loved this recipe, please leave a comment or tag me on Instagram with your creations. Happy baking!


