**Prep time:** 15 minutes
**Cook time:** 30 minutes
**Total time:** 45 minutes
**Servings:** 12 bars
There’s something utterly delightful about lemon desserts. The bright, zesty flavor has a special way of uplifting our spirits. Today, we’re diving into a luscious **Easy Lemon Cream Cheese Bars with Crescent Roll Crust** recipe that promises to be a hit at any gathering. This dessert is not only easy to whip up but also offers a delightful combination of a creamy lemon filling nestled within a flaky crescent roll crust. Think of it as a sunny summer day captured in dessert form, making it perfect for everything from family gatherings to potlucks.
In this article, you’ll discover just how simple it is to create these bars from scratch, a bit of their background, and some tips to personalize the recipe to suit your taste preferences. So, get your rolling pin ready as we embark on this delicious journey!
What Are Easy Lemon Cream Cheese Bars with Crescent Roll Crust?
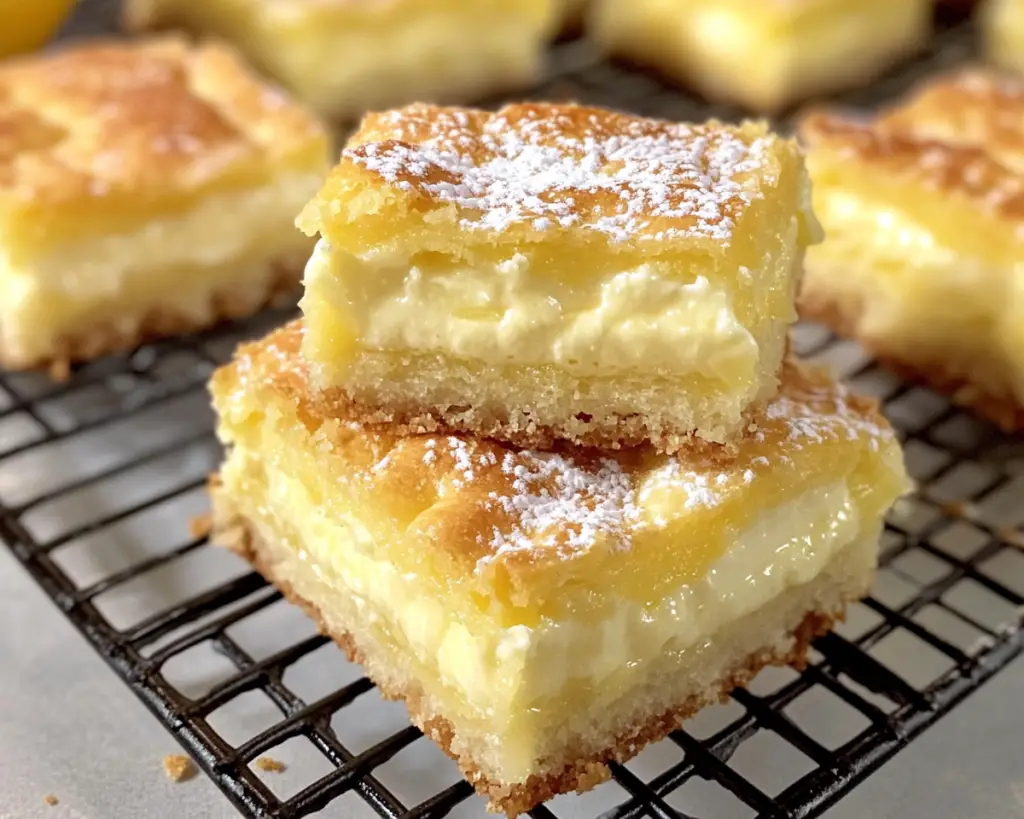
Easy Lemon Cream Cheese Bars with Crescent Roll Crust are a zesty, refreshing dessert made with a soft, buttery **crescent roll crust** and a creamy, sweet lemon-infused **cream cheese filling**. The concept behind these bars is straightforward yet ingenious: using pre-made crescent rolls as a crust not only simplifies the process but also adds a unique, flaky texture that contrasts beautifully with the smooth and tangy filling.
Originating from the popular trend of using crescent rolls in dessert recipes, these lemon bars have become a favorite in many households. The lemon filling typically combines **cream cheese**, **sugar**, and **lemon juice**, offering a delicious balance of sweet and tart flavors. The bars are usually baked until set, creating a delightful treat that can be served warm or chilled, making it versatile for any occasion.
Why You’ll Love These Easy Lemon Cream Cheese Bars
There are numerous reasons why these Easy Lemon Cream Cheese Bars will win over your heart and taste buds.
– **Simple Preparation:** The use of crescent rolls streamlines the process, making it easy even for novice bakers to succeed. You won’t spend hours in the kitchen, which is an added bonus for busy parents or anyone looking for a quick dessert solution.
– **Deliciously Bright Flavor:** The combination of cream cheese, sugar, and fresh lemon juice creates a wonderful balance that delights the palate. The creaminess of the filling really pairs well with the citrus zest, making each bite refreshing and light.
– **Cost-Effective:** Utilizing crescent rolls and common pantry staples keeps the costs low. You can produce a stunning dessert without breaking the bank!
– **Versatile Serving Options:** These bars can be enjoyed warm out of the oven or cooled in the refrigerator for a chilled treat. They’re perfect for any occasion, whether it’s a cozy family dinner or a festive picnic with friends.
– **Easy Customizations:** Lemon lovers might want to kick up the citrus flavor, while others may prefer a more mellow taste. The simplicity of the base recipe allows for countless variations, keeping this dessert exciting each time you make it.
Avoid the misconceptions that preparing desserts has to be complex or time-consuming—this recipe proves that delicious seasonal treats can easily be a part of your cooking repertoire!
Ingredients You’ll Need
To create these delightful Easy Lemon Cream Cheese Bars, you will need the following ingredients:
– **2 tubes of crescent roll dough (8 ounces each)**
Crescent roll dough serves as the flaky base for these bars, providing both texture and flavor. Look for brands that contain no preservatives for a fresher taste.
– **8 ounces of cream cheese, softened**
Cream cheese gives the filling its creamy texture. Ensure it is softened before mixing to achieve a smooth consistency. If you’re lactose intolerant, you can substitute it with a dairy-free cream cheese alternative.
– **1 cup sugar**
The sugar sweetens the cream cheese filling and balances the tartness of the lemon. For a healthier alternative, you could use coconut sugar or a honey/agave syrup mixture.
– **2 tablespoons of fresh lemon juice**
Fresh lemon juice brings brightness and acidity to the filling. Bottled lemon juice can be used in a pinch, but fresh is always preferred for its vibrant flavor.
– **1 tablespoon of lemon zest**
Zesting the outer peel of the lemon adds an intense lemon aroma and enhances the overall flavor profile. You can also try using zest from a Meyer lemon for a sweeter touch.
– **1 teaspoon of vanilla extract**
This subtle flavor elevates the overall taste of the dessert. Choose pure vanilla extract for the best results over artificial options.
– **Powdered sugar (for dusting, optional)**
A light sprinkle of powdered sugar on top of the bars adds a nice touch and enhances presentation—but it’s entirely optional!
How to Make Easy Lemon Cream Cheese Bars with Crescent Roll Crust
Now that you have all the ingredients ready, it’s time to bring these bars to life. Follow these step-by-step instructions carefully to ensure a delicious result:
1. **Preheat Your Oven:** Start by preheating your oven to 350°F (175°C). Preheating ensures that the dough bakes evenly and gives it that perfect golden-brown color.
2. **Prepare the Crescent Roll Crust:** Open two tubes of crescent roll dough. Unroll one tube and place it in a greased 9×13 inch baking dish. Gently press the dough to fit the bottom and create a seamless layer. Be careful not to stretch it too much, as you want to retain the flaky texture.
3. **Bake the Base:** Place the baking dish in the preheated oven and bake for about 10 minutes, or until the crust is lightly golden. This pre-baking step helps to firm up the base and prevents it from becoming soggy once the filling is added. Watch it closely to avoid over-baking!
4. **Make the Cream Cheese Filling:** While the crust is baking, prepare the filling. In a mixing bowl, combine the softened cream cheese and sugar. Using an electric mixer, beat on medium speed until the mixture is smooth and creamy. This step is crucial for ensuring there are no lumps in your filling.
5. **Add the Flavorings:** Once creamy, add the fresh lemon juice, lemon zest, and vanilla extract to the cream cheese mixture. Mix until everything is well combined. The filling should be light and fluffy, with a lovely citrus aroma wafting through your kitchen.
6. **Spread the Filling:** After the crust has pre-baked, remove it from the oven and let it cool for a few minutes. Carefully spread the cream cheese filling evenly over the warm crust. Use a spatula to ensure an even layer; it should cover the entire surface.
7. **Top with Remaining Dough:** Open the second tube of crescent roll dough and unroll it over the filling, similarly to the first layer. You can cut the dough into smaller pieces if necessary and place them over the filling, or you can simply unroll it as a whole layer. Pinching the seams together helps prevent the filling from leaking out.
8. **Bake Again:** Return the baking dish to the oven and bake for an additional 20-25 minutes or until the top is golden and the filling is set. Keep an eye on it, as ovens can vary. A toothpick should come out clean when inserted into the center.
9. **Cool and Slice:** Once done, remove the baking dish from the oven and allow it to cool for at least 30 minutes at room temperature. Once cool, transfer it to the refrigerator for another hour to set further. Cooling helps the flavors meld and makes cutting easier. When ready, slice into squares or bars and serve. Dust with powdered sugar, if desired.
10. **Enjoy Your Treat:** Take a moment to appreciate the tantalizing aroma of fresh lemon and cream cheese! These bars can be enjoyed slightly warm or fully chilled, depending on your preference.
5 Variations & Substitutions
If you want to customize your Easy Lemon Cream Cheese Bars, here are five delightful variations and substitutions you can try:
1. **Berry Lemon Cream Cheese Bars**
To add a fruity twist, incorporate fresh berries (like blueberries or raspberries) into the cream cheese filling. Gently fold in about 1 cup of fresh berries after mixing the filling. This variation adds a burst of sweetness and color while complementing the tart lemon flavor.
2. **Lemon Coconut Bars**
For a tropical flair, add shredded coconut to the filling. Substitute 1/4 cup of the cream cheese with coconut cream, and fold in 1/2 cup of unsweetened shredded coconut. This variation provides a rich, creamy taste with a delightful chewiness, making each bite feel like a vacation treat.
3. **Gluten-Free Option**
If you’re adhering to a gluten-free diet, you can use gluten-free crescent roll dough available at various grocery stores. Additionally, ensure the remaining ingredients are gluten-free and print out the labels as needed.
4. **Chocolate-Lemon Bars**
For chocolate lovers, consider drizzling melted chocolate over the baked and cooled bars. You can also fold in mini chocolate chips into the cream cheese filling for a sweet contrast. The combination of chocolate and lemon creates a decadent dessert that is sure to please.
5. **Mini Lemon Cream Cheese Tarts**
For bite-sized fun, divide the crescent roll dough into smaller portions and use muffin tins to create mini tarts. This makes for great finger food at gatherings and gives everyone a taste of lemony goodness in a cute little package!
Common Mistakes to Avoid
As with any recipe, several pitfalls could occur while preparing your Easy Lemon Cream Cheese Bars. Here are some common mistakes to keep an eye on:
– **Using Cold Cream Cheese:** It’s crucial that your cream cheese is at room temperature or softened. Cold cream cheese will not blend well and can lead to a lumpy filling, which doesn’t have the desired creamy texture. Always remember to take it out of the fridge about 30 minutes to 1 hour before you start prepping your filling.
– **Not Pre-Baking the Crust:** Skipping out on the pre-baking process may result in a soggy bottom. When the crust isn’t baked first, the filling will leak into the dough, creating a mushy texture. Always ensure that the crust is lightly golden and semi-firm before adding anything on top.
– **Overbaking the Bars:** Baking for too long can lead to dry bars rather than the creamy texture you’re aiming for. Keep an eye on the time, and check for doneness a few minutes before the time is up. Look for the top to turn golden, and perform the toothpick test to confirm the filling is set.
– **Pouring the Filling While the Crust Is Too Hot:** If you add the cream cheese filling while the crust is still steaming hot, it may cause the filling to melt unnecessarily and ruin the texture. Allow it to cool slightly before spreading the filling over to ensure it sets as desired.
– **Skipping the Cooling Time:** If you’re too eager to cut the bars right out of the oven, you may end up with gooey squares instead of neat bars. Cooling in the refrigerator allows the filling to firm up properly, making for cleaner cuts and better presentation. Patience is essential!
Storage, Freezing & Reheating Tips
Storing and reheating your Easy Lemon Cream Cheese Bars is straightforward, making them perfect for meal prep or make-ahead desserts. Here’s how to ensure they remain fresh:
– **Storing in the Refrigerator:** Store any leftover bars in an airtight container in the refrigerator. They’ll stay fresh for up to 4-5 days, making them an excellent option for planned snacks throughout the week.
– **Freezing for Later:** If you want to prepare a batch ahead of time, these bars freeze beautifully. Cut into squares and place them in a single layer on a parchment-lined baking sheet in the freezer until frozen solid. Once frozen, transfer them to an airtight container or freezer-safe bag with parchment paper between layers to prevent sticking. Frozen lemon bars can last up to 2-3 months.
– **Thawing:** To enjoy your frozen lemon bars, simply remove them from the freezer and let them thaw in the refrigerator for a few hours. They regain their delightful creamy texture after thawing!
– **Reheating:** If you prefer to serve them slightly warm, place individual squares in the microwave for about 10-15 seconds, checking periodically so they don’t become too hot.
– **Food Safety Best Practices:** Always ensure to check the signs of spoilage before consuming, especially if the bars have been stored for longer than their optimal duration. If they appear or smell off, it’s better to err on caution and not consume them.
Frequently Asked Questions
1. **Can I use bottled lemon juice instead of fresh?**
Yes, you can use bottled lemon juice as a substitute. However, fresh lemon juice offers a brighter flavor that enhances the dish significantly. If you need to use bottled juice, opt for a high-quality brand with no added sugars for the best taste.
2. **What alternatives can I use for sugar?**
If you’re looking for a healthier alternative, you can use alternatives such as coconut sugar or substitute with a sugar-free sweetener like Stevia or Erythritol. Be sure to follow the conversion ratios provided on the packaging, as these can vary from standard granulated sugar.
3. **Can I make this dairy-free?**
Absolutely! To make these bars dairy-free, substitute cream cheese with vegan cream cheese options found in many grocery stores. Use plant-based butter for the crescent roll crust if necessary and ensure all remaining ingredients are free from dairy.
4. **How do I know when my bars are done?**
The bars are done when the top is golden brown, and the filling is set. You can test this by inserting a toothpick into the center—if it comes out clean or with only a few crumbs, they’re ready. Overbaking will result in a dry texture.
5. **What can I do with leftover lemon juice?**
Leftover lemon juice can be used in a myriad of ways! It’s great for marinades, homemade salad dressings, or flavoring beverages like lemonade and cocktails. You can also freeze the leftover juice in ice cube trays for long-term storage.
In conclusion, these Easy Lemon Cream Cheese Bars with Crescent Roll Crust are the perfect recipe to add to your baking repertoire. With their bright flavor, creamy texture, and the ease of preparation, you can enjoy them any time of year. Whether you stick to the classic version or try out the various adaptations available, they are sure to be a crowd favorite. So, gather your ingredients, hit the kitchen, and delight your family and friends with these delightful treats! Enjoy, and don’t forget to share your creations with others!


