**Prep Time:** 20 minutes
**Cook Time:** 0 minutes
**Total Time:** 20 minutes
**Servings:** 8 servings
Peanut butter pie—a dessert that resonates with many—often sparks childhood memories of indulgence. This Easy No-Bake Peanut Butter Pie with Oreo Crust is an irresistible treat that’s not only quick to whip up but also requires no baking, making it the perfect choice for busy parents, beginners, or anyone craving a creamy, luscious dessert without the fuss of an oven. The combination of chocolatey Oreo cookies and rich peanut butter filling creates a delightful contrast of flavors and textures that’s sure to satisfy any sweet tooth.
In this article, you will learn how to make this delightful peanut butter pie that’s rich, creamy, and utterly delicious. We will cover what exactly makes this pie unique, the ingredient breakdown, step-by-step instructions, creative variations, storage tips, and much more. Let’s dive into the details of this scrumptious dessert.
What Is Easy No-Bake Peanut Butter Pie with Oreo Crust?
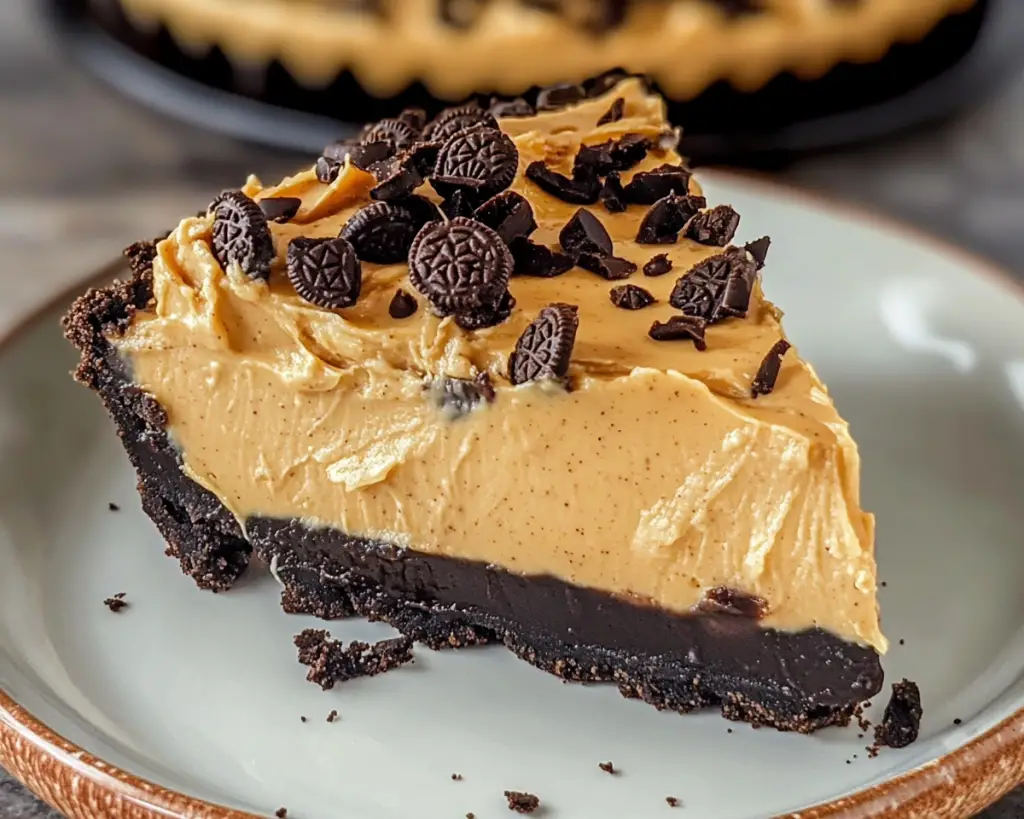
Easy No-Bake Peanut Butter Pie is a classic American dessert that has been a staple at family gatherings, potlucks, and summer barbecues. The essence of this pie lies within its **no-bake nature**, meaning there’s no need for a hot oven—perfect for warm days when the last thing you want is to heat up the kitchen.
This pie typically features a smooth and creamy filling made from **peanut butter, cream cheese, and whipped topping**, which gives it a light, airy texture. The filling is then nestled in a **crunchy Oreo crust**, providing an exhilarating contrast. This concoction creates a dessert that is not only rich and flavorful but also incredibly easy to make. It can be topped with chocolate sauce, whipped cream, or even chopped peanuts for an added crunch and flavor.
The flavors of peanut butter and chocolate meld beautifully, creating a sweet and salty experience that is hard to resist. Whether served at a birthday party, holiday gathering, or simply as an after-dinner treat, this peanut butter pie is guaranteed to be a crowd-pleaser.
Why You’ll Love This Easy No-Bake Peanut Butter Pie with Oreo Crust
There are plenty of reasons why this Easy No-Bake Peanut Butter Pie should be on your radar. First and foremost, the **taste**. The rich peanut butter filling pairs beautifully with the sweet, chocolatey flavor of the Oreo crust, making each bite a delightful pleasure. The blend of creaminess and crunch creates an appealing texture that makes it feel indulgent without being overly heavy.
**Ease of Preparation** is another significant component. With no baking required and just a few simple steps, it’s an ideal dessert for beginner cooks or for busy parents looking to whip something up quickly. You can even get your kids involved in the process, allowing them to crush the Oreos or help with the mixing.
From a cost perspective, this dessert is relatively inexpensive to make as it requires fewer ingredients than traditional baked pies. Ingredients like cream cheese, peanut butter, and whipped topping are easy to find at your local grocery store, making this recipe budget-friendly.
The nutritional aspect cannot be ignored, either. Peanut butter is a source of protein and healthy fats, and when enjoyed in moderation, this pie can be a satisfying and relatively healthy treat.
As for misconceptions, many people may think that making a pie from scratch requires significant skill in the kitchen. However, this recipe debunks that notion, providing you with a true “whip it up in no time” experience. Plus, you can always personalize it, adjusting sweetness or toppings based on your and your family’s preferences.
Ingredients You’ll Need
Here’s what you will need to create this succulent No-Bake Peanut Butter Pie with Oreo Crust.
– **Oreo Cookies (24 pieces)**: The star of your crust, Oreos provide that signature chocolate flavor and crunch. You can substitute with any chocolate sandwich cookies if desired.
– **Unsalted Butter (1/2 cup)**: Used to bind the crushed Oreo cookies together into a crust. Make sure to melt it before combining it with the cookies to achieve a uniform consistency.
– **Cream Cheese (8 oz)**: Softened cream cheese adds richness and creaminess to the filling. Allowing it to soften at room temperature will make mixing easier.
– **Peanut Butter (1 cup)**: The main flavor component of the pie, creamy peanut butter works best here. You can also use crunchy peanut butter for added texture but it may alter the consistency slightly.
– **Powdered Sugar (3/4 cup)**: Sweetens the filling and gives it a smooth texture. This ingredient can be adjusted to taste if you prefer a less sweet filling.
– **Whipped Topping (1 cup)**: This adds lightness and volume to the pie, creating a cloud-like texture. If you prefer a healthier option, you can use homemade whipped cream (just ensure it’s stable enough for the pie).
– **Chocolate Sauce (optional)**: For drizzling on top before serving, this adds extra decadence. You can use store-bought or make your own.
Remember that each ingredient contributes to the flavor and texture of the pie, so take care when measuring and preparing.
How to Make Easy No-Bake Peanut Butter Pie with Oreo Crust
Here’s a step-by-step guide to making your Easy No-Bake Peanut Butter Pie with Oreo Crust:
1. **Prepare the Oreo Crust**: Start by placing the Oreo cookies in a food processor and pulse them into fine crumbs. If you don’t have a food processor, you can place the cookies in a zip-top bag and crush them with a rolling pin. In a large mixing bowl, combine the Oreo crumbs with the melted unsalted butter. Mix until the crumbs are evenly coated and resemble wet sand.
2. **Press the Crust into the Pan**: Take a 9-inch pie pan and pour the Oreo crumb mixture into it. Using the back of a measuring cup or your fingers, press the crumbs firmly into the bottom and up the sides of the pan. Ensure it’s distributed evenly to hold its shape when set. Place the crust in the refrigerator to chill while you prepare the filling. This helps it firm up.
3. **Make the Peanut Butter Filling**: In a large bowl, beat the softened cream cheese using a hand mixer or stand mixer until smooth. Slowly add in the peanut butter and continue mixing until fully combined. Make sure there are no lumps; you want a silky texture here.
4. **Add Sweetener and Whipped Topping**: Gradually add the powdered sugar, mixing on low speed until combined. Then gently fold in the whipped topping using a spatula, mixing just until no white streaks remain. This folding technique keeps the mixture airy—essential for a light pie!
5. **Fill the Crust**: Once your filling is well-mixed, pour it into the chilled Oreo crust. Spear it evenly around the edges and smooth the top with a spatula. This is your chance to get creative; you can swirl the top or leave it flat, depending on your preference.
6. **Chill the Pie**: Cover the pie loosely with plastic wrap or foil. Refrigerate for at least 4 hours, but ideally overnight. This time allows the flavors to meld together and the filling to set properly.
7. **Serve and Enjoy**: Once chilled, remove the pie from the refrigerator. Optionally, drizzle chocolate sauce on top and maybe sprinkle some crushed Oreos for an extra touch. Slice with a clean knife and serve each piece with a dollop of whipped cream for presentation.
And there you have it—your Easy No-Bake Peanut Butter Pie with Oreo Crust is ready for indulgence!
5 Variations & Substitutions
Below are some ideas to mix things up and make this Easy No-Bake Peanut Butter Pie your own.
1. **Chocolate Peanut Butter Pie**: If you want to amplify the chocolate flavor, consider using chocolate Oreo cookies instead of regular ones for the crust. You can also fold in some melted chocolate into the filling to achieve a richer taste. For extra decadence, top with chocolate shavings or mini chocolate chips.
2. **Nutella Swirl Pie**: For those who adore Nutella, incorporate it into the filling for a delicious twist. Use half peanut butter and half Nutella to create a unique flavor that merges hazelnut and chocolate with peanut butter—a delightful mix that leaves you wanting more!
3. **Vegan Version**: You can easily convert this pie to a vegan dessert! Substitute the cream cheese with vegan cream cheese and the whipped topping with coconut whipped cream. For the crust, use vegan Oreo cookies and **coconut oil** instead of butter.
4. **Fruit-Flavored Variation**: Incorporate ripe bananas or crushed pineapple in the filling to add a fresh element. Make sure to adjust the sugar level to account for the natural sweetness from these fruits. The tropical burst will provide it with a refreshing twist, perfect for summer gatherings.
5. **Peanut Butter Cup Pie**: For a more indulgent experience, you can fold chopped mini peanut butter cups into the filling before pouring it into the crust. This adds fabulous flavor and texture, making your pie even more scrumptious—and perfect for chocolate and peanut butter lovers alike!
These variations allow for endless creative possibilities, so feel free to experiment based on your taste preferences and needs.
Common Mistakes to Avoid
While making an Easy No-Bake Peanut Butter Pie may seem straightforward, there are a few common pitfalls to watch out for:
– **Using Cold Ingredients**: Ensure that your cream cheese is at room temperature before you start mixing. **Cold cream cheese** can lead to lumps in your filling, throwing off the creamy texture you desire. If you forget to take it out beforehand, you can cut it into small chunks and microwave it for a few seconds, allowing it to soften.
– **Not Compacting the Crust**: An overly crumbly crust can lead to a pie that falls apart when served. Make sure to **press the crust firmly** into the pie pan, using the back of a measuring cup to ensure it holds together once filled.
– **Overmixing the Filling**: When incorporating the whipped topping into the peanut butter mixture, do so gently. Overmixing can deflate the airiness that gives the pie its light texture. Aim for just combined without any visible streaks.
– **Insufficient Chilling Time**: While it might be tempting to dig in after a few hours, allow for an **overnight chilling** period when possible. This ensures that your filling is solid and the flavors are melded together beautifully.
– **Portion Control**: With such a rich dessert, it can be easy to over-serve. Keep portions reasonable; a little goes a long way with this creamy treat.
Keeping these points in mind will help you create a perfectly set and delicious pie every time.
Storage, Freezing & Reheating Tips
When it comes to storing your Easy No-Bake Peanut Butter Pie, here are some essential tips:
– **Refrigeration**: Store any leftovers in the refrigerator for up to 5 days. Use plastic wrap or foil to cover the pie to prevent it from absorbing any odors in the fridge.
– **Freezing**: If you want to freeze the whole pie or individual slices, cover it tightly with plastic wrap, followed by aluminum foil to prevent freezer burn. The pie can be frozen for up to 3 months. To thaw, place it in the refrigerator for a few hours or overnight before serving.
– **Serving After Freezing**: **Do not attempt to cut the pie while still frozen.** Allow it to defrost completely, as slicing will be challenging when the filling is icy.
These tips will help you to enjoy this delicious dessert over time without worrying about compromising its flavor or texture.
Frequently Asked Questions
1. **Can I use natural peanut butter for this pie?**
Yes, you can use natural peanut butter if you prefer! However, keep in mind that natural peanut butter tends to be runnier than conventional peanut butter, which may alter the texture of the pie slightly. If using natural peanut butter, consider using a bit less or adjusting the powdered sugar to ensure the pie’s firmness.
2. **Can I use a store-bought crust instead of making my own?**
Absolutely! If you’re short on time or prefer convenience, you can easily substitute a pre-made chocolate cookie crust for homemade. Just follow the same filling instructions, and it will turn out beautifully.
3. **Can I make this pie ahead of time?**
Yes! This pie is ideal for making ahead, as it holds up well in the refrigerator overnight. Making this easy dessert a day in advance allows the flavors to meld together, resulting in an even more delicious treat!
4. **Why is my filling too runny?**
A runny filling often results from under-mixing or using insufficiently firm ingredients. Make sure your cream cheese is fully softened, and that you whip the mixture until well combined. If you find it runny, you can add more powdered sugar to thicken it or let it chill longer in the fridge.
5. **How can I make this pie suitable for gluten-free diets?**
To make a gluten-free version, select gluten-free Oreos for the crust, ensuring that all other ingredients are gluten-free as well. Check the labels of any ingredients used, particularly for whipped topping, as some brands may contain gluten.
With these insights and tips, you’re well on your way to creating a delightful Easy No-Bake Peanut Butter Pie with Oreo Crust. You’ll impress family and friends with your culinary skills, all while enjoying a dessert that’s creamy and utterly delicious.
In conclusion, this dessert combines simplicity and indulgence, making it both accessible and tantalizing. Don’t hesitate to customize it to your liking or share it with loved ones! This Easy No-Bake Peanut Butter Pie is more than just a treat; it’s an experience waiting to be savored. So, roll up your sleeves, gather your ingredients, and enjoy the creation of this sweet masterpiece!


