Prep time: 20 minutes
Cook time: 30 minutes
Total time: 50 minutes
Servings: 8
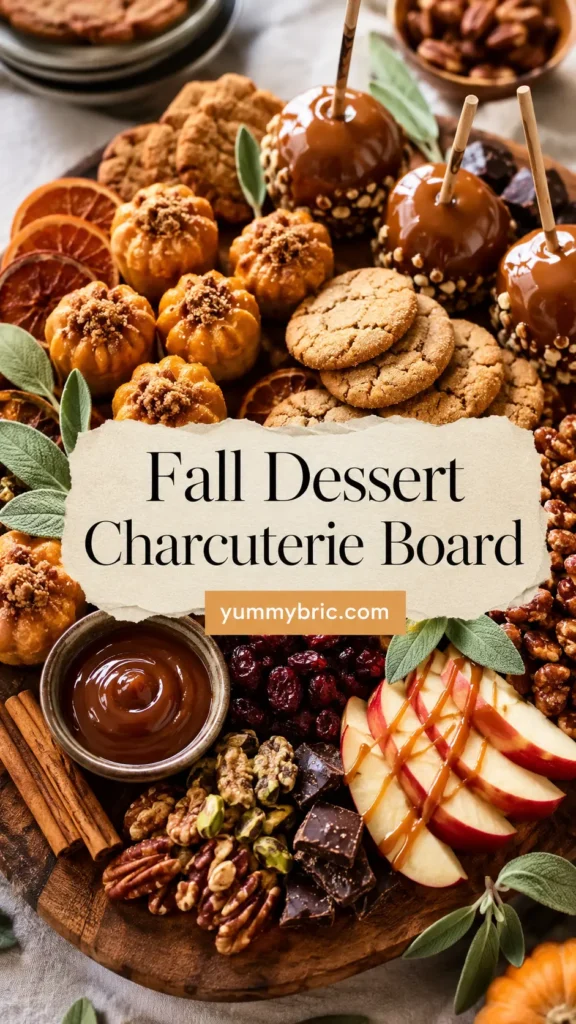
Fall is a delightful time of year filled with vibrant colors, cool breezes, and pumpkin-spiced everything. One way to celebrate the season is by creating a stunning **Fall Dessert Charcuterie Board with Pumpkin Bites**. This board is not only visually appealing but also provides a variety of flavors and textures that everyone at your gathering will love. Perfect for family gatherings, office events, or a cozy night in, this charcuterie board brings together the essence of fall in each bite.
What Is Fall Dessert Charcuterie Board with Pumpkin Bites?
A **Fall Dessert Charcuterie Board with Pumpkin Bites** is a beautifully arranged selection of pumpkin-themed treats, paired with complementary flavors and textures. It usually includes bite-sized pumpkin goodies such as cookies, cake bites, and dips, all arranged on a wooden board or platter. The idea is to create a feast for the eyes as well as the palate, ensuring that your guests feel excited and intrigued as they indulge in the assortment. The combination of sweet and savory elements, along with seasonal touches like fresh fruit and nuts, can make this dessert board a seasonal highlight.
Why You’ll Love This
One of the many reasons you’ll adore this dessert charcuterie board is its versatility. You can adjust the ingredients based on your preference or what you have at hand. Additionally, assembling this board allows for creativity—experimenting with different flavors and presentations will make it truly unique. It’s an excellent way to cater to various tastes, whether your guests prefer pumpkin spice flavors or something a bit more tangy. The colors of fall, along with the tasty components, will surely make guests linger longer at the dessert table.
Ingredients You’ll Need
Here’s a comprehensive list of the ingredients for your **Fall Dessert Charcuterie Board with Pumpkin Bites**:
- 1 cup pumpkin puree: This is the star ingredient that adds moisture and sweetness to your desserts.
- 2 cups all-purpose flour: This provides the base for your pumpkin treats.
- 1 cup brown sugar: For that rich sweetness and molasses undertone.
- 1/2 cup granulated sugar: Balances out the flavors and enhances sweetness.
- 1/2 cup unsalted butter: Adds richness and helps with texture.
- 2 large eggs: These bind the ingredients together and provide a light texture.
- 1 tsp vanilla extract: For added flavor depth.
- 1 tsp baking powder: Helps your treats rise and become fluffy.
- 1 tsp cinnamon: A classic spice that complements the pumpkin beautifully.
- 1/2 tsp nutmeg: Adds warmth and a subtle hint of earthiness.
- 1/4 tsp salt: Enhances overall flavor.
- 1 cup chocolate chips: Optional but always a popular addition for sweetness.
- Assorted fruits (apples, pears): For added crunch and natural sweetness.
- Nuts (walnuts or pecans): For texture and a satisfying crunch.
- Caramel sauce: For drizzling over fruits or desserts.
- Whipped cream: A perfect topping for the pumpkin bites.

How to Make
- Prepare the Pumpkin Bites: In a mixing bowl, combine the pumpkin puree, brown sugar, and granulated sugar. Mix well until creamy. Then, add the melted butter, eggs, and vanilla extract. Stir until fully combined.
- Sift Dry Ingredients: In another bowl, sift together the flour, baking powder, cinnamon, nutmeg, and salt. Gradually incorporate the dry ingredients into the wet mixture, stirring until just combined. Be careful not to overmix.
- Fold in Chocolate Chips: If using chocolate chips, gently fold them into the batter for an indulgent touch. This will give your pumpkin bites a delightful surprise.
- Prepare Baking Sheet: Preheat your oven to 350°F (175°C). Line a baking sheet with parchment paper or lightly grease it. Use a cookie scoop to drop portions of batter onto the prepared sheet, spacing them an inch apart.
- Bake: Bake in the preheated oven for about 15-20 minutes or until a toothpick comes out clean. Let them cool slightly on the tray before transferring them to a wire rack.
- Assemble the Charcuterie Board: Once the pumpkin bites are cooled, arrange them on a large board. Fill the spaces with assorted fruits, nuts, and drizzle caramel sauce over the fruits or bites for added flair. Lastly, add a bowl of whipped cream for dipping or topping.
Variations & Substitutions
Pumpkin Spice Cake Bites: Instead of cookies, consider making pumpkin spice cake bites. Use a boxed cake mix that you can enhance with your favorite spices. Mix the cake batter, bake, and cut into bite-sized pieces. Coat them in a sweet glaze or dust with powdered sugar for an elegant look.
Pecan Pie Bits: Incorporate pecan pie filling into your charcuterie board. You can prepare mini tart shells, fill them with pecan filling, and bake. These little bites can pair beautifully with pumpkin flavors and make your board even more enticing.
Dairy-Free Options: If you or your guests have dietary restrictions, you can easily make this dessert board dairy-free. Use plant-based butter and almond milk or coconut milk in place of regular milk in the pumpkin bites. Ensure you choose dairy-free chocolate chips if you include them.
Gluten-Free Alternatives: Swap out regular flour for a gluten-free flour blend to make the pumpkin treats gluten-free. Be sure to check the other ingredients used for any gluten content as well.
Common Mistakes to Avoid
Make sure to not skip the *sifting* of your dry ingredients. This could lead to uneven mixing and a dense texture in your pumpkin bites. Also, be cautious with ingredient measurements; overly packed flour can lead to dry bites. Another common mistake is overbaking. Keep an eye on your oven timer and perform the toothpick test to ensure they are perfectly done, resulting in that soft and moist texture.
Storage, Freezing & Reheating Tips
For best freshness, store leftover pumpkin bites in an airtight container in the refrigerator, where they will stay good for about 3 days. If you want to store them longer, you can freeze the bites by laying them out on a baking sheet and freezing until solid. Once frozen, transfer them to a freezer-safe bag. They can last up to 3 months in the freezer. To reheat, pop them in the oven at 350°F (175°C) for about 10-15 minutes, or until warmed through.
Frequently Asked Questions
Can I use canned pumpkin? Absolutely! Canned pumpkin is a great time-saver and works perfectly for this recipe. Just make sure you’re using pure pumpkin puree, not pumpkin pie filling.
How can I make the board more visually appealing? Include a variety of colors and textures. Different fruits, nuts, and even edible flowers can help enhance the overall look. A clean, rustic wooden board adds charm.
Is this recipe suitable for kids? Yes, it’s an excellent choice for family gatherings! The sweetness of the pumpkin bites and the variety of fruits will surely delight children. Just ensure you monitor ingredients for allergies.
How can I make homemade pumpkin puree? To make pumpkin puree, simply roast a pumpkin, scoop out the flesh, and blend until smooth. It’s fresher and has a richer flavor, although canned pumpkin is more convenient.
What else can I add to my charcuterie board? Consider adding cheeses like cream cheese or goat cheese for a savory aspect, as well as any seasonal candies like chocolate-covered pretzels. Experimenting is key!
Conclusion: Creating a **Fall Dessert Charcuterie Board with Pumpkin Bites** is not only an enjoyable and visually appealing endeavor, but it also brings together friends and family for a delightful evening. Using quality ingredients, experimenting with flavors, and presenting it beautifully can easily make this dessert board the highlight of your fall gatherings. So roll up your sleeves and start crafting a stunning charcuterie board that celebrates this beautiful season!