Honestly, I can’t even begin to tell you how much joy these **Garlic Herb Cheese Bombs** bring me. Just picturing that golden-brown, cheesy goodness exploding in your mouth makes my heart skip a beat! There’s something incredibly alluring about biting into a warm pastry that has melted cheese just waiting to be released. I stumbled upon this recipe during a chilly winter afternoon a couple of years ago when I was hosting a casual gathering for some friends. You know, one of those days where the clouds seem to match your mood. As I sifted through my collection of cookbooks and better-for-wear recipe printouts crammed between the pages, there it was: a humble little recipe for cheese bombs.
At first, I wasn’t sure. I mean, how could something so simple be so divine? But as soon as I took that first gooey bite, it was love at first taste! The spices mingling harmoniously with rich cheese, wrapped in a buttery, flaky crust—let’s just say I had found my new obsession. Since then, it’s become my go-to snack for all occasions. They’re perfect for game nights, movie marathons, or, let’s be real, just a sneaky midnight treat. The best part? They’re actually incredibly forgiving, so even if you mess up a smidge, they somehow still turn out delightful.
Now, each time I make these little bliss bites, they bring back those warm memories of friendship and laughter. Picture this: my friends gathered in my kitchen, waiting eagerly as the aroma wafts through the air, telling us not-so-subtly that cheese is about to make our lives infinitely better. I mean, who wouldn’t want to be surrounded by friends, laughter, and of course, melty cheese? Here’s the thing about these cheese bombs—they aren’t just about the ingredients; they’re about bringing people together and making beautiful memories.
What Goes Into Garlic Herb Cheese Bombs?
Now let’s talk about the stars of the show—the ingredients. Each one plays a part in this cheesy drama, and I’m pretty sure you’ll fall in love with them as much as I have.
– **All-purpose flour**: This is the backbone of any dough, really. I like to use unbleached all-purpose flour because it feels more wholesome, and honestly, I can be a bit picky about my baking. It just makes a difference, you know?
– **Unsalted butter**: Ah, butter—the magical ingredient that turns anything into comfort food! I always have a stash of the good stuff in my fridge. The brand matters to me, too; I swear by Irish butter for its creamy richness, but any high-quality unsalted butter will do the trick. This one lends that flaky texture to our bombs.
– **Dried herbs (like basil, oregano, and thyme)**: A lovely little trio! You don’t need to stress too much about measuring them precisely; I tend to just throw in a pinch of this and that. The fragrance while they’re baking is unreal, honestly. Sometimes, I imagine I’m back in my grandmother’s kitchen, where she would whip up the most fabulous aromas.
– **Garlic powder**: I mean, do I really need to explain this one? Garlic makes everything better—it’s like the superhero of the spice world. I always go a little heavy-handed with it because there can never be too much garlic, right?
– **Cheese (mozzarella, cheddar, or any melty favorite)**: Here’s where it gets exciting! You can tailor this to whatever cheese makes your heart sing. I often use a mix of **mozzarella** for that gooey melt and some sharp **cheddar** for a kick. Sometimes, I even toss in a bit of **parmesan** for extra depth. It’s a fridge-cleaning dream come true.
– **Baking powder**: This little guy is key for making the dough puff up and become airy. Don’t skip this—trust me; you’ll want the bombs to rise when they bake!
– **Salt**: A sprinkle of this will enhance all the flavors and bring everything together. I like using sea salt since it adds a little crunch. You know what I’m talking about—the best kind of salty!
Now, don’t let the ingredient list fool you—these bombs are, in fact, ridiculously easy to whip up. I find that once you have your ingredients lined up, it feels almost therapeutic putting everything together. Give it a try—you might surprise yourself!
Is Garlic Herb Cheese Bombs Actually Good for You?
Let’s have a real talk here. Are these little heavenly bites good for you? Well, they definitely fall into the “indulgence” category! But listen, life is all about balance, right?
I mean, you’re looking at butter and cheese—both super delicious, but maybe not on the top of Dr. Oz’s list of heart-healthy foods. But sometimes, a little indulgence is exactly what we need. The comforting warmth, the bubbly cheese, and the crispy exterior can make even the grayest of days feel a tad brighter. Plus, you can feel good knowing you’re making them from scratch.
And hey, if you make them as a special treat or for a gathering, you’ll be sharing joy with your loved ones, which is honestly a slice of health in its own right. There’s something to be said about the comfort food experience, you know? So yes, while I won’t claim they’re health food, I will say they’re good for the soul. Just make sure you balance out your life and eat some greens when you can.
Here’s What You’ll Need
– 2 cups **all-purpose flour**
– 1/2 cup **unsalted butter**, cold and cubed
– 1 tablespoon **baking powder**
– 1 teaspoon **salt**
– 1/2 teaspoon **garlic powder**
– 1 teaspoon dried **oregano**
– 1 teaspoon dried **basil**
– 1 teaspoon dried **thyme**
– 1 cup shredded **mozzarella cheese**
– 1/2 cup shredded **cheddar cheese** (or more if you’re feeling indulgent)
– Additional butter and seasoning for brushing, if desired
– Optional dipping sauce of your choice—marinara is a classic!
How to Make Garlic Herb Cheese Bombs Step-by-Step
Okay, friends! Grab your apron. I promise you, this is going to be so much fun, and soon you won’t be able to resist popping these bombs into your mouth!
1. **Preheat your oven** to 375°F (190°C). Trust me when I say this is an essential step—you want those bad boys to hit the heat right away!
2. In a large mixing bowl, combine the **flour**, **baking powder**, **garlic powder**, **salt**, **oregano**, **basil**, and **thyme**. Mix it up really well. I usually use a whisk, but you can get in there with a fork if you prefer. Feel free to dance a little while you do this—why not?
3. Next, add the cold **butter** to the flour mix. Using your hands or a pastry cutter, work that butter into the flour until it resembles coarse crumbs. I mean, it’s okay if some chunks are bigger than others—it’ll still be delicious.
4. Now, stir in the **mozzarella** and **cheddar**. Seriously, it’s time to make it cheesy! At this point, you can really taste-test the cheese if you want. Who can blame you?
5. Gradually add in about 3/4 cup of cold water, mixing until just combined. You want the dough to be slightly sticky but manageable. If it’s too dry, toss in a splash more water—it’s not like we’re baking a soufflé here!
6. On a lightly floured surface, turn out your dough and shape it into a ball. Don’t stress out about being perfect—knead it a couple of times, and you’re good to go!
7. Roll out the dough into a rectangle—about 1/4 inch thick. I won’t lie; I sometimes make it a little thicker because I can’t resist that fluffy bite!
8. Cut the dough into even squares—about 3×3 inches. You can use a knife or a pizza cutter for this. Bonus points if you get creative and make goofy fun shapes, too.
9. Place a generous spoonful of cheese filling in the center of each square. Don’t overstuff, but let’s be real—who can resist a bit of overflow?
10. Fold up the edges of the dough over the cheese, pinching to seal all that cheesy goodness inside. I’m sometimes a bit clumsy with this step, but that’s okay. Sometimes I end up with little remnant cheese dribbles on the edges, and honestly, they’re like little happy accidents waiting to happen!
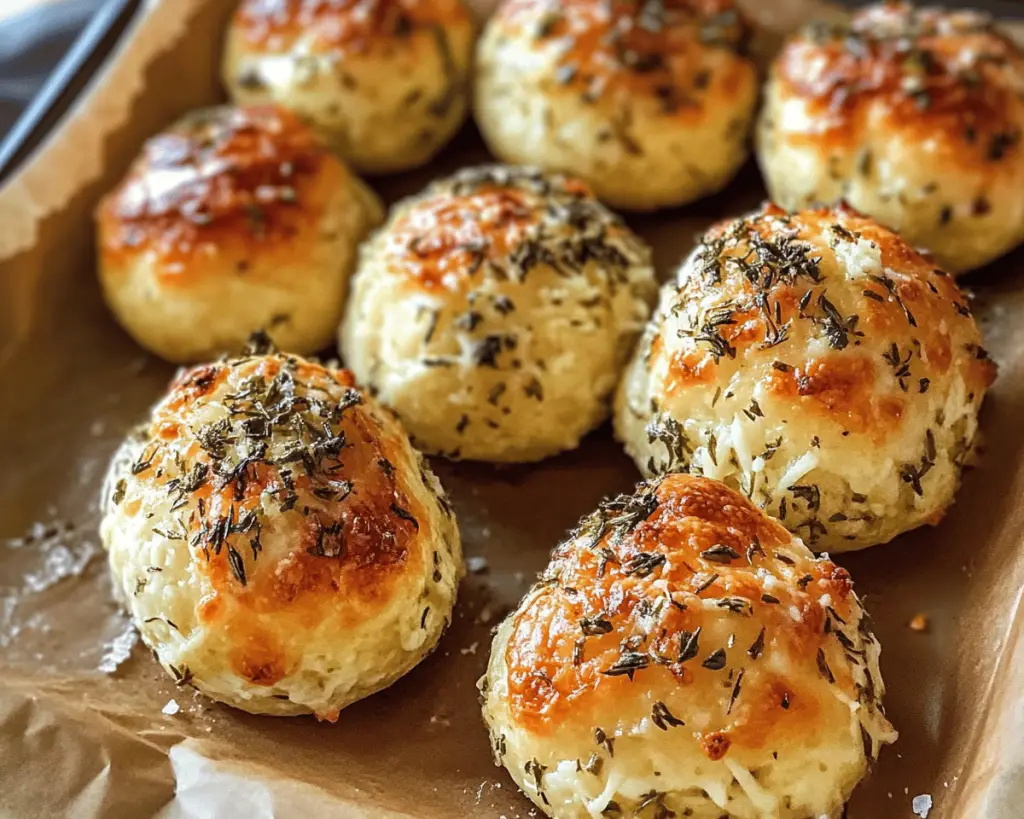
11. Arrange the cheese bombs on a baking sheet lined with parchment paper. Brush the tops with melted butter and sprinkle a little extra seasoning if you’re feeling fancy. Or don’t—because let’s be real, they’ll be amazing regardless.
12. Bake for 18–20 minutes or until golden brown. Your house is going to smell divine, just letting you know! Keep an eye on them so they don’t get too brown; we’re looking for that perfect crunch and golden hue.
13. Once they’re out of the oven, let them sit for a couple of minutes—but seriously, don’t wait too long. I can’t help but dive right in. Serve alongside your favorite dipping sauce, and you’re in cheesy heaven.
Little Extras I’ve Learned Along the Way
Here’s the thing: once you get the hang of making these garlic herb cheese bombs, you can totally customize them! Swap out the cheeses for whatever you have on hand—the more creative, the better. I’ve even added some spicy pepper jack cheese for a little kick, and wowza, that was a game-changer, let me tell you!
If you want to make them even more decadent, toss in diced cooked bacon, some sautéed mushrooms, or even sun-dried tomatoes. I once made a batch with fresh herbs from my garden, and they tasted *so much better*! Each variation is like a new adventure.
When you’re feeling like a lazy cook, you can use store-bought dough. Puff pastry works wonderfully for these bites! Just remember to roll them smaller since the pastry can puff up a lot.
Oh, and speaking of shortcuts, if you’re in a pinch, you can even skip the kneading altogether and just mix everything until combined. That’s my secret when I’m feeling overwhelmed—you know those days when you just need to whip something together quickly. They still turn out great, just slightly denser.
Lastly, these cheese bombs freeze beautifully! Just be sure to cool them completely and then store them in an airtight container or a resealable bag. To reheat, pop them in the oven for about 10-15 minutes, and you’ll have a satisfying snack ready to go anytime the craving strikes!
You know, every time I whip up a batch of these wonderful cheese bombs, it feels like a hug from the inside. They remind me to slow down, savor good food, and celebrate the simple joys in life—good company, laughter, and the incredible warmth of sharing something delicious. This one means a lot to me. Let me know if you try it—I’d love to hear your twist!