**Prep time:** 25 minutes
**Cook time:** 0 minutes
**Total time:** 25 minutes
**Servings:** 24 truffles
Gingerbread truffles are the ultimate holiday treat that perfectly encapsulates the warmth, spice, and joy of the season. Picture sinking your teeth into a delightful chocolate-covered truffle filled with the comforting flavors of gingerbread. Each bite is a festive explosion of spice and sweetness that is ideal for holiday gatherings or as a special gift for friends and family. These truffles are not only easy to make but can also be customized to suit various tastes, making them a wonderful addition to your holiday baking repertoire.
In this article, you will discover a simple yet delectable recipe for gingerbread truffles, learn about the ingredients, explore variations, and get helpful tips for making these delightful treats. Let’s get started!
What Are Gingerbread Truffles?
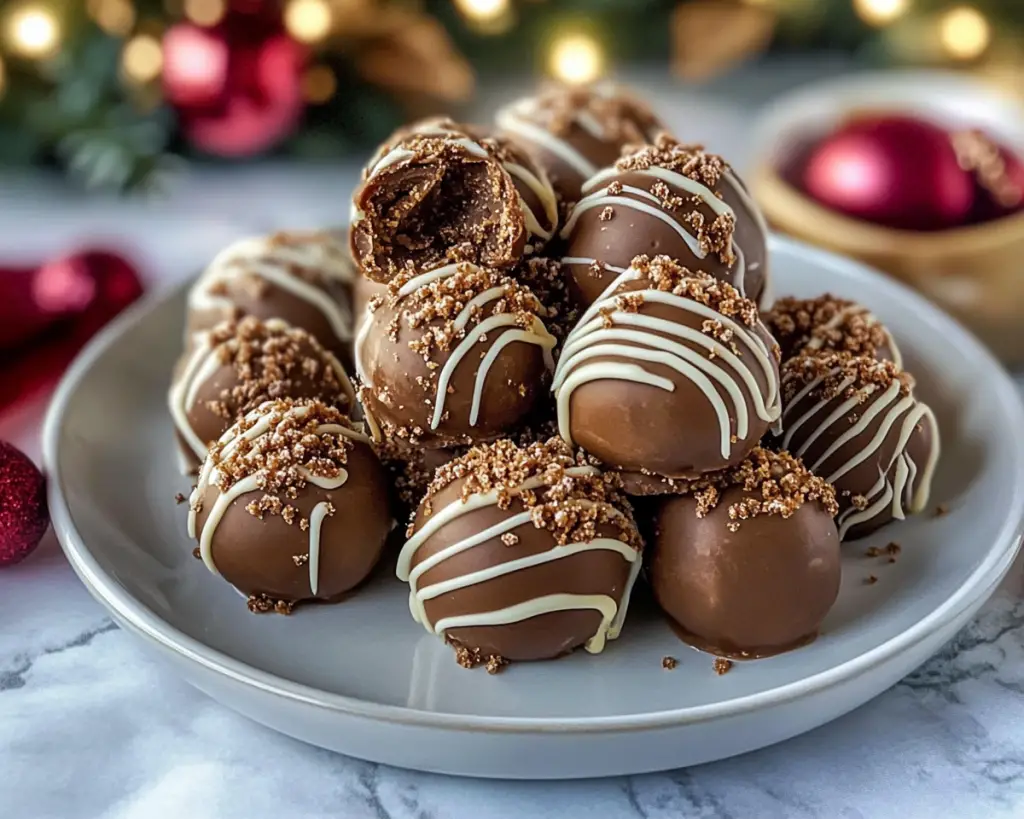
Gingerbread truffles are small, round confections that blend the rich, spicy flavors traditionally associated with gingerbread cookies with the smooth, creamy texture of chocolate. The core of the truffle is often made from a mixture of gingerbread cookie crumbs, cream cheese, and flavorful spices like ginger, cinnamon, and nutmeg. This filling is then rolled into balls and coated in a layer of chocolate, making for a treat that is both visually appealing and deliciously satisfying.
The origin of gingerbread itself dates back to ancient times, with roots in Europe, particularly in Germany and the United Kingdom. Traditionally, it is made with a combination of spices that typically include ground ginger, cloves, nutmeg, and cinnamon. The transition from a hard cookie to a soft truffle showcases the versatility of gingerbread in a modern form—offering a unique and festive twist that is perfect for holiday celebrations. The creamy center and the chocolate coating create a delightful texture contrast, making these truffles a favorite among both children and adults alike.
Why You’ll Love This Gingerbread Truffles Recipe
There are countless reasons to love these gingerbread truffles! First and foremost, their **taste** is truly irresistible. The spiciness of the gingerbread filling combined with the sweetness of the chocolate coating makes for a perfect balance of flavors. Whether you enjoy them as a sweet treat after dinner or as a cozy snack by the fire, they are bound to please.
Secondly, this recipe is incredibly **easy to follow**. With only a handful of ingredients and minimal prep time, you can whip up a batch of these indulgent treats in no time. They’re perfect for busy parents or beginner cooks who want to impress friends and family without spending hours in the kitchen.
Additionally, gingerbread truffles are a **budget-friendly** holiday treat, allowing you to make homemade gifts without breaking the bank. Packaging them in decorative boxes or jars is a lovely way to present these truffles to loved ones.
Finally, there’s something particularly **enchanting** about making holiday treats from scratch. The process of measuring, mixing, and rolling the truffles can become a cherished tradition in your household, creating warm memories that last a lifetime.
Ingredients You’ll Need
Here is a list of the ingredients required for making gingerbread truffles, along with explanations of their roles and helpful tips for substitutions:
– **Gingerbread Cookies:** About 10-15 store-bought or homemade gingerbread cookies work best. These serve as the base for your truffle filling, providing that classic gingerbread flavor.
– **Cream Cheese:** 4 oz of softened cream cheese is essential for binding the cookie crumbs into a creamy filling. If you prefer a dairy-free option, you can substitute with a vegan cream cheese alternative.
– **Powdered Sugar:** 1 cup of powdered sugar is mixed into the filling to add sweetness and improve the texture, making it smooth. If you want a lower-sugar option, consider using unsweetened cocoa powder or a sugar alternative.
– **Spices:** 1 teaspoon each of ground ginger, cinnamon, and nutmeg are crucial for flavoring. These spices enhance the overall taste of the truffles. Feel free to adjust the ratios to your personal preference.
– **Vanilla Extract:** 1 teaspoon of pure vanilla extract adds depth to the flavor profile. Synthetic vanilla can be substituted, but natural vanilla is recommended for the best taste.
– **Melting Chocolate or Almond Bark:** 8 oz for coating. You can choose semisweet or dark chocolate based on your palate. If you’re looking for a dairy-free option, ensure you’re using vegan chocolate.
– **Decorative Sprinkles or Crushed Nuts (optional):** These can be used for garnish or additional texture. Consider using crushed gingersnap cookies for a more intense ginger flavor!
How to Make Gingerbread Truffles
Step 1: **Prep Your Ingredients**
Start by giving your gingerbread cookies a good crumble. You can break them into pieces and place them in a food processor to achieve fine crumbs. You want a texture similar to sand. If you don’t have a food processor, you can place them in a plastic zip-top bag and crush them with a rolling pin.
Step 2: **Mix the Filling**
In a mixing bowl, combine the cookie crumbs with the softened cream cheese, powdered sugar, ground ginger, cinnamon, nutmeg, and vanilla extract. Use a spatula or your hands to mix the ingredients until well combined. The mixture should be thick and easily moldable.
**Tip:** If the mixture seems too dry, feel free to add a tad bit more cream cheese to achieve the desired consistency.
Step 3: **Shape the Truffles**
Once your mixture is homogenous, take small portions (about one tablespoon each) and roll them into balls using your palms. Ensure they are evenly shaped and consistent in size for even coating later. Place the rolled truffles on a parchment-lined baking sheet.
Step 4: **Chill the Truffles**
Refrigerate the truffles for at least 30 minutes to firm up. This step is essential as it makes the truffles easier to handle when coating them in chocolate.
Step 5: **Melt the Chocolate**
While the truffles chill, prepare your chocolate coating. You can melt the chocolate in a microwave-safe bowl in 30-second increments, stirring in between until completely melted and smooth. Alternatively, you can use a double boiler for a more controlled melting process.
Step 6: **Coat the Truffles**
Remove the truffles from the fridge. Using a fork or toothpick, dip each truffle into the melted chocolate, ensuring they are fully coated. Allow the excess chocolate to drip off before placing them back on the parchment-lined baking sheet.
**Tip:** For a festive touch, sprinkle crushed nuts or decorative sprinkles over the chocolate before it sets.
Step 7: **Let Them Set**
Allow the chocolate-covered truffles to cool completely at room temperature or pop them in the refrigerator for a quicker set. Once the chocolate is firm, they are ready to enjoy!
Step 8: **Store and Serve**
Gingerbread truffles can be stored in an airtight container in the refrigerator for up to two weeks. They also make an excellent gift when packaged in decorative boxes or jars.
5 Variations & Substitutions
1. **Nutty Gingerbread Truffles:** For added texture and flavor, consider mixing in ½ cup of finely chopped nuts, such as pecans or walnuts, into the filling mixture. This variation not only provides crunch but also enhances the nutty undertones of the spiced truffles. Perfect for nut lovers!
2. **Vegan Gingerbread Truffles:** To adapt this recipe for a dairy-free audience, simply substitute cream cheese with a vegan cream cheese product and use vegan chocolate for coating. Your truffles can still be wonderfully creamy and delicious!
3. **Chocolate Gingerbread Truffles:** If you’re a true chocolate lover, you could swap half of the gingerbread cookies with chocolate crinkle cookies to achieve a dual-flavored truffle. This combination makes for an indulgent treat that beautifully balances the flavors of ginger and chocolate.
4. **Spiced Eggnog Gingerbread Truffles:** For a festive twist, add a splash of eggnog flavoring to the filling. You can achieve this by mixing in a tablespoon of eggnog and a pinch of nutmeg for a delightful holiday fusion that recalls the rich flavors of classic eggnog.
5. **Pumpkin Spice Gingerbread Truffles:** For a seasonal twist, mix in canned pumpkin puree (about 1/4 cup) to your filling along with the spices. This addition adds a soft texture and a unique flavor that helps to bridge the holiday seasons of autumn and winter.
Common Mistakes to Avoid
When making gingerbread truffles, there are some common pitfalls to watch out for. One of the most frequent mistakes is **not chilling the mixture** before forming the truffles. Chilling is essential for a firmer consistency; skipping this step results in truffles that fall apart during the coating process. Always make sure that the rolling mixture is cold before you begin!
Another common issue is not allowing the chocolate to cool slightly before dipping the truffles. If the chocolate is too hot, it can cause the truffles to melt or become misshapen. Allow the chocolate to cool for about 5-10 minutes after melting.
Using **dry or over baked cookie crumbs** also hampers the final texture of the truffle. Be sure to use fresh cookies, and if you’re baking them yourself, monitor the baking time closely to avoid any burnt cookies.
Finally, avoid making the truffles too large. Aim for about one-inch balls; larger truffles are harder to coat and may end up being too rich to enjoy. Keep them small for a perfect balance of flavors in each bite!
Storage, Freezing & Reheating Tips
To enjoy your gingerbread truffles beyond the holiday season, proper storage is key. Place them in an airtight container and store them in the refrigerator for up to two weeks. For longer storage, you can also freeze the uncoated truffles. Lay them on a parchment-lined baking sheet until frozen solid, then transfer them to a freezer-safe bag or container. Frozen truffles should maintain quality for up to three months.
When you’re ready to enjoy them, pull them out of the freezer, allow them to thaw in the refrigerator for a few hours, and then proceed to coat them in chocolate as directed in the recipe.
**Food Safety Tip:** If you plan to keep your truffles for an extended period, it’s best to portion them out into small batches, ensuring that you only thaw what you need to avoid repeated thawing and refreezing.
Frequently Asked Questions
**1. Can I use store-bought gingerbread cookies?**
Absolutely! Store-bought gingerbread cookies are a convenient option that saves time and effort while still providing great flavor for your truffles. Just make sure they are fresh and not too dry for the best results.
**2. How long do truffles last?**
Gingerbread truffles can be safely stored in an airtight container in the fridge for up to two weeks. If you choose to freeze them, they can last up to three months, allowing you to enjoy them at a later date without losing quality.
**3. Can I make these truffles gluten-free?**
Yes, you can make gluten-free gingerbread truffles by using gluten-free gingerbread cookies. Be sure to check the ingredients to confirm they are indeed gluten-free, and you’ll have a delicious treat that everyone can enjoy.
**4. What type of chocolate works best for coating?**
Semisweet, dark, or even white chocolate all work wonderfully for coating gingerbread truffles. Choose the type that best aligns with your personal taste or dietary preferences. Just ensure it’s a good quality chocolate for the best flavor.
**5. How do I create a non-chocolate coating?**
If you’re looking to avoid chocolate, consider rolling the truffles in crushed nuts, toasted coconut, or a light sprinkle of powdered sugar or cinnamon sugar for a more festive appearance. This can also introduce delightful new textures to your treats!
In conclusion, gingerbread truffles are a delightful treat that encapsulates the essence of holiday flavors in a simple yet indulgent way. Whether you’re sharing them with family and friends, delivering homemade gifts, or simply treating yourself, every bite is sure to warm your heart and fill you with holiday cheer. I encourage you to experiment with the variations and make this recipe your own. Enjoy the cheer of the season, and happy baking!
[Read also: Easy Dessert Recipes for Beginners]


