Prep time: 30 minutes
Cook time: 45 minutes
Total time: 1 hour 15 minutes
Servings: 8 servings
Indulging in a warm slice of homemade apple pie is a comforting experience that resonates deeply with many of us. Whether it’s a hug from a family member or the delightful aroma wafting from the kitchen, there’s something inherently nostalgic about pie. This Heart Shaped Apple Pie Recipe is the perfect dessert for Valentine’s Day. It combines the warm, sweet flavors of apples and cinnamon with a touch of love through its unique shape. You will find not only how to create this beautiful dessert but also learn tips for ensuring your pastries turn out perfectly every time.
In this article, I’ll walk you through why this heart-shaped dessert is more than just visually appealing. You will discover practical tips to make the process smooth and easy, especially for beginners. From the ingredients you need to the variations you can try, I’ll provide a wealth of knowledge that will make you excited to bake this pie from scratch. Let’s dive into the wonderful world of heart-shaped apple pie!
What Is Heart Shaped Apple Pie Recipe Easy Valentines Day Dessert Idea?
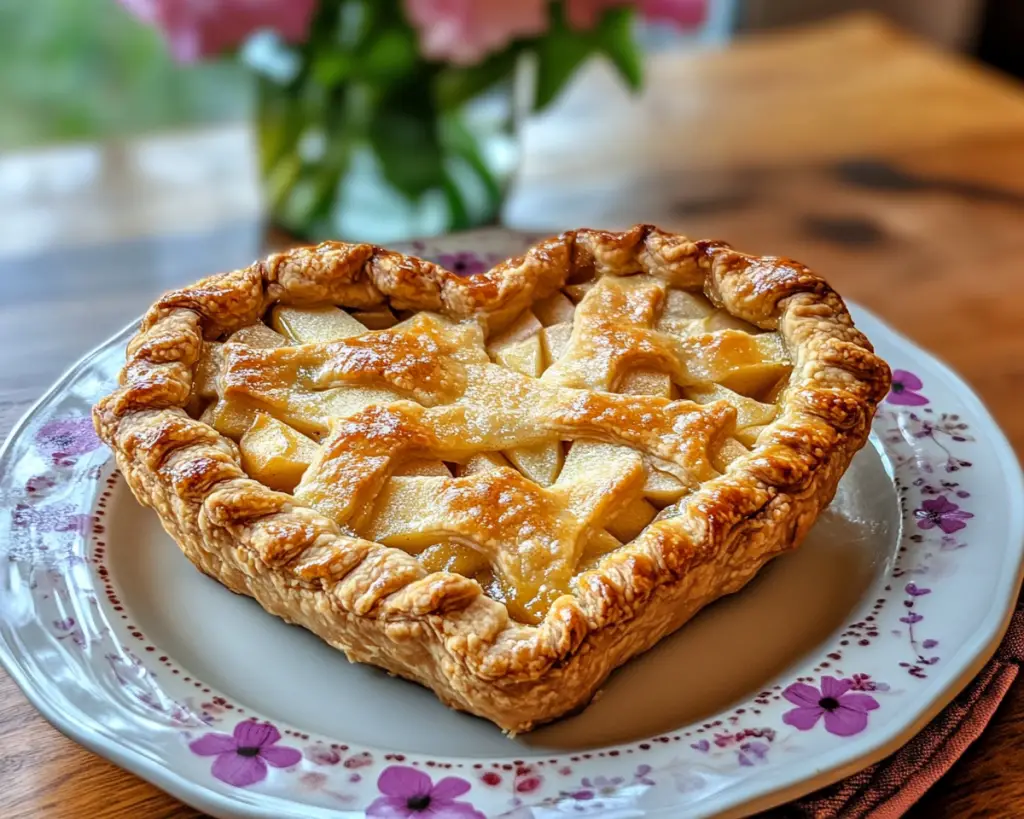
The Heart Shaped Apple Pie is a delightful twist on the classic apple pie, specifically intended for celebrating love on Valentine’s Day. Originating as a traditional American dessert, apple pie is often regarded as a symbol of home and comfort. The heart shape not only enhances its visual appeal but also adds an emotional touch, making it an ideal dessert to share with your loved ones.
With a flaky, buttery crust that crumbles delicately as you cut into it, the pie is filled with cinnamon-spiced apples that provide a mouth-watering sweetness alongside a slight tartness. This dessert is not just about flavor; it also evokes memories of gathering around the kitchen table with family or friends, making it a must-prepare treat for any romantic occasion. Whether you are cooking for your significant other, family, or even just for yourself, this pie speaks volumes about care and affection.
The texture of the filled pie is another enchanting aspect. The apples soften while baking, giving them a melt-in-your-mouth quality, and the spice blend heightens the overall comforting experience. You will learn how easy it is to create and customize this dessert, transforming simple ingredients into a masterpiece that is heartwarming in every sense.
Why You’ll Love This
There are numerous reasons to fall in love with this Heart Shaped Apple Pie. First and foremost, it’s scrumptious! The combination of golden brown apples with just the right hint of cinnamon creates a beautifully balanced dessert that’s not overly sweet. Plus, the flaky, homemade crust has a delightful texture that contrasts perfectly with the tender apple filling.
One of the main benefits of making this pie is how simple it is. With minimal prep work and basic ingredients, you can create a delightful dessert that feels gourmet. This recipe is accessible even for beginners, allowing anyone to impress their loved ones without the need for advanced baking skills. You might think that making pie from scratch is daunting, but once you try this recipe, you’ll see how straightforward it can be.
Additionally, this dessert is cost-effective. Most of the ingredients are pantry staples, making it budget-friendly. Baking at home also allows you to control what goes into your pie, aiding in healthier choices. You can easily swap out refined sugars or make it gluten-free if needed. The versatility of this recipe supports various dietary preferences, making it ideal for shared celebrations.
Ingredients You’ll Need
- Pie Crust: You will need 2 ½ cups of all-purpose flour, 1 cup of unsalted butter (cold and cut into cubes), and 1 teaspoon of salt. The crust can also be pre-made for convenience.
- Apples: Use 6-8 cups of mixed apples such as Granny Smith and Honeycrisp for a balanced flavor. If you prefer a sweeter filling, opt for sweeter varieties.
- Cinnamon: 1 teaspoon of ground cinnamon provides that warm spice essential for apple pie. Adjust according to your preference.
- Sugar: ¾ cup of granulated sugar sweetens the filling, but you may reduce this if your apples are very sweet.
- Lemon Juice: 2 tablespoons of fresh lemon juice enhance the flavor and balance the sweetness.
- Flour for coating apples: About 2 tablespoons of flour helps absorb excess juices to prevent a soggy crust.
- Egg wash: An egg mixed with a tablespoon of water helps achieve a golden finish on the crust.
Each ingredient plays a vital role in achieving the desired flavor and texture. If you have specific dietary needs, most of these can be easily substituted. For instance, for a gluten-free option, you can replace the all-purpose flour with a gluten-free flour blend. In addition, using coconut oil instead of butter can appeal to vegan diets.
How to Make
- Prepare the Pie Crust: In a large mixing bowl, combine the all-purpose flour and salt. Add the cold butter cubes to the mixture, using a pastry cutter or your hands to work the butter into the flour until it resembles coarse crumbs. Once combined, sprinkle in cold water, one tablespoon at a time until the dough begins to form. Divide the dough in half, wrap each portion in plastic wrap, and refrigerate for at least 30 minutes. This refrigeration process is crucial for achieving that flaky crust.
- Prepare the Apple Filling: While your dough is chilling, peel, core, and slice your apples thinly. Aim for uniform sizes to ensure even cooking. In another bowl, mix together the sliced apples, granulated sugar, cinnamon, lemon juice, and flour. This mix allows each apple slice to absorb the flavors while coating them adequately to prevent the pie from being watery. Taste and adjust sweetness or spice in the filling according to your preference.
- Roll Out the Dough: After the dough has chilled, take one portion out and place it on a lightly floured surface. Roll it out into a circle large enough to fit your pie dish, around 12 inches in diameter, ensuring it’s about ¼ inch thick. Transfer the rolled dough carefully into your heart-shaped pie dish or a regular one. This step can be daunting for beginners, so don’t fear imperfections; they can add character!
- Add the Apple Filling: Pour the apple filling into the prepared crust. Ensure the apples are evenly distributed and even out the top for aesthetic appeal. If you’d like, you can add a sprinkle of cinnamon on top to enhance flavor. This layer is the heart of your pie that encloses all the warm and inviting goodness.
- Top the Pie: Roll out the second portion of dough in the same way you did for the bottom crust. Carefully place it over the filling, crimping the edges together to seal them. Use a knife to cut small vents into the top crust, allowing steam to escape. Here, you can also use heart-shaped cookie cutters to cut out decorative shapes before placing the crust to add a charming touch. Remember, presentation matters!
- Brush and Bake: Preheat your oven to 425°F (220°C). Before baking, brush the top crust with egg wash for a shiny golden finish. Sprinkle a bit of sugar on top for a sweet sparkle. Place the pie in the oven for about 25 minutes, then lower the temperature to 350°F (175°C) and bake for an additional 20-25 minutes, or until the crust is golden brown and the apples are bubbling. Keep an eye during the final minutes, as oven temperatures can vary widely.
- Cool and Serve: Once baked, remove the pie from the oven and let it cool for at least 15-20 minutes. This ensures that the filling sets slightly, making it easier to slice. Serve warm with a scoop of vanilla ice cream or whipped cream for an extra indulgence. The contrast of warm pie with cold cream is simply divine!
Variations & Substitutions
Healthy Alternative: If you are looking for a healthier twist on this recipe, consider using whole wheat flour instead of all-purpose flour for the crust. This small switch will add more fiber to the dish. Additionally, you can use coconut sugar or maple syrup as a natural sweetener instead of granulated sugar. This variant retains the delicious flavor while adding a healthful benefit, making it a fantastic option for those aiming to eat cleaner.
Gluten-Free Version: For those with gluten sensitivities, you can utilize a gluten-free flour blend to make your pie crust. Many brands offer ready-made gluten-free pie crusts, which can save you time while ensuring you don’t miss out on this delightful dessert. Just watch the moisture in the filling, as gluten-free flours can sometimes require adjustments to avoid sogginess.
Fruit Combination: Don’t hesitate to explore various fruit combinations! You can mix in berries, peaches, or pears with the apples to create a unique fruit medley. Each fruit offers a different flavor profile, making your pie distinctive each time you make it. Additionally, seasonal fruits can add freshness and new dimensions to this classic recipe, impressing your guests with every bite.
Vegan Style: For a vegan-friendly pie, substitute coconut oil or a vegan butter alternative for the butter in the crust. Use a flaxseed egg as a substitute for the egg wash or simply brush with almond milk. This not only meets dietary needs but also leaves room for a combination of vivid flavors, rich textures, and heartfelt stories!
Common Mistakes to Avoid
A few pitfalls can lead to a less than perfect pie, but you can easily avoid them with some foresight. One of the most common issues is a **soggy bottom crust**. To prevent this, make sure to sprinkle flour over the apple mixture before pouring it into the pie crust; it helps absorb extra juices. Additionally, blind-baking your bottom crust for about 10 minutes before adding the filling can provide an excellent barrier, creating a crispier base.
Another mistake is using the wrong types of apples. Ensure that you select apples that hold their shape when baked, such as Granny Smith or Jonagold. A mix of sweet and tart varieties further enhances the flavor profile, leading to a much more balanced pie. Furthermore, **not venting the top crust** can lead to steam building up inside, causing a soggy filling. Make sure to make slits or creative shapes for steam to escape, allowing the apples to cook evenly without excess moisture.
Storage, Freezing & Reheating Tips
To maintain the freshness of your Heart Shaped Apple Pie, proper storage is crucial. If you have leftovers, allow the pie to cool completely before placing it in an airtight container. You can keep the pie in the refrigerator for up to five days. Be sure to gently reheat in the oven to restore the flaky texture before serving.
If you want to extend the pie’s life, you can freeze it. Wrap the pie tightly in plastic wrap and then foil to prevent freezer burn. It can last up to three months in the freezer. When you’re ready to enjoy your frozen pie, allow it to thaw in the refrigerator overnight before baking it at 350°F (175°C) for about 20-25 minutes.
When reheating, avoid using a microwave, as this can lead to a soggy crust. Instead, use the oven for the best texture. If the crust edges begin to brown too quickly, cover them with aluminum foil to prevent burning.
Frequently Asked Questions
Can I make Heart Shaped Apple Pie ahead of time? Yes, you can prepare the pie crust in advance and store it in the refrigerator for up to three days. You can also make the apple filling and keep it in the refrigerator before assembling the pie. This can greatly reduce prep time on the day you intend to serve it.
What types of apples are best for pie? Ideally, a combination of tart and sweet apples works best. Granny Smith apples are known for their tartness and hold their shape well during baking, while sweeter varieties like Fuji or Honeycrisp add a lovely sweetness. Mixing a few types will create a more balanced flavor.
Can I make the pie gluten-free? Absolutely! You can use a gluten-free flour blend for the crust. Many brands now offer pre-made gluten-free pie crusts that can be a convenient option. Ensure other ingredients you choose are also gluten-free.
How do I know when my pie is done baking? The perfect indicator is a golden-brown crust. The edges should be firm to the touch, and you should see the filling bubbling through the vents. If you’re unsure, you can use a toothpick inserted into the filling to check for tenderness in the apples.
Can I use pre-made pie crust? Yes! If you’re looking for a quicker option, using store-bought pie crust can save you time. Just be sure to follow the instructions for baking times, and remember that each crust brand may vary slightly in thickness and baking time.
Conclusion:
This Heart Shaped Apple Pie is an unbeatable dessert choice for Valentine’s Day or any occasion that calls for a touch of warmth and love. You’ll appreciate the delightful aroma while baking, alongside the satisfaction of crafting something beautiful and delicious. Do not hesitate to make it your own with various fruit combinations or dietary substitutions. Share it with your loved ones and witness their delight as they take the first bite. So go ahead, gather the ingredients, roll up your sleeves, and create a heartfelt memory with this wonderful dessert!


