Prep time: 20 minutes
Cook time: 35 minutes
Total time: 55 minutes
Servings: 8
The aroma of a freshly baked pie is one of life’s simple pleasures, especially when that pie is shaped like a heart. The Heart Shaped Cherry Pie is more than just a delicious dessert; it’s a delightful way to express love and affection, making it an ideal treat for Valentine’s Day. Whether you’re looking to impress your partner, celebrate love among friends, or just indulge yourself, this recipe is a wonderful blend of sweet, tart cherries enveloped in a flaky, buttery crust. In this article, you will discover how to make this stunning dessert, tips to perfect your baking, variations to suit your taste, and answers to frequently asked questions.
What Is Heart Shaped Cherry Pie Recipe – Easy Valentine’s Day Dessert?
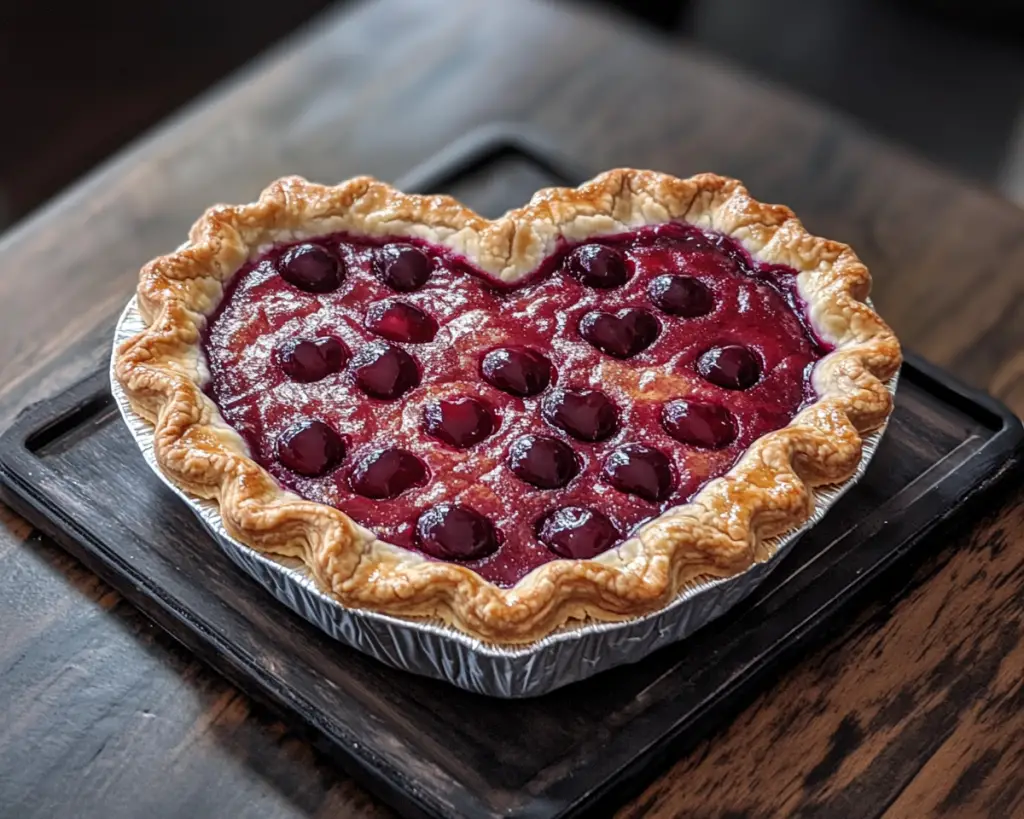
The Heart Shaped Cherry Pie is a twist on the classic cherry pie, distinguished not only by its shape but also by the depth of flavor and texture it offers. Traditional cherry pie recipes often feature a rich blend of sweet and tart cherries encased in a golden crust, and this heart-shaped version elevates that experience. The flaky pastry crumbles at just the right moment under your fork, providing a delightful contrast to the luscious, juicy cherry filling.
The origins of cherry pie can be traced back to early American settlers who brought their love for pie-making from Europe. This specific version, however, has become a popular symbol of love and romance, often served on Valentine’s Day. Every bite bursts with the sweet and slightly tart flavor of cherries, which are complemented beautifully by the buttery crust.
The appeal of this pie goes beyond merely its aesthetic; it brings a sense of warmth and familiarity. The vibrant red of the cherries evokes passion and joy, making it a favorite among all ages. This recipe emphasizes not only the delightful flavors but also the fun of baking, allowing you to create something beautiful and delicious while spending time in the kitchen.
Why You’ll Love This
You’ll love this Heart Shaped Cherry Pie not only for its delicious taste but also for its ease of preparation. It is a relatively simple recipe that calls for staple pantry ingredients, making it cost-effective. Additionally, the sweet-tart flavor of the cherries is not only satisfying but also offers a burst of freshness, perfect for any dessert table.
Many people mistakenly believe that pie making is only for experienced bakers, but this Heart Shaped Cherry Pie challenges that misconception. With clear instructions and straightforward steps, even beginners can create a stunning pie that looks like it came from a bakery. The versatility of this recipe also shines through its ability to adapt to different dietary needs and preferences—whether you want to use fresh, frozen, or even canned cherries, this recipe has you covered.
Apart from being a crowd-pleaser, this pie also fits nicely into various occasions. While it serves as a special treat for Valentine’s Day, it can also make an appearance at family gatherings, birthdays, or even just as a delightful weekend dessert. Whatever the context, this pie is sure to bring smiles and sweet memories.
Ingredients You’ll Need
- All-purpose flour: 2 ½ cups – The foundation of your crust, providing structure and texture. You can substitute with gluten-free flour if required.
- Sugar: ¾ cup – Enhances the sweetness of the pie and balances the tartness of the cherries.
- Salt: ½ teaspoon – A crucial ingredient that amplifies the flavors in the crust.
- Unsalted butter: 1 cup (2 sticks) – Benefits the overall flakiness and richness of the crust. Substitute with margarine for a dairy-free option.
- Ice water: 4-6 tablespoons – Helps bind the dough without melting the butter, essential for a flaky crust.
- Fresh or frozen cherries: 4 cups – The star of the show! Use pitted cherries for ease, and if you use frozen, let them thaw and drain excess juice.
- Lemon juice: 1 tablespoon – Brightens the flavors of the cherries and balances the sweetness.
- Cornstarch: 2 tablespoons – Acts as a thickening agent to keep your filling from being too runny.
- Vanilla extract: 1 teaspoon – Enhances the natural sweetness of the cherries.
- Egg (for wash): 1 – Gives the crust a beautiful golden finish when brushed on before baking.
How to Make
- Prepare the pie crust: In a large bowl, combine the all-purpose flour, sugar, and salt. Mix well. Cut the cold, unsalted butter into small cubes, and add it to the flour mixture. Use a pastry cutter or your fingertips to blend the butter into the flour until the mixture resembles coarse crumbs. This will ensure that your crust turns out flaky.
- Add water: Gradually add the ice water, one tablespoon at a time, mixing gently until the dough comes together. It should be moist but not sticky. If it feels too crumbly, add more water, as needed, being cautious not to overwork the dough.
- Chill the dough: Divide the dough into two discs, wrap them in plastic wrap, and refrigerate for at least 1 hour. This rest period helps relax the gluten in the dough, resulting in a more tender crust.
- Make the cherry filling: In a medium bowl, combine the pitted cherries, lemon juice, cornstarch, sugar, and vanilla extract. Gently mix to coat the cherries in the dry ingredients, ensuring that they are well combined. This mixture will thicken and create a delicious filling during the baking process.
- Preheat the oven: While your dough chills, preheat your oven to 425°F (220°C). This high temperature is crucial for achieving a beautifully baked crust.
- Roll out the dough: Once the dough is chilled, remove one disc from the refrigerator. On a floured surface, roll it out to about ¼-inch thickness. Using a heart-shaped cookie cutter, cut out your pie base, and carefully transfer it to a pie dish. This will be the bottom layer of your pie.
- Add the filling: Spoon the cherry filling onto the prepared pie base, spreading it evenly. This ensures that every slice is filled with that sweet cherry goodness.
- Top the pie: Roll out the second disc of dough in the same manner and cut out a heart shape for the top. Alternatively, you can cut out smaller heart shapes and place them decoratively over the filling. This adds a charming touch to your pie.
- Egg wash: In a small bowl, beat the egg and brush it over the top crust to give it a golden, shiny finish. This step is essential for visual appeal.
- Bake: Place the pie in the oven and bake for 30-35 minutes or until the crust is golden brown and the cherry filling is bubbling. The aroma that fills your kitchen will be utterly irresistible, drawing everyone in!
- Cool and serve: Once baked, remove the pie from the oven and let it cool slightly before slicing. This will help the filling set and make serving much easier. Enjoy with a scoop of ice cream for an extra indulgent treat.
Variations & Substitutions
Chocolate Cherry Pie: If you want a rich twist, consider adding chocolate to your cherry pie. You can layer chocolate ganache at the bottom of the pie crust before adding the cherry filling. This brings a luscious, decadent flavor that chocolate lovers will adore, transforming the pie into an indulgent treat perfect for date nights or special occasions.
Berry Mix Pie: For those who enjoy mixing flavors, substitute half of the cherries with blueberries or raspberries. The combination provides a beautiful color contrast and a blend of sweet and tart flavors, making it a berry lover’s delight. This variation is perfect for summer picnics or festive gatherings.
Gluten-Free Cherry Pie: If you need to cater to dietary restrictions, you can easily make a gluten-free version. Simply swap out the all-purpose flour for a gluten-free blend. Make sure you use gluten-free certified cornstarch and check the labels on all ingredients to avoid any gluten contamination. The taste and texture will remain delicious, allowing everyone to enjoy a slice!
No Sugar Cherry Pie: For those watching their sugar intake, consider using a sugar substitute, such as stevia or monk fruit. Adjust the sweetness to taste, as these alternatives can vary in sweetness levels. This variation is perfect for individuals following a keto diet or those who simply prefer a healthier option.
Mini Heart Pies: For a fun twist, you can also make mini heart-shaped cherry pies. Using a muffin tin, cut smaller hearts from the dough and fill them with the cherry mixture. They are fun, portion-controlled treats that are perfect for parties, gatherings, or for packing in lunchboxes.
Common Mistakes to Avoid
A common mistake when making pie is overworking the dough. This can lead to a tough crust instead of the desired flaky texture. When mixing the ingredients, handle the dough as little as possible. Use cold ingredients like ice water and chilled butter to keep the dough manageable and easy to work with.
Another pitfall is not letting the pie cool before slicing. Immediately cutting into a hot pie may result in juice spilling everywhere, ruining the presentation. Allow the pie to cool for at least 15-20 minutes; this will help the filling set properly.
Using too much flour when rolling out the dough can also result in a crust that is too dry. While some flour is necessary to prevent sticking, be careful not to overdo it. When measuring flour, spoon it into the measuring cup and level it off rather than packing it in.
Additionally, overlooking the checking for doneness can lead to a soggy or undercooked pie. Use a combination of visual and tactile cues to determine if the pie is ready. The crust should be golden brown, and you should see bubbles in the filling. Always trust your instincts and inspect the pie closely before removing it from the oven.
Storage, Freezing & Reheating Tips
To store your Heart Shaped Cherry Pie, let it cool completely before covering it with plastic wrap or transferring it to an airtight container. Properly stored, it will last for up to 3 days at room temperature or about a week in the refrigerator. That said, refrigerating may slightly affect the texture of the crust; it may become less crisp.
If you want to extend the life of your pie, consider freezing it. You can freeze either the unbaked or baked pie. To freeze an unbaked pie, cover it tightly with plastic wrap and then with aluminum foil. It will last for up to 3 months in the freezer. When you are ready to bake, set it in the fridge overnight to thaw before baking it according to the original instructions.
If you choose to freeze a baked pie, allow it to cool completely, then wrap it in plastic wrap and aluminum foil before placing it in the freezer. For reheating, preheat your oven to 350°F (175°C), and bake for about 15-20 minutes, or until warmed through, covering it loosely with foil to prevent the crust from burning.
It’s essential to always check for freshness and ensure the cherry filling has not spoiled, as this can happen with prolonged storage.
Frequently Asked Questions
Can I use canned cherries for this recipe?
Yes, you can use canned cherries in this recipe. When using canned cherries, make sure to drain them thoroughly and pat them dry to avoid excess liquid in your filling. You may also want to reduce the sugar slightly since canned cherries are often packed in syrup, adding extra sweetness.
Can I make this pie in advance?
Absolutely! You can prepare the Heart Shaped Cherry Pie a day in advance. Bake it entirely, allow it to cool, and then store it wrapped in plastic wrap or in an airtight container in the refrigerator. This will let the flavors meld beautifully, making it even tastier when served the next day.
What if I don’t own a heart-shaped cutter?
If you don’t have a heart-shaped cutter, don’t worry! You can simply use a round cutter or even freehand cut the shape using a sharp knife. The pie will still taste delicious, and the love and effort you put into it will shine through, regardless of the shape.
How do I know when the pie is done baking?
The pie is done baking when the crust is a beautiful golden brown, and you’ll see cherry filling bubbling through the vents or openings in the crust. If the edges start to brown too quickly, you can cover them with strips of aluminum foil. An internal temperature of 195°F (90°C) is also a good indicator of doneness.
Can I use other fruits besides cherries?
Certainly! You can substitute cherries with other fruits like blueberries, raspberries, or even a mixture of berries. For a more tropical twist, try using peaches or apples. Just ensure to adjust the sugar and thickener as different fruits have different sweetness and moisture levels.
Conclusion:
The Heart Shaped Cherry Pie recipe is not just a dessert; it’s a heartfelt gesture that can make any occasion memorable. Its combination of sweet and tart flavors, alongside a flaky crust, provides a sensory delight that everyone can appreciate. Whether you stick to the classic recipe or decide to explore unique variations, this pie is inviting to all levels of bakers. So go ahead, gather your ingredients, and give it a try. Customize it to your liking, and don’t forget to share it with your loved ones. Let your kitchen become a warm space filled with love and sweetness, one pie at a time!


