Prep time: 25 minutes
Cook time: 1 hour
Total time: 1 hour 25 minutes
Servings: 12 servings
When the chilly winds of winter arrive, there is nothing quite like indulging in a rich and decadent dessert. The aroma of hot chocolate wafting through your home evokes memories of cozy nights spent wrapped in blankets, sipping cocoa because it brings warmth and comfort. Now, imagine transforming that beloved drink into a dessert that captures all its magic. Enter the Hot Chocolate Cheesecake — a delightful mashup that creates an experience you will savor in every bite. This recipe combines the velvety richness of traditional cheesecake with the comforting flavors of rich hot chocolate. Creamy, dreamy, and utterly delicious, this cheesecake is perfect for holiday gatherings or simple evenings spent at home with loved ones.
What makes this recipe special is its ability to transport you to a place of cozy contentment. You’ll learn not only how to create this culinary masterpiece but also how to perfect it with your own unique twist. From the creamy texture to the chocolatey notes, this dish is sure to become a staple in your winter dessert repertoire. Let’s embark on this delightful journey together!
What Is Hot Chocolate Cheesecake Recipe: Easy Winter Dessert for Cozy Nights?
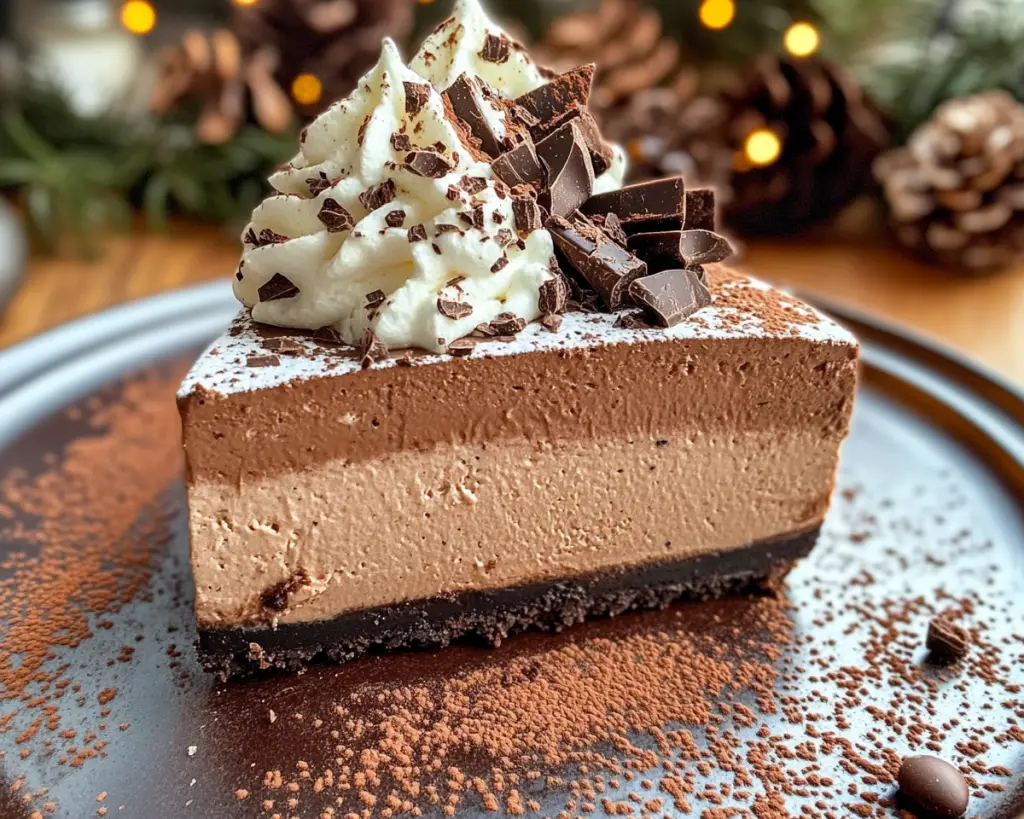
The Hot Chocolate Cheesecake is a playful yet elegant dessert that takes inspiration from two beloved winter favorites: **hot chocolate** and **cheesecake**. Originating from the classic dessert, this recipe is elevated with rich layers of cream cheese, melted chocolate, and an infusion of cocoa powder, creating a thick, lush filling that is as captivating as it is delicious. The base, often characterized by a chocolate cookie crust or a traditional graham cracker crust, provides a delightful crunch that contrasts beautifully with the creamy filling.
This dessert is further adorned with toppings that echo the indulgence of hot chocolate; whipped cream, marshmallows, and chocolate shavings can be added to enhance its beauty and flavor. The texture is smooth and rich, while the flavors meld together to create a treat that is both familiar and exciting. The combination of **chocolate**, **cream cheese**, and a touch of sweetness creates a heavenly sensation that melts in your mouth. Whether you are serving it to family or guests, this cheesecake will elevate any occasion.
Why You’ll Love This
There are countless reasons to adore this Hot Chocolate Cheesecake. First and foremost is its **indulgent taste**; each bite is a luscious combination of rich chocolate and creamy cheesecake. This dessert can easily be prepared ahead of time, which is a lifesaver for busy parents and home cooks alike. Not only is it easy to prepare, but it is also budget-friendly. Made with simple, accessible ingredients, it allows you to impress guests without breaking the bank.
Another advantage is **versatility**. While this recipe provides a fantastic foundation, it invites you to get creative! You can alter the crust, spice up the filling, or play with toppings to suit your tastes or dietary preferences. Many may believe cheesecakes are difficult to make, but this recipe dispels that notion. With a few simple steps, you will be well on your way to achieving dessert success. Get ready to wow your friends and family with a stunning and delicious dessert that will leave everyone asking for seconds!
Ingredients You’ll Need
- Chocolate cookie crumbs: These provide a rich, crunchy base that complements the creamy filling. You can substitute with graham cracker crumbs if desired.
- Unsweetened cocoa powder: Essential for imparting the **chocolate flavor** without adding extra sweetness. Look for high-quality cocoa for the best taste.
- Granulated sugar: Sweetens the cheesecake and balances flavors. Brown sugar can be used for a richer flavor.
- Unsalted butter: This helps to bind the crust together. Ensure it is melted for easy mixing.
- Cream cheese: The star of the show! Its rich, creamy texture provides moisture and body to the cheesecake. Make sure it is at room temperature for easy blending.
- Sour cream: Adds a layer of tanginess that complements the sweet chocolate flavors in the cheesecake.
- Eggs: Bind the ingredients together. Use large eggs for the best results.
- Chocolate chips: For an extra burst of **chocolate goodness**, folding these into the filling enhances both texture and flavor.
- Whipped cream: Optional but recommended for the topping; it lightens the dessert and adds an elegant finish.
- Mini marshmallows: They serve as a whimsical topping that replicates the look and feel of a classic hot chocolate.
How to Make
- Prepare the Crust: Begin by preheating your oven to 350°F (175°C). In a mixing bowl, combine the chocolate cookie crumbs with melted unsalted butter and granulated sugar. Mix until the texture resembles damp sand and press this mixture firmly into the bottom of a 9-inch springform pan. Aim for an even layer, as this will be the foundation of your cheesecake.
- Bake the Crust: Place the crust in the preheated oven for about 8 minutes. This step is crucial as it sets the crust and enhances its flavor. Once finished, allow it to cool while you prepare the filling.
- Make the Filling: In a separate large mixing bowl, combine softened cream cheese and granulated sugar. Using a hand mixer or stand mixer, beat the mixture at medium speed until it becomes silky and smooth. Ensure that there are no lumps; this will help achieve that creamy texture that cheesecakes are known for.
- Add the Cocoa and Eggs: Gradually add the cocoa powder to the cream cheese mixture, blending well to incorporate. Then, add in the eggs, one at a time, mixing thoroughly after each addition. This step helps create a cohesive blend, ensuring a tender and creamy cheesecake.
- Incorporate Sour Cream and Chocolate Chips: Once the filling is smooth, fold in the sour cream. This adds moisture while enhancing the cheesecake’s flavor. You may also stir in a handful of chocolate chips for that extra indulgence. The filling should have a silky consistency at this stage.
- Pour Filling onto Crust: Carefully pour the cheesecake filling into the cooled crust, smoothing the top with a spatula. Tap the pan gently on the counter to remove any air bubbles trapped in the mixture.
- Bake the Cheesecake: Place the springform pan back in the oven, baking for about 50-60 minutes or until the edges are set but the center still has a slight jiggle. This ensures the center remains creamy and won’t crack. Set a timer and keep a close eye on it!
- Cool and Chill: Once baked, turn off the oven and crack the oven door, allowing the cheesecake to cool slowly for about an hour. This helps prevent cracking. After turning it off, let it cool in the oven with the door ajar. When cooled, transfer it to the fridge for at least 4 hours, preferably overnight. Chilling intensifies the flavors and improves the texture.
- Prepare Toppings: Once chilled, remove the cheesecake from the springform pan. You can top with whipped cream, mini marshmallows, and chocolate shavings to evoke that classic hot chocolate experience.
- Serve and Enjoy! Slice your cheesecake into equal pieces and serve chilled. Each piece should showcase that stunning contrast between the rich, creamy filling and the crisp crust for an unrivaled experience.
Variations & Substitutions
Alternative Crust: If you’re looking for a twist, try a **graham cracker crust** instead of chocolate cookie crumbs. This will still retain the pie-like feel while providing a different taste sensation. The light sweetness and added crunch are perfect complements to the rich cheesecake filling.
Healthier Version: For a **lighter cheesecake**, consider using Greek yogurt instead of sour cream. This swap will offer a tangy element while significantly reducing the calories and fat content, making it great for individuals watching their intake. You can also use reduced-fat cream cheese for a similar effect.
Dairy-Free Option: If you need a **dairy-free version**, opt for plant-based cream cheese and nut milk. Coconut milk can also add a delightful richness that complements the flavor profile. Look for dairy-free chocolate chips, and you’ll have a dessert that appeals to vegan diets.
Flavored Variations: To add a little flair, incorporate **flavors** like peppermint or vanilla extract into your filling. A splash of peppermint extract can transform this dessert into a festive treat, perfect for holiday gatherings. Simply adjust the amount you add; start sparingly to avoid overpowering the chocolate flavor.
Mini Cheesecakes: If you prefer smaller bites, consider making **mini cheesecakes**. Use a muffin tin with cupcake liners and follow the same steps for baking but reduce the oven time to about 25-30 minutes. This makes for an adorable presentation and is perfect for parties or gatherings.
Common Mistakes to Avoid
When making your Hot Chocolate Cheesecake, it’s vital to avoid common pitfalls that can sabotage your efforts. One of the most frequent mistakes is **overmixing the batter** — this can introduce unnecessary air into the filling, resulting in cracks once the cheesecake is baked. Always mix until just combined, and you will have a beautifully smooth texture.
Another crucial aspect is ensuring your ingredients, particularly the cream cheese, are at room temperature. **Cold ingredients** will not blend smoothly and can lead to lumps, which is something you want to avoid at all costs. Take the time to let your cream cheese soften out of the fridge before starting the mixing process.
Pay attention to **baking time**. Overbaking can lead to a dry cheesecake, so remember to keep an eye on it, especially in those last few minutes in the oven. Additionally, cooling the cheesecake properly is essential; do not skip the step of letting it cool in the oven. This gradual cooling reduces the likelihood of cracks forming on the surface.
Storage, Freezing & Reheating Tips
The Hot Chocolate Cheesecake can be stored in the refrigerator for up to 5 days if covered tightly with plastic wrap or aluminum foil. It’s best kept chilled to maintain its creamy texture and robust flavors. If you want to prepare ahead, know that this cheesecake holds up wonderfully when made in advance.
Should you wish to freeze your cheesecake, wrap it tightly in plastic wrap, followed by aluminum foil to prevent freezer burn. Frozen, it can last up to 2 months. To defrost, remove it from the freezer and let it sit in the fridge overnight to gradually thaw. This slow process helps maintain quality and texture.
When bringing your cheesecake back to life from the freezer, it’s recommendable to avoid refreezing any uneaten pieces — this can alter the texture. When reheating slices, a brief period in the microwave is all you need; opt for low power to gently warm it without overcooking. Serve it fresh, with toppings if desired, and experience that first bite as if it were made that day!
Frequently Asked Questions
Can I use a different type of chocolate for this recipe? Yes, you can absolutely experiment with different types of chocolate. While semi-sweet chocolate gives a classic flavor, dark chocolate offers a more intense taste, while milk chocolate will provide a sweeter flavor profile. Just be aware that this change may affect the overall sweetness of your cheesecake.
How do I prevent my cheesecake from cracking? To minimize the risk of cracking, it’s vital to avoid overmixing the batter and using room-temperature ingredients. Additionally, allow the cheesecake to cool gradually in the oven with the door ajar, and consider baking in a water bath for extra humidity during cooking, which can also help prevent surface cracks from forming.
Can I add toppings to the cheesecake before serving? While it might be tempting to add whipped cream or toppings before chilling, it’s best to wait until right before serving. This will keep the toppings fresh and intact, contributes to okay aesthetics, and prevents sogginess as it sits in the fridge.
How can I tell when my cheesecake is done baking? The cheesecake is done when the edges are set, but the center still has a slight jiggle. It’s crucial to pull it out just before it seems firm, as it will continue to cook once removed from the oven. Slightly underbaked cheesecake tends to develop a creamier texture.
What should I do if my cheesecake cracks? If your cheesecake cracks, don’t worry! This is a common occurrence. Consider covering it with whipped cream or chocolate ganache as a delicious way to mask any imperfections. Alternatively, you can drizzle some sauce or scatter toppings to disguise it artfully, turning it into a focal point instead of a flaw.
Conclusion:
The Hot Chocolate Cheesecake is not just a dessert; it’s an experience that brings warmth, comfort, and joy. Its unique blend of flavors and textures will win the hearts of everyone who tries it. Whether you’re indulging yourself or sharing with friends, this cheesecake is sure to be a showstopper. Don’t hesitate to customize it; the recipe is meant to inspire creativity in the kitchen. Grab your ingredients and start baking today — the holidays are a perfect time to create lasting memories around the table!


