Prep time: 15 minutes
Cook time: 1 hour 15 minutes
Total time: 1 hour 30 minutes
Servings: 6
The aroma of a perfectly roasted chicken wafts through the house, evoking memories of family gatherings and holiday feasts. You can almost taste the cozy warmth, combined with a peppery, herby crust that beckons you to take that first bite. If you’ve ever felt overwhelmed by the notion of cooking chicken at home, this recipe will turn you into a confident cook in no time. Buckle up as we explore how to create an unforgettable dish, the “I’M Officially Addicted To This Perfect Rotisserie Chicken!” With every bite, you’ll understand why this dish holds a special place in the hearts and stomachs of many.
This recipe is designed to be approachable, ensuring that even kitchen novices can tackle it with ease. You’ll learn how to achieve a succulent, flavorful chicken that will serve as both a centerpiece and a delightful meal prep option. Moreover, whether you’re busy juggling work and family or simply want to whip up something hearty, this dish will come to the rescue time and again. By the end of this article, you’ll not only master the cooking technique but also learn valuable tips, variations, and ways to make it your own!
What Is I’M Officially Addicted To This Perfect Rotisserie Chicken!?
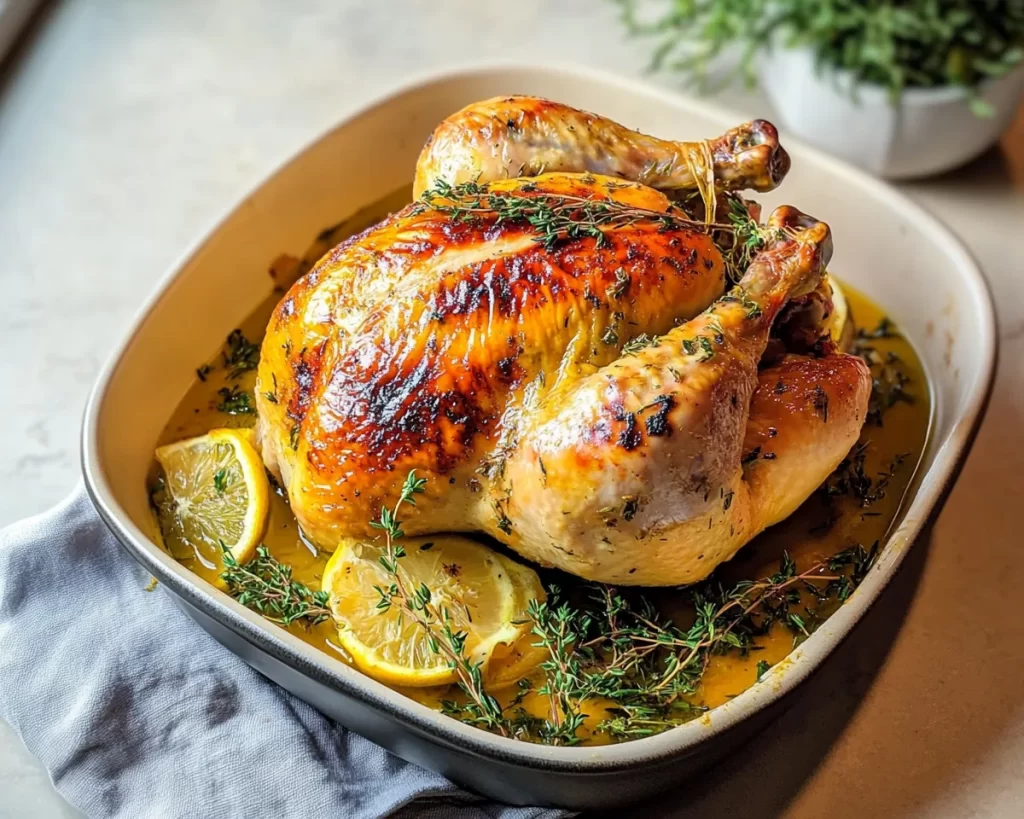
“I’M Officially Addicted To This Perfect Rotisserie Chicken!” refers to a delicious home-cooked edition of the classic rotisserie chicken you often find at grocery stores. The essence of rotisserie chicken lies in its moist and tender flesh, ideally seasoned with a mix of spices that creates a beautiful, crispy skin. This dish traces its roots back to traditional French rotisserie cooking, where whole chickens were slowly roasted over an open flame, retaining moisture while delivering a symphony of flavors.
What sets this version apart is its focus on home-cooking techniques, allowing you to control the flavor and ingredients. The texture is outstanding—from the tender meat to the crispy skin that crackles as you carve the bird; each bite is an experience to savor. The flavor profile ranges from savory to tangy, often incorporating herbs like rosemary, thyme, and garlic, which meld together beautifully during the cooking process. This dish is versatile enough to be served with various sides or transformed into other meals throughout the week, making it a true culinary gem in your kitchen arsenal.
Why You’ll Love This
One of the greatest benefits of this recipe is its incredible flavor. The blend of spices marries perfectly with the succulent chicken, making every bite a delight for your taste buds. And let’s be honest—who doesn’t love a good homemade dinner that captures both the essence of comfort food and a touch of gourmet? Not only does this recipe excel in taste, but it also offers a straightforward, no-fuss cooking process that fits perfectly into busy weeknights.
Another reason to love this dish is its cost-effectiveness. Purchasing a whole chicken is often cheaper than buying individual cuts, allowing you to stretch your food budget. Plus, you can use leftovers to create delicious new meals throughout the week! Some may mistakenly think that rotisserie chicken must be difficult or time-consuming to make, but this dish dispels that notion entirely. You’ll find it to be not only simple but also rewarding.
When it comes to health, this recipe allows you to choose fresh ingredients and control the amount of seasoning, making it a healthier option compared to restaurant or store-bought rotisserie chickens, which can be laden with preservatives. However, the real beauty lies in its versatility: whether you want a hearty meal paired with seasonal veggies or plan to shred chicken for salads, tacos, or sandwiches, this recipe adapts effortlessly to your culinary needs.
Ingredients You’ll Need
- Whole Chicken: The star of the show! Aim for a 4-5 pound bird for optimal cooking. If you’re using a frozen chicken, be sure to thaw it completely before cooking for even results.
- Olive Oil: Essential for coating the chicken to achieve that golden-brown skin. You could also use melted butter or avocado oil as a substitute for added flavor.
- Garlic Powder: A must for depth of flavor. If you prefer fresher flavors, substituting with minced garlic will enhance the aroma.
- Onion Powder: This adds a subtle sweetness and richness to the seasoning. If you don’t have onion powder, finely grated fresh onion can work too.
- Smoked Paprika: Offers a distinctive smoky flavor that beautifully complements the chicken. For a spicier twist, consider using cayenne powder instead.
- Salt and Pepper: Essential for bringing all the flavors together. Don’t be shy with the seasoning, as it draws out the natural flavors in the chicken.
- Fresh Herbs: Thyme and rosemary are classic choices. You can also experiment with herbs like oregano or sage for a different herbaceous note.
- Lemon: Not just for garnish! When you add lemon to the cavity, it infuses moisture and brightness into the meat during cooking.
Each of these ingredients plays a crucial role in achieving that satisfying rotisserie flavor and texture. The whole chicken provides the base, while the oil helps to crisp up the skin. The seasoning blend elevates the dish, ensuring that every bite is packed with flavor.
How to Make
- Preheat your oven: Start by preheating your oven to 425°F (220°C). This initial high temperature allows the chicken skin to crisp up beautifully, creating that signature rotisserie texture.
- Prepare the chicken: Remove the chicken from its packaging and pat it dry with paper towels. Drying the skin is crucial for that crispy exterior. If you find any giblets inside the cavity, discard them or save them for future use, according to your taste.
- Season generously: Drizzle the chicken with about 2-3 tablespoons of olive oil. Rub it all over the bird, including under the skin where possible, for maximum flavor. Next, generously sprinkle garlic powder, onion powder, smoked paprika, salt, and pepper all over the chicken. Don’t forget to also season inside the cavity!
- Add the herbs and lemon: If you’re using fresh herbs, chop them roughly and place them inside the cavity along with a halved lemon. The herbs will infuse their wonderful aroma, while the lemon will add moisture and brightness to the meat as it cooks.
- Place in a roasting pan: Transfer the chicken breast-side up into a roasting pan or a cast-iron skillet. By using a roasting rack, you elevate the chicken, allowing air to circulate and ensuring even cooking.
- Roast: Place the chicken in the oven and roast it for about 1 hour and 15 minutes. The cooking time can vary depending on the size of the chicken and your oven’s accuracy, so refer to a meat thermometer to check for doneness. The internal temperature should reach 165°F (74°C) when inserted into the thickest part of the thigh.
- Rest the chicken: Once cooked, remove the chicken from the oven and let it rest on the counter for at least 15 minutes. Resting allows the juices to redistribute, ensuring a flavorful and moist chicken when you carve it.
- Carve and serve: To carve, use a sharp knife to slice through the skin and meat. Start with the legs and wings, then move to the breast. Serve with your favorite sides, and enjoy the fruits of your labor!
Each step in this cooking process is designed to build flavor and reinforce cooking techniques, making it accessible for beginners yet rewarding for experienced cooks.
Variations & Substitutions
Citrus Herb Variation: If you’re looking to brighten up the flavors, consider adding additional citrus fruits. Oranges can complement the lemon beautifully; simply place orange slices inside the cavity of the chicken along with the herbs. This variation offers a fresh, zesty touch that pairs well with any side dish, providing a delightful twist on the classic recipe.
Spicy Rotisserie Chicken Variation: For those who enjoy a kick, add cayenne pepper or chili powder to your seasoning mix. This adjustment elevates the flavor profile and gives the chicken a sizzle that will tantalize your taste buds. Serve it with cooling sides like coleslaw or a refreshing cucumber salad to balance the heat.
Herb Butter Variation: Instead of olive oil, consider creating a herb butter by mixing softened butter with minced garlic and your choice of herbs. Rub this mixture under the skin for an even deeper flavor. The butter provides richness to the chicken, ensuring it stays moist and flavorful, perfect for impressing guests or a special family dinner.
BBQ Glaze Variation: For a tangy twist, apply your favorite BBQ sauce during the last 15 minutes of cooking. This caramelizes on the skin, adding an irresistible sweetness and smokiness. This variation is particularly delightful when paired with classic sides like potato salad and corn on the cob for summertime gatherings.
Vegetable Medley Addition: To make this a one-pan meal, add chopped root vegetables like carrots, potatoes, and onions around the chicken in the roasting pan. As the chicken cooks, the vegetables absorb the delicious juices, becoming tender and flavorful. This method simplifies meal prep while maximizing flavor and nutrition.
Each of these variations allows you to adjust the recipe to fit your taste preferences, dietary needs, or simply your mood on any given day.
Common Mistakes to Avoid
One of the most frequent mistakes when cooking chicken is not allowing it to come to room temperature before roasting. This step is important as it ensures even cooking; a cold chicken will take longer to cook through, leading to dry, overcooked meat on the outside while the inside may remain undercooked. Always let the chicken rest on the kitchen counter for about 30 minutes before cooking.
Another common pitfall is under-seasoning, as some cooks fear overdoing it. However, rotisserie chicken is known for its bold flavors; don’t be shy. Make sure to season not only the skin but also the cavity. This will ensure the flavors permeate the meat, resulting in a luscious and savory taste.
Additionally, many people skip the resting phase after the chicken is cooked. Allowing the chicken to rest for 10-15 minutes post-roasting is crucial for achieving the desired tenderness. Cutting into it immediately causes the juices to run out, leaving you with dry meat.
Lastly, using the wrong oven temperature is a common error. Cooking at too low a temperature may lead to long cooking times and a lack of crispy skin. Stick to the recommended temperature and make use of a reliable meat thermometer to guide you toward that juicy, perfectly cooked rotisserie chicken.
Storage, Freezing & Reheating Tips
Storing your leftover rotisserie chicken properly can extend its shelf life while preserving its flavor and moisture. Once the chicken has cooled down, carve it into pieces and place it in an airtight container in the refrigerator. Properly stored, cooked chicken will last for 3 to 4 days.
For longer storage, consider freezing the leftover chicken. Wrap tightly in plastic wrap or aluminum foil, then place it in a freezer-safe bag to prevent freezer burn. When stored this way, rotisserie chicken can last up to 4 months in the freezer. Some cooks even recommend freezing the chicken in portions to simplify the thawing process for individual meal prep.
When it comes to reheating, focus on retaining moisture to avoid dryness. The best methods entail either reheating in a covered dish in the oven at 350°F (175°C) or using the microwave. If using the microwave, place a damp paper towel over the chicken to lock in moisture and heat in short intervals until warmed through.
Food safety is paramount, especially when handling chicken. Ensure that your chicken reaches the correct internal temperature when cooking, and never leave cooked chicken at room temperature for over two hours to prevent bacterial growth.
Frequently Asked Questions
Can I use a frozen chicken for this recipe?
Yes, you can use a frozen chicken, but it must be completely thawed before cooking. Ideally, allow it to thaw in the refrigerator for 24 hours prior to the cooking process. If you’re short on time, you can use the cold-water thawing method; just make sure to cook the chicken immediately after thawing.
What can I serve with rotisserie chicken?
Rotisserie chicken pairs beautifully with a variety of sides. Classic options include mashed potatoes, steamed vegetables, salads, and rice. You can also serve it with warm crusty bread or creamy coleslaw. The versatility of rotisserie chicken allows you to adapt the meal to fit any occasion or season.
How do I know when the chicken is fully cooked?
The best way to ensure your chicken has reached a safe internal temperature is to use a meat thermometer. Insert it into the thickest part of the thigh—if it reads 165°F (74°C), the chicken is done. Additionally, you can check that the juices run clear when you pierce the meat with a knife.
Can I marinate the chicken overnight?
Absolutely! Marinating the chicken overnight can enhance the flavor as the spices penetrate the meat more deeply. Just make sure to keep the marinated chicken in the refrigerator and allow it to come to room temperature before cooking for optimal results.
Is this recipe suitable for meal prep?
Yes, this rotisserie chicken is excellent for meal prep! It can be easily divided into portions and stored in the fridge to be used in various meals throughout the week. Use it in salads, sandwiches, tacos, or stir-fries, and it will save you time while still delivering on taste and nutrition.
Conclusion:
In summary, “I’M Officially Addicted To This Perfect Rotisserie Chicken!” is more than just a recipe; it’s a gateway to culinary confidence and a cherished addition to family meals. From its succulent flavor and adaptability to its budget-friendly nature, this dish is sure to become a staple in your kitchen. Don’t hesitate to make it your own by experimenting with the tips provided or tweaking the seasoning to suit your family’s preferences. Try it out for dinner tonight, and watch as it transforms into a beloved meal that everyone will crave again and again. Happy cooking!


