**Meta Title:** Irresistible Authentic Italian Cannoli Recipe
**Meta Description:** Enjoy a delightful authentic Italian cannoli recipe with crunchy shells and creamy ricotta filling. Easy to make and utterly delicious!
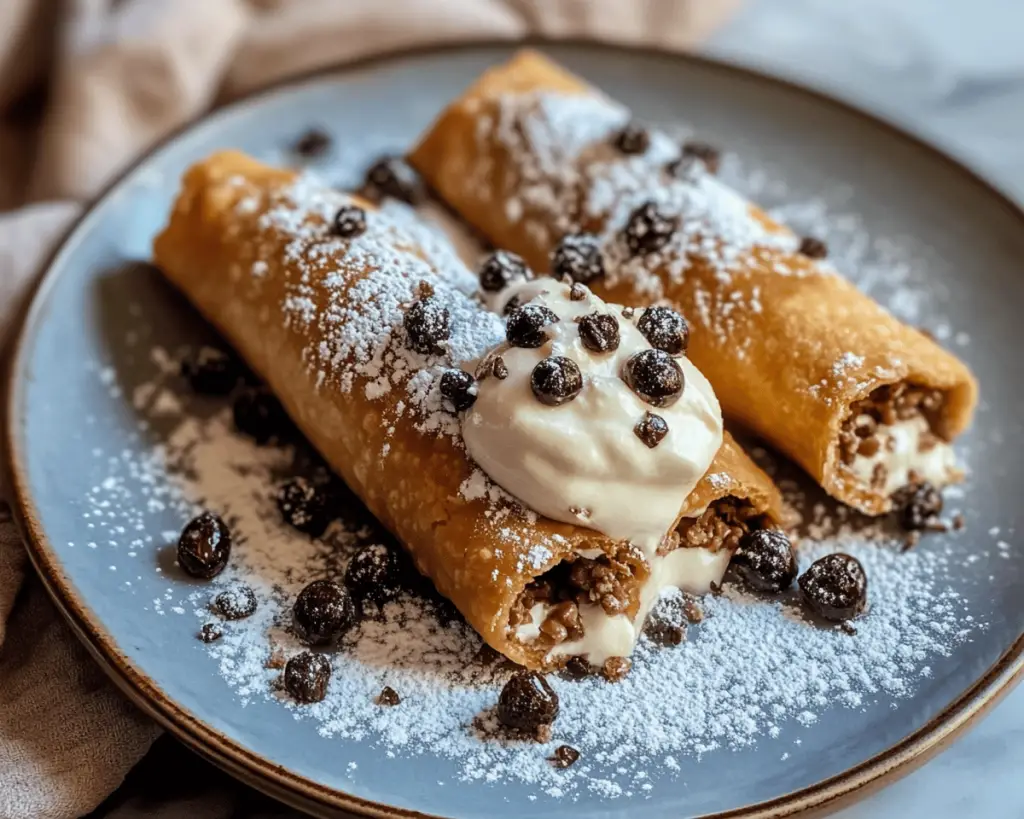
You know that feeling when you take a bite of a dessert and it instantly transports you to a sun-drenched street in Sicily? That’s what authentic Italian cannoli do for me. They’re more than just a treat; they are a canvas for flavors, textures, and memories. Picture this: golden-brown pastry shells, crispy on the outside, filled with a rich, creamy blend of sweetened ricotta cheese accented with vanilla and a hint of orange. Topped off with chocolate chips or candied fruit, each cannolo is a masterpiece that delights the senses.
In this article, you’ll learn how to create irresistible, authentic Italian cannoli from scratch. I’ll guide you through every step, share my best tips, and celebrate the joy of making this classic dessert in your own kitchen.
What is Cannoli?
Cannoli are traditional Italian pastries originating from Sicily, with their name deriving from the Latin word “canna,” meaning “tube.” These delightful sweets consist of tubular pastry shells that are deep-fried to a crunchy perfection and filled with a sweet, creamy filling made primarily from ricotta cheese.
The beauty of cannoli lies in their versatility; the filling can be flavored with vanilla, orange zest, or even chocolate, and garnished with pistachios, candied fruit, or chocolate chips for added texture and taste. The contrast between the **crisp** shell and the **smooth** filling is what makes them so irresistible, and it’s no wonder they hold a special place in Italian culinary tradition. They are often enjoyed during festive occasions and celebrations, giving rise to the phrase, “Life is too short to skip dessert!”
Why You’ll Love This Authentic Italian Cannoli Recipe
This cannoli recipe stands out for its simplicity and authenticity. Unlike many versions you might find in cafes and bakeries, this recipe allows you to recreate the true flavors of Italy in your own kitchen.
You’ll appreciate the **freshness** and **quality** of ingredients used here. Making cannoli from scratch not only tastes better, but it also provides an incredibly rewarding experience. As you roll out the dough and fill the shells, the aromatic scents waft through your kitchen, leaving you filled with anticipation.
Plus, this recipe is adaptable to accommodate your personal preferences—whether you prefer a little extra sweetness or a more decadent filling. Cannoli also hold up well in the refrigerator, and with proper storage, they can last a few days, making them perfect for meal prep or impressing guests at dinner parties.
Ingredients You’ll Need
To create this delicious authentic Italian cannoli, gather the following ingredients:
1. **All-purpose flour (2 cups)**: The base of your pastry; look for a finely milled flour for the best texture.
2. **Granulated sugar (3 tablespoons)**: Sweeten the dough slightly and balance the filling’s richness.
3. **Cocoa powder (1 tablespoon)**: Optional, but it adds flavor and a lovely color to the shells.
4. **Salt (½ teaspoon)**: Enhances flavors—don’t skip this!
5. **Unsalted butter (3 tablespoons)**: Adds richness and helps create a tender texture.
6. **Egg yolks (2)**: Contributes to the dough’s structure and adds moisture.
7. **White wine or vinegar (2 tablespoons)**: Helps tenderize the dough and adds a hint of flavor. Use a dry white wine.
8. **Ricotta cheese (2 cups, preferably whole milk)**: The star of the filling—look for fresh, high-quality ricotta for the best flavor.
9. **Confectioners’ sugar (½ cup)**: Sweetens the ricotta filling; you can adjust this based on your taste.
10. **Vanilla extract (1 teaspoon)**: Adds warmth and a lovely aroma to the filling.
11. **Candied orange peel or zest (optional)**: For an aromatic burst of citrus flavor.
12. **Chocolate chips or chopped pistachios (for garnish)**: Tasty toppings to elevate your cannoli experience.
How to Make Authentic Italian Cannoli
Ready to embark on your cannoli-making adventure? Follow these step-by-step instructions to create perfect cannoli right at home.
**1. Prepare the Dough**
Begin by in a large bowl, mixing together the **all-purpose flour**, **sugar**, **cocoa powder** (if using), and **salt**. Add the **cold, diced butter** and mix until the mixture resembles coarse crumbs. Next, create a well in the center and add the **egg yolks**. Gradually add the **white wine** (or vinegar) and mix until the dough comes together. Don’t over-knead; just make sure it’s well combined.
**2. Let it Rest**
Wrap the dough in plastic wrap and refrigerate for at least 1 hour. This resting period is crucial as it allows gluten to relax, resulting in tender shells.
**3. Make the Filling**
While the dough is resting, prepare the filling. In a mixing bowl, combine **ricotta cheese**, **confectioners’ sugar**, and **vanilla extract**. Mix until creamy, then add the **candied orange peel** (if using) for a bright pop of flavor. Taste the filling and adjust sugar if necessary. Once smooth, cover and refrigerate the filling until you’re ready to use it.
**4. Roll Out the Dough**
After resting, on a floured surface, roll out the dough until it’s about 1/8 inch thick. If you have a pasta machine, this works wonders for uniform thickness. Cut the dough into 4-inch rounds using a round cutter.
**5. Shape the Shells**
To form the shells, wrap each round of dough around a metal cannoli tube, pressing the edges to seal. Use a little water to help them stick together. Ensure they are tightly wrapped and overlap slightly to secure the shape.
**6. Fry the Cannoli Shells**
Heat oil in a deep frying pan over medium heat until it reaches about 350°F (175°C). Carefully slide the wrapped tubes into the hot oil, frying until golden brown—about 2-3 minutes. Rotate the tubes to ensure an even fry. Once done, remove them using tongs and drain on paper towels. Allow them to cool before gently sliding out the metal tube.
**7. Fill the Shells**
When the shells are completely cooled, fill a pastry bag (or a ziplock bag with a corner snipped) with the chilled ricotta filling. Pipe the filling generously into both ends of each shell until overflowing.
**8. Garnish and Serve**
For an extra special touch, dip the ends of your filled cannoli in **mini chocolate chips or chopped pistachios**. Dust lightly with powdered sugar for that traditional cannoli look. Serve immediately for maximum crunch, or chill for 30 minutes for flavors to meld.
Tips, Tricks & Variations
– **Don’t Overfill**: For the best texture, fill your cannoli just before serving. If you fill them too early, the moisture from the filling can make the shells soggy.
– **Perfect Frying Temperature**: To test if your oil is hot enough, drop in a small piece of dough—if it sizzles and rises to the surface, you’re good to go.
– **Flavor Variations**: Experiment by adding **chocolate** or **almond extracts** to the filling for a unique taste. You can even add a tablespoon of **mascarpone cheese** for a richer filling.
– **Storage**: If you have leftover unfilled shells, store them in an airtight container at room temperature. The filling can be stored in the refrigerator for up to 5 days.
– **Vegan Option**: Substitute the ricotta with a mixture of silken tofu combined with maple syrup and a splash of vanilla for a delightful vegan filling. For the dough, replace the egg yolks with a flax egg mixture.
What to Serve With Cannoli
Cannoli are fabulous on their own, but you can elevate the experience with charming accompaniments. Try serving them alongside a rich **espresso** or a glass of **Marsala wine**. A dollop of fresh **whipped cream** or a scoop of **vanilla gelato** complements the flavors beautifully. Alternatively, you could serve a side of **marinated berries** to add a fresh, fruity contrast to the rich filling.
Nutrition & Health Benefits
While cannoli are best enjoyed in moderation, they do offer some benefits, particularly when using quality ingredients. Cannoli can provide a small dose of protein from the ricotta, as well as calcium, which is vital for bone health. Each cannolo typically has approximately 150-200 calories, depending on the filling and size.
For more detailed nutritional information on cheeses and general dietary guidelines, feel free to consult [Healthline](https://www.healthline.com) and [USDA](https://www.usda.gov).
Frequently Asked Questions
**1. Can I make cannoli ahead of time?**
Absolutely! You can prepare the dough and filling ahead of time. Fry the shells and fill them just before serving to ensure they remain crisp.
**2. What if I can’t find cannoli tubes?**
If you can’t find metal cannoli tubes, you can use wooden dowels or roll the dough into cylinder shapes, ensuring they are sealed tight to keep their shape.
**3. Can I freeze cannoli shells?**
Yes! Once the shells are cooled, store them in an airtight container and freeze. They can last up to 2 months; just re-crisp them in the oven before filling.
**4. How do I know if my oil is hot enough?**
As mentioned, use the bread test: drop in a small piece of dough; if it sizzles and rises quickly, your oil is ready for frying.
**5. What’s the best way to store leftover filling?**
Store any leftover filling in an airtight container in the refrigerator for up to a week. You can use it on pancakes or as a dip for fruit!
In conclusion, making your cannoli allows you to experience the true essence of Italian cuisine. Each step, from crafting the dough to the final filling, is filled with joy and anticipation. Make them for special occasions or anytime you seek a taste of Italy at home. I can’t wait for you to try making this authentic Italian cannoli recipe. If you loved it, leave a comment or tag me on Instagram—I’d love to see your delicious creations!