Prep time: 20 minutes
Cook time: 0 minutes
Total time: 20 minutes
Servings: 8 servings
Are you ready to indulge in a delightful dessert that brings back memories of sun-soaked picnics and sweet, carefree afternoons? If you’re like many who have reminisced about classic desserts from their childhood, then the Irresistible No-Bake Banana Pudding Crunch Cheesecake is a recipe you won’t want to miss. This heavenly dessert combines all the best elements of banana pudding and creamy cheesecake, making it an ideal treat for any occasion.
This recipe is extra special because it requires no baking, meaning you can whip it up quickly and easily. The creamy and rich texture of the cheesecake pairs delightfully with the layers of crunch from cookie crumbles, while the bananas add a natural sweetness and a lovely flair. Throughout this article, you will learn how to create this delectable dessert, including tips, variations, and troubleshooting advice. So, gather your ingredients and let’s dive into the world of the Irresistible No-Bake Banana Pudding Crunch Cheesecake!
What Is Irresistible No-Bake Banana Pudding Crunch Cheesecake?
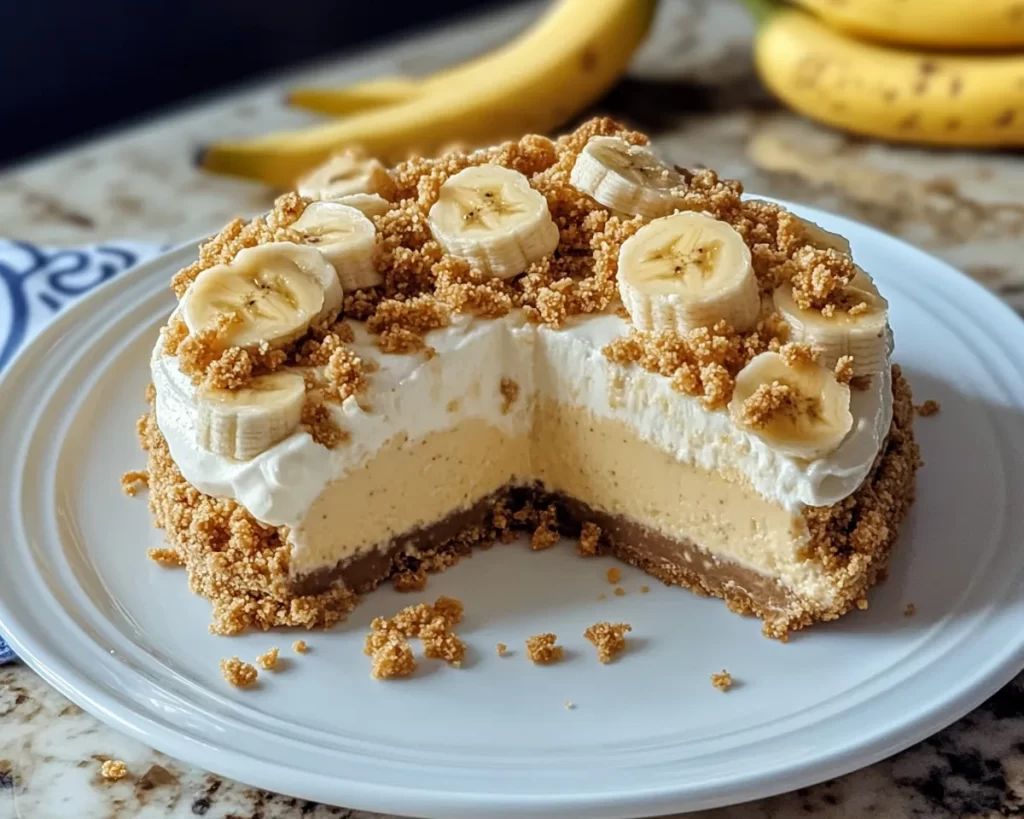
The Irresistible No-Bake Banana Pudding Crunch Cheesecake is a delicious fusion of traditional banana pudding and classic cheesecake. As the name suggests, this cheesecake requires **no baking**, making it a hassle-free dessert ideal for those who are short on time or who might not be as confident in the kitchen. The creamy filling, laced with sweet **mashed bananas**, provides an excellent balance against crunchy components, often made from **Nilla wafers** or graham crackers.
Originating from a blend of Southern desserts, this cheesecake pays homage to the simplicity and comforting flavors one associates with banana pudding. The smooth and rich texture of the cheesecake filling complements the softness of the fresh bananas, while the crunchy layers offer delightful contrasts. Each bite presents layers of flavor and texture that are both satisfying and comforting, making it an irresistible treat for any dessert lover.
Why You’ll Love This
You’re going to love this No-Bake Banana Pudding Crunch Cheesecake for many reasons. Firstly, it’s incredibly **easy to prepare**. With no baking required, you can have this show-stopping dessert ready in about 20 minutes. Perfect for beginners or busy weeknight desserts, you’ll impress your family and friends without breaking a sweat. This dessert not only caters to your sweet tooth but also does so with **minimal effort**.
In addition to its uncomplicated preparation, it’s also economical. Most of the ingredients are standard pantry staples, making it budget-friendly. The creamy flavor and delightful crunch create a satisfying mouthful, proving you don’t have to spend a lot to create a high-quality dessert. Furthermore, the versatility of this recipe allows you to adapt it for various dietary preferences, ensuring everyone can enjoy a slice. Lastly, it’s a hit for gatherings, birthday parties, and potlucks, as it appeals to a wide range of tastes and makes a beautiful presentation.
Ingredients You’ll Need
To get started on your Irresistible No-Bake Banana Pudding Crunch Cheesecake, gather the following ingredients:
- 8 oz cream cheese: The base of the cheesecake provides creaminess and stability.
- 1 cup powdered sugar: Adds sweetness without the graininess of granulated sugar.
- 1-1/2 cups whipped topping: This adds lightness and airiness to the cheesecake texture.
- 2 ripe bananas: Fresh bananas provide natural sweetness and flavor; they also add moisture.
- 1 tsp vanilla extract: Enhances the overall flavor of the cheesecake.
- 1 cup Nilla wafers or graham crackers: Provides the crunchy texture as well as a sweet flavor contrast.
- Extra sliced bananas: For layering and garnish on top before serving.
- Optional: chocolate shavings or caramel sauce: For additional toppings to elevate presentation and flavor.
Each of these ingredients plays a crucial role in the final product. If you’re looking for substitutions, consider using Greek yogurt in place of cream cheese for a lighter option or switching out Nilla wafers for a gluten-free cracker for those with dietary restrictions. You can also opt for coconut cream instead of whipped topping for a dairy-free version while maintaining a creamy texture.
How to Make
Now that you have your ingredients ready, let’s create this mouth-watering dessert step by step. Follow the instructions carefully to ensure the best results.
- Prepare your crust: Begin by crushing your Nilla wafers or graham crackers into fine crumbs. You can use a food processor for this, or simply place them in a zip-top bag and crush them with a rolling pin. The goal is to achieve a sandy texture. Next, transfer the crumbs to a medium bowl and mix with melted butter until combined. The mixture should hold together when squeezed. Press this evenly into the bottom of a 9-inch springform pan, creating an even layer. Refrigerate for 10 minutes to set while preparing the filling.
- Make the cheesecake filling: In a large mixing bowl, beat together the cream cheese and powdered sugar until the mixture is smooth and creamy. This process typically takes about 2-3 minutes on medium speed. Once combined, gently fold in the whipped topping until no white streaks remain. This will help give your cheesecake its light and airy texture. Be cautious not to overmix, as you want to maintain the fluffiness from the whipped topping.
- Add the flavor: Next, mash the ripe bananas in a separate bowl until they are smooth but still have some small lumps for texture. Stir the mashed bananas and vanilla extract into the cream cheese mixture until evenly incorporated. This step infuses the cheesecake filling with rich banana flavor and creaminess. On a sensory note, the smell of ripe bananas mixing with creamy goodness is simply irresistible!
- Layer your cheesecake: Remove the crust from the refrigerator and begin layering the cheesecake filling on top of the crust. Use a spatula to spread the filling evenly, creating a smooth top. You can save a small amount of the filling for decorative purposes if desired. After this, arrange additional banana slices on top of the filling. These provide a pop of color and support the banana flavor.
- Final chill: Cover the cheesecake with plastic wrap or a lid and refrigerate for at least 4 hours or overnight. Chilling allows the flavors to meld together beautifully and helps the cheesecake set properly, making it easier to slice. The waiting may be tough, but trust me, it’s worth it!
- Serve and enjoy: Once chilled and set, remove the cheesecake from the refrigerator and, if desired, top with chocolate shavings or a drizzle of caramel sauce for an extra indulgent touch. Carefully release the sides of the springform pan, slice, and serve. Enjoy this amazing dessert with family and friends!
Variations & Substitutions
Chocolate Banana Crunch Cheesecake: If you’re a chocolate lover, try adding cocoa powder into the cheesecake filling. Additionally, you can layer crushed chocolate cookies or even chocolate pudding between the banana layers. This variation not only enhances the flavor but also adds a beautiful marble effect. Dark chocolate lovers will appreciate the bitter-sweet contrast that complements the sweetness of bananas perfectly.
Dairy-Free Banana Cheesecake: For a dairy-free option, substitute cream cheese with vegan cream cheese and use coconut whipped cream instead of whipped topping. Also, the crust can be made with gluten-free cookies to accommodate those with dietary restrictions. This version still retains the luscious creaminess while being friendly for those avoiding dairy.
Peanut Butter Banana Cheesecake: Introducing peanut butter to the mix creates a fantastic flavor balance with the banana and cream cheese. Simply mix in 1/2 cup of creamy peanut butter into the cheesecake filling. This not only brings an element of richness but also adds protein, making it a delicious option for a post-workout treat!
Banana Berry Cheesecake: Combine sliced strawberries or blueberries with bananas for a unique twist. This variation not only adds bursts of flavor but also brings a vibrant color contrast. Layer the fresh berries on top of the banana slices before chilling, or incorporate them into the cheesecake filling with the mashed bananas.
Nutty Banana Crunch Cheesecake: Enhance the crunch factor by adding finely chopped nuts, like walnuts or pecans, to the crust or sprinkled on top of the cheesecake. This gives the dessert added texture and flavor, appealing to nut enthusiasts and making it feel even more homemade.
Common Mistakes to Avoid
When preparing your Irresistible No-Bake Banana Pudding Crunch Cheesecake, there are common pitfalls to be aware of. One mistake is not allowing the cheesecake enough time to set in the refrigerator. If you don’t refrigerate it for long enough, the cheesecake will be soft and difficult to slice. Always aim for at least four hours; overnight is best for ideal consistency.
Another common error is not using ripe bananas. Ripe bananas ensure maximum sweetness and a pleasing creaminess that contributes to the overall flavor of the cheesecake. Overripe bananas may be a better option as they are sweeter and easier to mash.
Also, avoid using whipped cream directly from a can. Store-bought whipped cream may lack the stability needed in the filling. Instead, making your whipped topping from scratch or using a stabilizer in store-bought toppings helps achieve a firm, desirable texture.
Storage, Freezing & Reheating Tips
To store your Irresistible No-Bake Banana Pudding Crunch Cheesecake, cover it tightly with plastic wrap or aluminum foil and keep it in the refrigerator. It’s best enjoyed fresh, but it will last for up to 4 days when stored properly. Make sure to keep the cheesecake sealed to prevent it from absorbing other odors from the fridge.
If you need to make your cheesecake in advance, you can freeze it. To do this, wrap the entire cheesecake tightly in plastic wrap and then aluminum foil. It can be frozen for up to two months. When you’re ready to serve, thaw the cheesecake in the refrigerator overnight before slicing.
Reheating is not necessary for no-bake cheesecake, as it is typically served cold. However, if you want to enhance your experience, you can add a warm sauce like caramel or chocolate on top just before serving.
Frequently Asked Questions
Can I substitute the cream cheese with something else? Yes! You can use vegan cream cheese for a dairy-free option or Greek yogurt for a healthier, yet creamy alternative. Just be aware that these substitutes may alter the final texture slightly.
How can I make this recipe gluten-free? You can easily make this cheesecake gluten-free by using gluten-free cookies for the crust. Look for options such as gluten-free vanilla wafers or any other suitable alternative that you enjoy.
How long does this dessert last in the fridge? When stored properly in an airtight container or wrapped well, your No-Bake Banana Pudding Crunch Cheesecake can last in the refrigerator for up to 4 days. It’s important to note that the bananas may brown slightly over time.
Can I use other fruits instead of bananas? Absolutely! While bananas are a key ingredient, you could use other fruits such as strawberries, raspberries, or even mangoes to create a fruity cheesecake. Just keep in mind that different fruits have varying levels of sweetness and moisture, which may alter the texture and flavor.
Is there a way to make this recipe lower in sugar? To reduce the sugar content, you can substitute the powdered sugar with a sugar alternative like Stevia or Erythritol. Additionally, using less ripe bananas may help to decrease the overall sweetness while maintaining flavor.
Conclusion:
In conclusion, the Irresistible No-Bake Banana Pudding Crunch Cheesecake is not just a dessert; it’s an experience. The layers of creamy cheesecake, sweet bananas, and crunchy crust offer a delightful play on textures and flavors that will surely impress. Whether you’re hosting a gathering or simply treating yourself to a sweet indulgence, this recipe is the perfect solution. You can customize it to your liking, ensuring everyone at the table finds something to enjoy.
So go ahead, gather your family and friends, and bring this delightful dessert to your next gathering. They will thank you for it, and you’ll feel rewarded for bringing such joy to the table. Don’t hesitate to share your experiences when making the cheesecake, bringing your unique twist to this beloved classic! Now go and create your masterpiece!
[Read also: Easy Dessert Recipes for Beginners]