Let’s Get Real
So here I am, sitting at my kitchen island on a rainy day, looking at the grey clouds and feeling as if even my coffee has lost its enthusiasm. You know the kind of day I’m talking about — where no amount of sunshine in a mug can uplift the mood? The only solution? A seriously decadent treat. And let me tell you, if you’re looking to indulge, look no further than these Irresistible Salted Caramel Fudge Truffles. Yes, I am shouting the ‘irresistible’ part because, well, that’s exactly what they are. If you thought you could resist them, you haven’t met my truffles yet. (Insert evil laugh here)
Confession time: I wasn’t a truffle lover as a kid. In fact, I was one of those picky eaters who thought fudge was overrated. I know, I know — the horror! But then I hit my rebellious twenties and discovered that fudge could be silky, rich, creamy, and drizzled with something as magical as salted caramel. From then on, I was sold, and now I can’t seem to contain my obsession. If you had told me that I’d be madly in love with fudge truffles someday, I would have suggested you consider joining a support group. But here we are, and I’m here to share every little secret of how to make these incredibly delicious Salted Caramel Fudge Truffles.
Now, I know what you’re probably thinking: “But do I even have the skills to whip these up?” Oh honey, if I can do it, so can you — even if your kitchen resembles a mini disaster zone! I mean, there’s something utterly satisfying about getting your hands a bit sticky when you’re creating these little bites of heaven. So grab your apron (or don’t, I’m not here to judge) and let’s dive into the sweet, sweet world of Salted Caramel Fudge Truffles!
Ingredients, Unfiltered
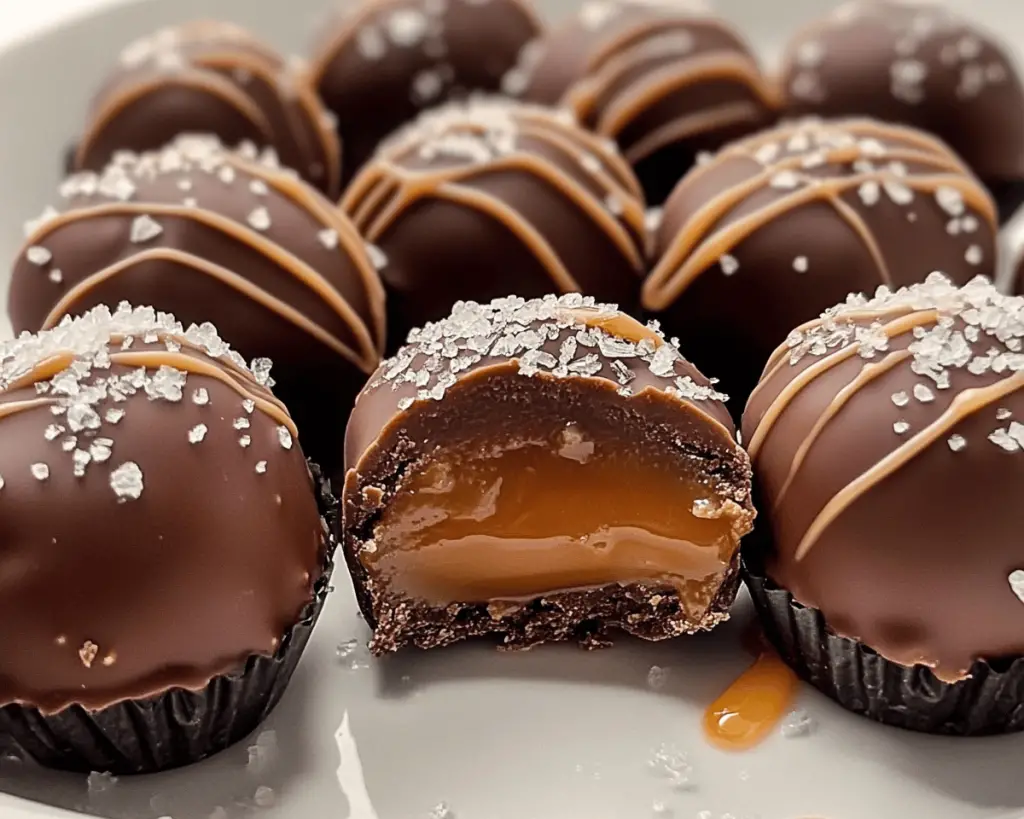
What’s Really in Irresistible Salted Caramel Fudge Truffles
Let’s break down the star players in this scrumptious ensemble, shall we? Buckle up, it’s a ride filled with lusciousness!
Granulated Sugar: The backbone of your sweet truffles. You’ll need this sugar to create the caramel, which means you’re about to enter the sweet realm of confectionery magic. Just don’t try to eat it straight; trust me, you’ll only end up with a nothing but a toothache and some sad feelings.
Heavy Cream: Yes, please! This is the rich, thick goodness we’ll use to achieve that creamy fudge consistency that’s nothing less than a warm hug for your taste buds. If you’ve never let heavy cream into your life, I strongly suggest you reconsider. It’s like liquid happiness, and no one could ever say no to that.
Unsweetened Cocoa Powder: The unsung hero of chocolatey flavors! Cocoa powder is what gives our truffles that rich chocolate base. Look for quality cocoa; believe me, it makes a huge difference. Don’t worry; it’s all in the name of pleasure.
Salted Butter: Because what’s the point of making salted caramel without salted butter? I use the good stuff here; it pays off in flavor. Plus, it’s just the right amount of salty paired with chocolate and sweet caramel. Pure heaven!
Sea Salt: Now, this is where the magic happens. The gentle kiss of sea salt elevates your truffles from delish to unforgettable. You can thank me later for putting this into your life.
Vanilla Extract: A dash of vanilla never hurt anyone! It brings out the flavors and makes everything taste more fancy. I can’t help it — I love the aroma and flavor that vanilla adds, like a flawless little bow on an already beautiful gift.
Chocolate Chips: I’m not picky, but I recommend going with semi-sweet chocolate for that perfect balance of rich sweetness, minus the cloying factor. I personally prefer dark chocolate because I’m edgy like that, but you do you!
Let’s Talk Health (or Not)
Is This Even Healthy? Let’s Discuss
Alright, everyone; it’s time for the million-dollar question. Are these Salted Caramel Fudge Truffles healthy? Spoiler alert: No. But honestly, do we care? Sure, there’s heavy cream, butter, and sugar, but my sweet friend, we’re here for a treat, not to govern our lives with kale and self-discipline! These truffles are for moments when you want to enjoy life, not count calories.
Look, life is all about moderation (except when it comes to pizza, but that’s a different story). Sometimes, you just gotta roll in the indulgence and let go of guilt for a while. And you know what? You deserve these beauties in your life. Just make peace with the fact that these truffles are a once-in-a-while treat, and embrace every delicious mouthful — guilt-free!
Your Grocery List
Here’s What You’ll Need
– 1 cup granulated sugar
– 1 cup heavy cream
– ½ cup unsweetened cocoa powder
– 4 tbsp salted butter
– 1 tsp sea salt (adjust to taste)
– 1 tsp vanilla extract
– 2 cups chocolate chips (semi-sweet or dark, your pick!)
– Additional sea salt for garnish
This recipe should yield about 20-24 delightful truffles, depending on how generous you are! But let’s be real; the truffle count may vary based on how often you “taste” the mixture — no judgment here!
The Actual Cooking Part
Okay, Let’s Make This
Alright, gather your ingredients and make sure you’ve got some good tunes playing — trust me, it sets the mood right. I often channel my inner chef, serenading in my apron while I whisk away, so I recommend you do the same. Here’s the lowdown on how to whip up these truffles:
1. **Prep Your Workspace:** First things first, channel your inner Martha Stewart and clear your workspace! A clean kitchen is a happy kitchen (and aesthetic, too!). I know it sounds tedious, but if I don’t, I’m simply lost among the clutter.
2. **Make the Caramel:** In a medium saucepan, combine the granulated sugar and water (just a smidge) over medium heat. Stir occasionally until the sugar dissolves completely. Yeah, I know, the bubbling stage is mesmerizing like TikTok — don’t get too lost, though! Once your sugar has turned into a beautiful amber color (about 10-15 minutes), remove it from the heat and add the heavy cream. Pro tip: Don’t panic at the bubbling mess — that’s just the cream reacting.
3. **Adding the Goodies:** Once you’ve mixed in the cream, return the saucepan to low heat and add the butter, cocoa powder, and vanilla extract. Stir it up like you mean it until everything is smooth and well combined. Taste your life at this moment and remind yourself you’re a culinary genius.
4. **The Hard Part (Not Really!):** Once all your ingredients are harmoniously blended, pour the mixture into a bowl and let it cool. At this moment, patience is key. Don’t dive in right away — give it some time to set. Pop it in the fridge for about an hour. When I skip this step, I just end up with a gooey mess. You don’t want that chaos.
5. **Scoop It Up:** Once your fudge mixture is cool and set, grab a melon baller or a small spoon. Don’t think of it as scooping; think of it as crafting your truffles. Form bite-sized balls and place them on a parchment-lined baking sheet. Honestly, it’s like a mini masterpiece waiting to happen. I often go “artsy” and make some of them more rustic-looking, simply to feel like a truffle artist!
6. **Chillin’ Out:** Once you’ve made all your little balls of joy, refrigerate them for another 30-60 minutes. Trust me, this will help them firm up, making it way easier to coat them in chocolate later.
7. **Coating Time:** Melt your chocolate chips in a microwave-safe bowl in short bursts, stirring in between. You want it nice and smooth, ready for truffle bathing. When in doubt, do not rush this process; patience + chocolate = perfect coating. Once melted, dip each truffle (I use a fork; makes life easier!) into the chocolate, making sure it’s completely covered. Let the excess drip off before placing them back on the parchment paper.
8. **Sprinkle the Goodness:** Don’t forget to sprinkle a bit of sea salt on top before the chocolate hardens. This is the glam touch that makes them look oh-so-professional and adds that salty contrast against the rich sweetness.
9. **Cooling Off:** Allow the truffles to set at room temperature or, if you’re impatient like me, pop them in the fridge for about 15 minutes until the chocolate is firm.
10. **Enjoy:** Now you can finally devour your creations! Take a moment to admire your work before shoving one (or three) in your mouth. By this point, the whole kitchen might be filled with the aroma of chocolate, and if it’s not, you may need to take a closer look at how this magic unfolded.
Side Notes & Sassy Hacks
Bonus Tips You Didn’t Ask For
– **Flavor Variations:** Feel free to get wild with flavors! If you want an adventurous twist, try adding a bit of espresso powder to your chocolate coating or even some peppermint extract for a seasonal vibe. Seriously, don’t hold back — make it your own!
– **Storing Your Truffles:** If you manage to have extras (good luck with that), store them in an airtight container in the fridge. They’ll keep for a week, but I can’t guarantee they’ll last that long.
– **Gifties:** Have a friend’s birthday coming up? Box some of these truffles up with a cute ribbon, and thank me later for gifting someone pure joy on their special day. Trust me; everyone will think you’re a fancy chocolatier!
Final Words of (Culinary) Wisdom
Honestly, making these Irresistible Salted Caramel Fudge Truffles is more than just preparing a sweet treat; it’s about embracing indulgence, having fun in the kitchen, and — let’s be real — feeling like a total rock star when you finally let them melt in your mouth. So, the next time you find yourself in dire need of something sweet, put on your apron and remind yourself that your truffle journey can be as therapeutic and satisfying as your favorite Netflix show.
If you try this recipe, please tag me in your creations. I love seeing your masterpieces! Otherwise, just send me a mental high-five. Happy sugary indulgence, my fellow food lovers!


