Prep time: 30 minutes
Cook time: 40 minutes
Total time: 1 hour 10 minutes
Servings: 4
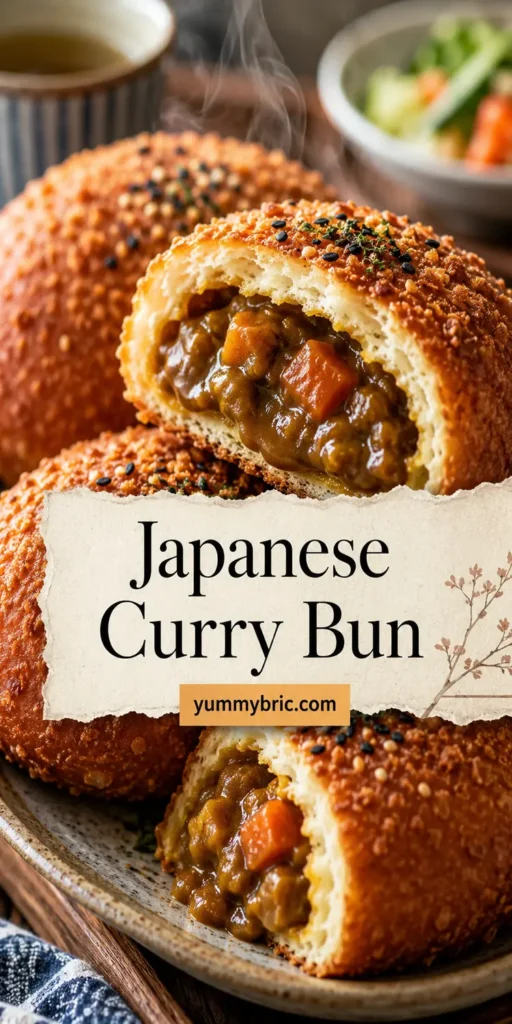
Japanese Curry Bun with Crispy Bread Crust is a delightful twist on traditional curry. This savory treat incorporates a rich, aromatic filling encased in a crispy, golden-brown bread crust. Perfect for lunch or a snack, these buns not only satisfy your hunger but also provide a feast for the senses. Imagine biting into a warm bun and experiencing the delightful contrast of its crunchy exterior and the tender, flavorful filling inside. Whether you are new to cooking or a seasoned pro, these buns are sure to impress your family and friends.
What Is Japanese Curry Bun with Crispy Bread Crust?
Japanese Curry Bun, also known as “Kare Pan,” is a popular street food in Japan. These buns feature a hearty filling made from Japanese curry and are encased in a soft, fluffy bread dough. Typically deep-fried to achieve a crisp, golden crust, they provide a satisfying contrast between the crispy exterior and the warm, savory filling. This dish is perfect for those looking for a quick, delicious meal that embodies the comforting flavors of Japanese curry.
Why You’ll Love This
There are numerous reasons to fall in love with Japanese Curry Buns. First and foremost, they offer a **delicious combination of flavors and textures**. The spicy and savory curry enhances the softness of the bread, creating a mouthwatering experience. Additionally, they are highly versatile—add your favorite protein or vegetable to the filling for a personal touch. These buns are also a great make-ahead option, allowing busy families to enjoy homemade goodness even on hectic days. Plus, they appeal to various dietary preferences, as they can easily be adapted for vegetarian or vegan diets.
Ingredients You’ll Need
- For the Curry Filling:
- 2 tablespoons vegetable oil – For sautéing and enhancing flavor.
- 1 onion, finely chopped – Adds sweetness and aroma to the curry.
- 2 carrots, diced – Provides a sweet crunch and vibrant color.
- 2 potatoes, diced – Adds heartiness and absorbs flavors.
- 1 cup cooked protein (chicken, beef, or tofu) – For a substantial filling.
- 2 tablespoons curry powder – The star ingredient that brings warmth and depth.
- 1 cup vegetable or chicken broth – To create a rich curry sauce.
- Salt and pepper, to taste – For seasoning.
- For the Bread:
- 3 cups all-purpose flour – The base for the bun.
- 2 tablespoons sugar – To slightly sweeten the dough.
- 1 teaspoon salt – Enhances flavor.
- 1 tablespoon instant yeast – Helps the dough rise quickly.
- 1 cup warm water – Activates the yeast and forms the dough.
- For Frying:
- Vegetable oil, for deep frying – Creates the perfect crispy exterior.
How to Make
- In a large pan, heat the vegetable oil over medium heat. Add the chopped onions and sauté until they turn translucent and soft, which should take about 5 minutes. This step builds a flavorful base for your curry.
- Next, stir in the diced carrots and potatoes, cooking them for another 5-7 minutes until they slightly soften. The aim is to maintain some texture, so avoid cooking them completely through at this stage.
- Add the cooked protein and curry powder, mixing well to coat all the ingredients. Pour in the broth and season with salt and pepper. Let this simmer for about 10-15 minutes until the vegetables are tender and the flavors meld together beautifully.
- While your filling simmers, prepare the dough. In a large bowl, combine the flour, sugar, salt, and instant yeast. Gradually add the warm water, mixing until the dough forms. Knead the dough for about 10 minutes until it becomes smooth and elastic. Cover the bowl with a damp cloth and let it rise in a warm place for about 30 minutes, or until it doubles in size.
- Once the dough has risen, punch it down and divide it into equal portions, typically about 8 pieces. Flatten each piece and place a generous spoonful of the curry filling in the center, carefully sealing the edges to form a bun. Make sure there are no gaps, as it helps maintain the shape while frying.
- Heat the vegetable oil in a deep pan or fryer. Carefully place the buns in the hot oil, frying until they are golden brown and crispy, which should take about 4-5 minutes on each side. Use a slotted spoon to turn them gently as they cook to get an even color.
Variations & Substitutions
Vegetarian Curry Bun
For a vegetarian alternative, substitute the protein with a mix of your favorite vegetables, such as bell peppers, mushrooms, and zucchini. You could also use chickpeas for added protein. Simply prepare the curry filling the same way, adjusting spices as needed to balance the flavors.
Spicy Curry Bun
If you enjoy a little kick, add a tablespoon of chili paste or diced fresh chilies to the curry filling. This not only elevates the heat but also adds a vibrant color, making these curry buns even more visually appealing. Adjust your chili level according to your spice tolerance.
Cheese-Filled Curry Bun
For a different take, consider adding a slice of cheese to the center of the bun along with the curry filling. Choose a melting cheese like mozzarella or cheddar for a gooey surprise when you bite into the bun. It melds wonderfully with the savory curry.
Common Mistakes to Avoid
One common mistake is overfilling the buns. Using too much filling can lead to leakage during frying; ensure that you use just enough to allow the bun to seal properly. Another mistake is not letting the dough rise sufficiently. If the dough is under-proofed, the buns might be dense rather than airy; always ensure they double in size before proceeding. Lastly, frying at too low a temperature can result in oil-soaked buns. The ideal frying temperature is around 350°F (175°C); use a thermometer to maintain accuracy.
Storage, Freezing & Reheating Tips
To keep your Japanese Curry Buns at their best, store them in an airtight container in the refrigerator for up to 3 days. For longer storage, you can freeze them. Allow the buns to cool completely, then place them in a single layer on a baking sheet. Freeze until solid, then transfer to a freezer bag. They will last up to 1 month in the freezer. To reheat, bake in a preheated oven at 375°F (190°C) for about 15-20 minutes until heated through. If you use a microwave, ensure you cover the buns to maintain moisture, but be aware that this may lead to a softer crust.
Frequently Asked Questions
Can I make the filling ahead of time?
Absolutely! The curry filling can be made a day in advance and stored in the refrigerator. This allows the flavors to develop more deeply. Just ensure to cool it completely before storing it in an airtight container.
Can I bake these buns instead of frying?
Yes, you can definitely bake the curry buns for a healthier alternative. Preheat your oven to 375°F (190°C), and place the assembled buns on a baking sheet. Brush them with egg wash or melted butter for added color and flavor. Bake for about 20-25 minutes, or until golden brown.
How do I know the buns are cooked through?
When frying, look for a golden brown exterior, which typically takes about 4-5 minutes per side. If baking, ensure they rise well and turn golden, which indicates they are cooked through. The filling, being pre-cooked, should be hot throughout.
Can I use different types of bread for this recipe?
While traditional kare pan uses a soft bread dough, you can experiment with different types. Brioche dough could provide a richer flavor, or even a whole grain option for added nutrition—just adjust your cooking time as necessary.
Is it possible to make these gluten-free?
Yes! To make gluten-free Japanese Curry Buns, use a gluten-free all-purpose flour blend. Be sure to also check that your curry powder and any other ingredients are gluten-free. The texture may vary slightly, but you’ll still achieve delicious results.
Conclusion:
Making Japanese Curry Buns with a crispy bread crust is a rewarding culinary adventure. With simple ingredients and a bit of patience, you can create a comforting and delicious dish that your family and friends will absolutely love. Remember, the joy of cooking comes not just from the dish itself but from the love and care you put into each step. Happy cooking!