Heavenly Red Velvet Cinnamon Rolls With This Simple Recipe
Meta Title
Indulge in heavenly red velvet cinnamon rolls.
Meta Description
Learn to make heavenly red velvet cinnamon rolls with this simple and delightful recipe that will wow your family and friends!
Introduction
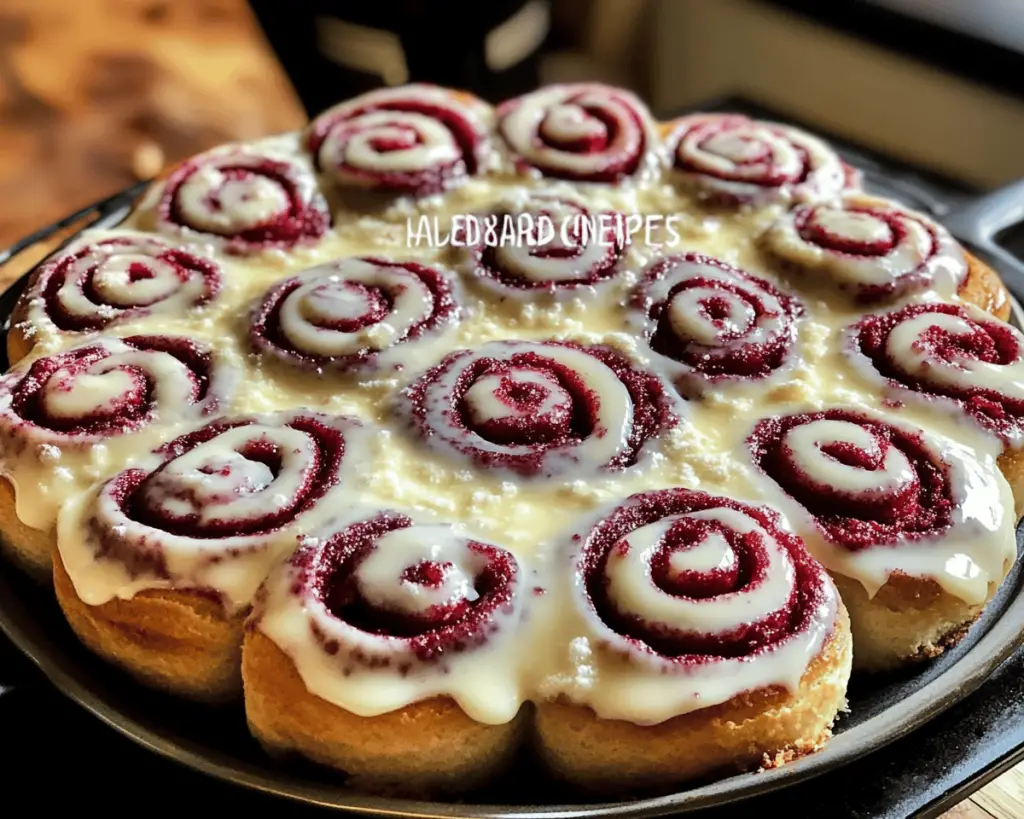
Imagine walking into your kitchen and being enveloped by the sweet, warm aroma of freshly baked red velvet cinnamon rolls—a treat that’s as visually captivating as it is delicious. The deep crimson hue of these rolls, coupled with swirling ribbons of rich cinnamon, creates a mouthwatering, irresistible dessert that’s perfect for any occasion. As you pull them from the oven, the soft and pillowy texture beckons for you to take a bite, and the creamy frosting promises to elevate each flavor, leading to a delightful moment of culinary bliss.
These heavenly red velvet cinnamon rolls are more than just a treat; they are a celebration of flavors, textures, and colors that can transform your breakfast or brunch into a memorable event. With a simple recipe that doesn’t require any advanced baking skills, you can achieve a bakery-quality creation right from the comfort of your home. Gather your ingredients and prepare for an aromatic experience that will have the whole family asking for seconds.
What Is Red Velvet Cinnamon Rolls?
Red velvet cinnamon rolls combine the classic cinnamon roll with the unique flavor profile of red velvet cake. Traditionally, red velvet is known for its striking red color and subtle cocoa flavor, usually complemented by a tangy cream cheese frosting. These elements, when layered into soft, fluffy dough and spiraled with cinnamon sugar, create a delightful fusion between breakfast and dessert. The result is a cinnamon roll that dazzles both the eyes and the palate.
The origin of red velvet cake dates back to the early 1900s, becoming a Southern favorite and eventually branching out into various desserts. Red velvet cinnamon rolls offer a creative spin on the traditional recipe, adding a playful and festive feel to the ordinary breakfast table. These rolls evoke nostalgia, like cozy family gatherings with delightful pastries that everyone cherishes. The heavenly combination of flavors—sweet, buttery, and spicy—result in a soft, melt-in-your-mouth experience that lingers long after the last bite.
Bonus Tip: For ultimate freshness, serve these rolls warm right out of the oven. You can also incorporate a variety of fillings like chopped nuts or chocolate chips for added depth.
Why You Will Love This Red Velvet Cinnamon Rolls
- Visually Stunning: The vibrant red color makes these rolls a standout, perfect for celebrations, holidays, or any special occasion.
- Decadent Flavor: With a rich cocoa undertone paired with a sweet cinnamon filling, each bite is heavenly, tantalizing your taste buds.
- Easy to Make: This recipe involves straightforward steps that can be easily followed, making it perfect for both novice and experienced bakers.
- Cream Cheese Frosting: The tangy cream cheese frosting not only elevates the flavor but also compliments the sweetness of the rolls beautifully.
- Family Favorite: These rolls are bound to become a beloved family recipe, adored by both adults and children alike.
- Versatile Treat: Enjoy them for breakfast, brunch, or as a sweet afternoon snack; they fit in well with any mealtime.
- Make Ahead: You can prepare the dough in advance, store it in the refrigerator overnight, and bake fresh rolls in the morning.
Extra Idea: Consider adding a splash of vanilla extract to the dough for an additional layer of flavor that enhances the overall experience.
Ingredients You Will Need
Main Ingredients
- Flour: All-purpose flour is typically used for a soft texture. Be certain to measure correctly by spooning it into the measuring cup and leveling it off for precision.
- Granulated Sugar: This gives sweetness to the dough and the filling. Brown sugar can also be used for a more caramelized flavor in the filling.
- Cocoa Powder: Provides the essential chocolate flavor to enhance the red velvet aspect. Use unsweetened cocoa powder for the best results.
- Yeast: Active dry yeast is ideal for making dough rise. Ensure it’s fresh for maximum effectiveness—check the expiration date!
- Milk: Whole milk produces a rich and buttery dough, but you can opt for low-fat milk if preferred.
- Butter: Softened butter adds moisture and flavor to the dough and filling; use unsalted butter for greater control over the sweetness.
- Eggs: One large egg provides rich texture and stability to the dough and enhances the overall flavor.
Additional Ingredients
- Cinnamon: Essential for a warm, spicy aroma in the filling. This spice perfectly complements the cocoa taste.
- Vanilla Extract: This adds a layer of sweetness and depth to the dough. Always use pure vanilla extract for the best flavor.
- Powdered Sugar: For making the creamy frosting, it dissolves smoothly into a sweet topping.
- Cream Cheese: A key ingredient for the frosting, it creates that beloved tangy flavor that pairs so well with sweet cinnamon rolls.
- Food Coloring: Gel or liquid red food coloring can be added to enhance the rolls’ iconic red velvet appearance.
Ingredient Substitutions Table
| Ingredient | Substitute |
|---|---|
| All-purpose flour | Gluten-free flour blend |
| Granulated sugar | Coconut sugar or maple syrup |
| Cocoa powder | Carob powder |
| Butter | Coconut oil or vegan butter |
| Milk | Almond milk or oat milk |
Step-by-Step Instructions
Step 1 – Prepare the Dough
In a mixing bowl, combine warm milk (105°F to 110°F) with sugar and yeast, allowing it to sit for 5–10 minutes until foamy. This activates the yeast which is essential for a fluffy dough.
Once foamy, stir in melted butter, eggs, and vanilla extract until blended. Gradually add flour, cocoa powder, and a pinch of salt. Mix together until a sticky dough forms. You may need to use your hands to fully incorporate the ingredients.
Pro Tip: For a richer flavor, you can slightly warm your milk and butter in a saucepan before combining, ensuring they are not too hot, as excessive heat can kill the yeast.
Step 2 – Knead the Dough
Transfer the dough to a floured work surface. Knead the dough for about 5–7 minutes, until it’s smooth and elastic. If it feels too sticky, sprinkle on some extra flour to help with kneading without overworking it.
When the dough is ready, shape it into a ball and place it in a greased bowl. Cover it with a clean kitchen towel or plastic wrap, allowing it to rise in a warm area until doubled in size, about 1–2 hours.
Pro Tip: If you’re in a hurry, you can preheat your oven to 200°F, then turn it off and place the covered dough inside to rise faster.
Step 3 – Prepare the Filling
While your dough is rising, prepare the cinnamon filling. In a small bowl, combine brown sugar, granulated sugar, cinnamon, and 1/2 teaspoon of cocoa powder. Mix until all ingredients are well incorporated, creating a sweet and spicy filling.
The blend of sugars and spices will create a delightful ribbon of flavor throughout your rolls once assembled.
Pro Tip: Incorporating finely chopped nuts, such as pecans or walnuts, into your filling adds an inviting crunch for texture.
Step 4 – Roll Out the Dough
Once the dough has risen, punch it down gently to release any air bubbles. Place it on a floured surface and roll it out into a rectangle, about 1/4-inch thick. Aim for dimensions around 12×18 inches for optimal roll size.
The thickness ensures a soft texture; if you roll it too thin, the rolls may become dry during baking.
Pro Tip: Use a rolling pin dusted with flour to prevent sticking and allow the dough to stretch easily.
Step 5 – Add the Filling
Spread a generous amount of softened butter evenly over the rolled dough. Then, sprinkle the cinnamon filling mixture all over, leaving a small border around the edges.
Ensure the filling is evenly distributed for consistent flavor in every bite. Don’t skimp on the filling; generous layers add to the irresistible taste of the rolls.
Pro Tip: For an extra layer of decadence, drizzle a little melted chocolate over the filling before rolling.
Step 6 – Roll and Slice the Dough
Starting from the long edge of the dough, carefully roll it up tightly into a log. Make sure to keep it snug to maintain the swirls within. Once rolled, use a sharp knife to slice the log into 12 equal pieces.
Slicing using unflavored dental floss works wonders for perfectly cut rolls without squishing the dough!
Pro Tip: Use a serrated knife coated with oil to make clean cuts without tearing the dough.
Step 7 – Second Rise
Place the sliced rolls on a greased baking dish or lined with parchment paper. Cover them again with a kitchen towel and let them rise for another 30–45 minutes until they are puffy and touching each other.
This second rising is key to achieving that fluffy texture that we all adore in cinnamon rolls.
Pro Tip: Preheat your oven during this time so that it’s hot and ready for baking right after this final rise.
Step 8 – Bake the Rolls
Preheat your oven to 375°F (190°C). Once the rolls have risen sufficiently, bake them in the preheated oven for 20–25 minutes or until they are golden brown. The kitchen will be filled with an aromatic scent reminiscent of a delightful bakery.
Keep an eye on them as baking times may vary based on your oven; you want them to remain soft and light.
Pro Tip: To prevent over-browning, you can loosely cover the rolls with aluminum foil halfway through baking.
Step 9 – Prepare the Frosting
While the rolls are baking, mix together the cream cheese frosting. In a bowl, combine softened cream cheese, butter, powdered sugar, vanilla extract, and a splash of milk until smooth and creamy.
For a lighter frosting, you can whip in a few additional tablespoons of heavy cream to make it extra fluffy!
Pro Tip: Chill the frosting in the refrigerator while the rolls are baking to achieve a firmer consistency when ready to spread.
Step 10 – Frost the Rolls
Once you take the rolls out of the oven, allow them to cool for about 10-15 minutes, then generously spread the cream cheese frosting over the warm rolls. The warmth will melt the frosting slightly, allowing it to drip into all of the nooks and crannies.
A little freshly grated chocolate or shredded coconut on top makes for an elegant finish!
Pro Tip: For an aesthetic touch, dust a little extra cocoa powder or colorful sprinkles on top of the frosting before serving.
Step 11 – Cool and Serve
Allow the rolls to cool for a few moments before serving. Slice and serve them warm for the best experience, and watch as friends and family gather around for these heavenly treats!
Pair them with a cup of coffee or a glass of milk for a delightful indulgence.
Advanced Technique: To make them even more special, consider adding chocolate chips or fresh raspberries into the filling, adding a fruity twist to the classic recipe.
Chef Tips, Variations, and Substitutions
- Flavor Boosters: Sprinkle chopped nuts such as pecans or almonds into the filling for a crunchy contrast.
- Vegan Swaps: Substitute eggs with flaxseed eggs (1 tablespoon of flaxseed meal mixed with 2.5 tablespoons of water per egg) and use a non-dairy cream cheese for the frosting for a vegan-friendly option.
- Gluten-Free Options: Utilize a gluten-free flour blend to cater to those with gluten intolerance while keeping the flavor intact.
- Short on Time: Use store-bought dough and combine it with the filling for a quicker version while still achieving delicious results.
- Experiment with Flavors: Infuse vanilla bean paste or almond extract into the dough for an exciting twist on flavor.
Extra Variation: You can make mini red velvet cinnamon rolls by slicing the dough logs into smaller pieces; they make for adorable bite-sized treats that are perfect for parties.
What to Serve With Red Velvet Cinnamon Rolls
- Fresh Fruit: Serve alongside fresh berries or sliced bananas for a light and refreshing contrast to the rich cinnamon rolls.
- Whipped Cream: Consider topping your rolls with whipped cream for a delightful touch of airy sweetness.
- Hot Beverages: A warm cup of coffee, tea, or hot chocolate complements the sweet flavors beautifully, creating a comforting experience.
- Cheese Spreads: A light smear of cream cheese spread alongside the rolls enhances the overall taste and presents well on a brunch table.
- Yogurt: A dollop of vanilla yogurt adds a rich creaminess that pairs well with the cinnamon rolls’ sweetness.
More Inspiration: Use flavored cream cheese spreads, such as strawberry or lemon, to top your cinnamon rolls for an additional burst of flavor.
Storage and Meal Prep Tips
For best results, store leftover cinnamon rolls in an airtight container at room temperature for up to 2 days. If you would like them to last longer, they can be refrigerated for up to a week.
For longer storage, freeze the unbaked rolls by placing them in the freezer after slicing on a baking tray. Once they are frozen, transfer them into a freezer bag or container. They can be kept frozen for up to 2 months.
When ready to enjoy, simply let them thaw overnight in the fridge, then allow them to rise for an hour before baking. If you’ve made extra frosting, keep that in the refrigerator in an airtight container as well.
Meal Prep Bonus: Prepare the dough in advance and store it in the refrigerator overnight to save time in the morning. Simply roll, fill, and bake the next day.
Nutrition Highlights
These delightful red velvet cinnamon rolls contain essential nutrients such as carbohydrates and proteins from the flour and eggs, as well as calcium from the milk and butter. The cream cheese frosting adds extra calories but also contributes to the overall texture and flavor profile
With proper ingredient selection, you can make these rolls healthier by reducing sugar, opting for whole grain flour, or using less frosting. Adaptations can make them fit into various dietary lifestyles, whether you’re vegetarian, gluten-free, or seeking lower-sugar options. Varieties of choice allow for inclusion in anti-inflammatory diets, too.
For more information on calorie counts, visit Healthline or check the USDA FoodData Central for tracking nutritional details.
Nutrition Insight: If you’re looking to boost the nutrition of your cinnamon rolls while retaining their delightful taste, consider incorporating applesauce instead of some butter, providing moisture and reducing fat.
Frequently Asked Questions
Can I prep red velvet cinnamon rolls the night before?
Absolutely! You can prepare the dough, shape and fill the rolls, then refrigerate them overnight. This saves time in the morning, allowing them to rise before baking, creating the same delicious taste and texture.
What makes red velvet cinnamon rolls different from regular cinnamon rolls?
Red velvet cinnamon rolls are distinguished by their vibrant red color and subtle chocolate flavor, which derive each from a combination of cocoa powder and food coloring. They also feature a creamy, tangy cream cheese frosting, making them a festive twist on the traditional cinnamon roll.
How can I store leftover cinnamon rolls?
Store leftover rolls in an airtight container at room temperature for up to two days. Alternatively, they can be refrigerated for a week or frozen for up to two months. Ensure they are adequately wrapped to prevent freezer burn.
Can I use a different frosting for the cinnamon rolls?
Of course! While cream cheese frosting is traditional, you can experiment with buttercream, whipped cream, or even a simple glaze made from powdered sugar mixed with milk and vanilla. The embellishments are endless!
How long does it take to bake red velvet cinnamon rolls?
Bake the cinnamon rolls in a preheated oven at 375°F for about 20–25 minutes, or until they are golden brown. Baking time can vary by oven, so keep an eye on them to achieve the perfect texture.
Variants Section
- Instead of traditional filling, add a layer of Nutella for a chocolate hazelnut twist to your red velvet rolls.
- Combine a drizzle of orange zest-infused icing for a citrusy balance to the rich flavors.
- Include white chocolate chips in your filling for a richer, more decadent treat.
- Swap out cocoa powder in the dough for matcha powder to create a unique green velvet cinnamon roll.
- Transform your rolls into sticky cinnamon buns by adding a sticky caramel sauce at the bottom of the baking dish before placing the rolls.
- Incorporate shredded coconut into your filling for a tropical twist.
- For seasonal flavors, consider adding pumpkin spice during the fall for a festive variation.
Conclusion
Heavenly red velvet cinnamon rolls are more than just a dessert; they bring comfort, joy, and indulgence to your table. The vivid colors and rich flavors invite everyone to gather and share in a delicious experience that’s hard to resist. The combination of light, fluffy dough and the enticing aroma of cinnamon together create a memorable dish that holds a special place in any kitchen.
Try this red velvet cinnamon rolls recipe tonight — your kitchen will smell amazing, and everyone will ask for seconds.


