**Prep time:** 30 minutes
**Cook time:** 10 minutes
**Total time:** 40 minutes
**Servings:** 12 cookies
When the holidays roll around and the chill in the air intensifies, what better way to celebrate than with some adorable **Melted Snowman Cookies**? Have you ever seen cookies that are cute, whimsical, and delicious all at once? These cookies genuinely fit the bill! They not only look like delightful little snowmen but also bring a smile to anyone who sees them and a burst of cheer when they take a bite.
These cookies are perfect for holiday parties, bake sales, or even just to brighten up a cold winter afternoon. They consist of a soft, chewy cookie base topped with a layer of white royal icing to create the appearance of a melting snowman. You can also allow your creativity to flow when decorating them. Each snowman can have its own personality based on the decorations you choose!
In this recipe, you’ll learn how to make these fun and festive cookies from scratch, including tips on making the perfect royal icing and adding details that will make your melted snowman cookies unforgettable. So, roll up your sleeves and let’s dive into the world of baking these delicious winter treats!
What Are Melted Snowman Cookies?
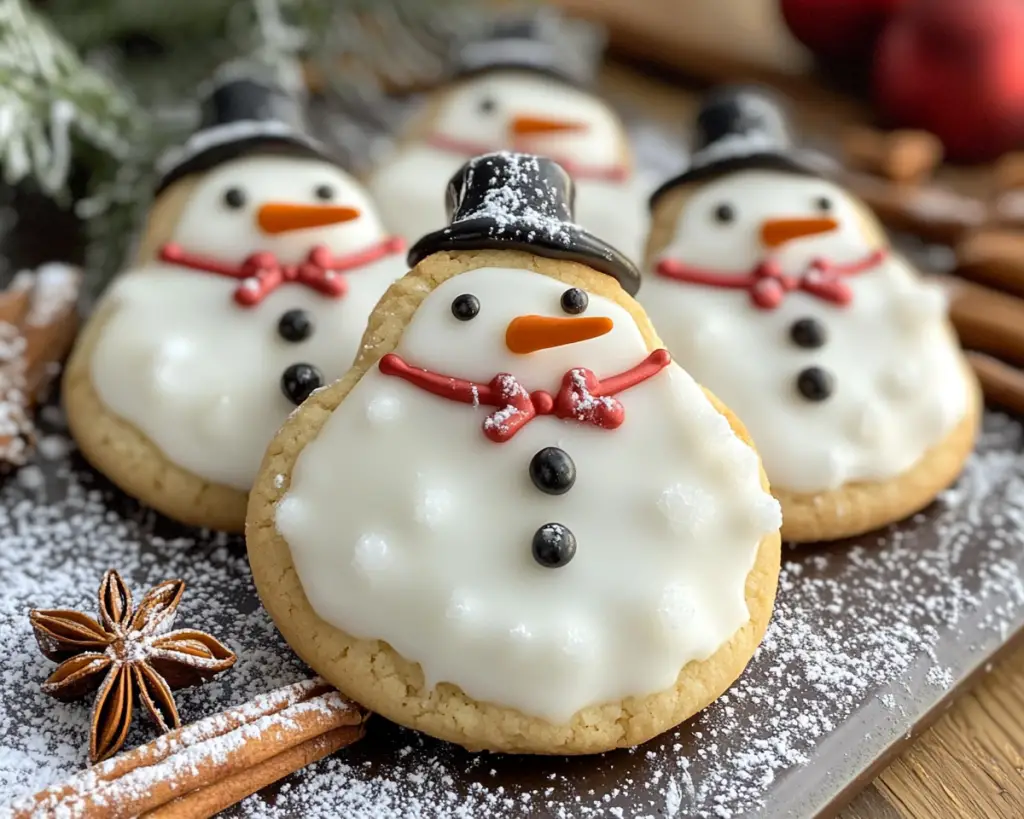
Melted Snowman Cookies are a creative dessert that captures the spirit of the winter season. Originating from playful holiday baking trends, these cookies typically consist of a **sugar cookie base** that’s decorated to look like a snowman sliding down in a puddle of melting snow. The cookie base is often soft and tender, giving it a delightful bite that pairs wonderfully with the sweet royal icing.
The texture of the cookies is chewy and buttery, offering a lovely contrast to the smooth and glossy royal icing. The icing resembles melting snow, while chocolate chips or candy pieces serve as the eyes, mouth, and nose of each snowman, helping to create a whimsical, cartoonish effect. Whether you’re baking with children or simply looking to impress guests at your next holiday gathering, these cookies bring smiles and a sense of joy that’s hard to resist.
Why You’ll Love This Melted Snowman Cookies Recipe
There are numerous reasons to love these Melted Snowman Cookies! First and foremost, they are incredibly **fun** to make. You can unleash your creativity when decorating each snowman, giving each cookie its unique personality. It’s an excellent activity for families, especially for families with children on winter break. This recipe also allows for **flexibility**; you can customize the decorations based on your preferences or available ingredients.
In addition to their **visual appeal**, these cookies are also a delight to eat. The buttery, soft cookie combined with the sweet, sugary icing makes every bite feel festive and joyous. They’re not only visually appealing but also quite **simple to make**, making them perfect for beginner bakers. You can whip them up in no time, allowing you to share a batch with friends or loved ones without spending a whole day in the kitchen.
Moreover, they are a great way to embrace the holiday spirit! By incorporating your children or friends in the decorating stage, you can create wonderful memories while bonding over shared experiences. And let’s not forget about the **aroma** that fills your home while baking—nothing can elevate the mood during the colder months quite like the scent of freshly baked cookies.
Ingredients You’ll Need
Here’s a quick list of the ingredients needed to whip up these delightful Melted Snowman Cookies:
– **2 ¾ cups all-purpose flour**: Provides the structure for the cookies.
– **1 teaspoon baking powder**: Helps the cookies rise slightly and gives them a fluffy texture.
– **½ teaspoon baking soda**: Assists with leavening and contributes to the cookie’s softness.
– **1 cup unsalted butter, softened**: Adds richness and moisture to the dough.
– **1 cup granulated sugar**: For sweetness and helping create the right texture.
– **1 cup powdered sugar**: Used in the royal icing for that smooth, glossy finish.
– **1 large egg**: Binds the ingredients together and provides moisture.
– **1 teaspoon vanilla extract**: Enhances the flavor of the cookies.
– **½ teaspoon salt**: Balances the sweetness of the cookies.
– **Royal icing ingredients**: 2 large egg whites and 4 cups powdered sugar (for the frosting effect), plus optional food coloring for decoration.
Each ingredient plays a crucial role in the overall flavor and texture of the cookies. For example, the balance of granulated and powdered sugar ensures that the cookies are sweet but not overwhelmingly so, while the butter and egg contribute to the tender, melt-in-your-mouth texture. If you need alternatives, consider using gluten-free all-purpose flour for a gluten-free option or substituting the unsalted butter with a dairy-free alternative for a vegan version.
How to Make Melted Snowman Cookies
Now that you have your ingredients ready, let’s get started with the step-by-step instructions to make these delightful cookies!
1. **Prepare Your Oven and Baking Sheets**
Preheat your oven to 350°F (175°C) and line two baking sheets with parchment paper. This step helps the cookies bake evenly while preventing them from sticking to the pan. Make sure the oven has reached the desired temperature before placing your cookies inside to ensure they bake correctly.
2. **Mix Dry Ingredients**
In a large mixing bowl, whisk together 2 ¾ cups of all-purpose flour, 1 teaspoon of baking powder, ½ teaspoon of baking soda, and ½ teaspoon of salt. Mixing these dry ingredients together first ensures that the leavening agents are evenly distributed, which is vital for achieving an even texture throughout the cookies.
3. **Cream Butter and Sugars**
In another bowl, use an electric mixer to cream 1 cup of softened unsalted butter with 1 cup of granulated sugar and 1 cup of powdered sugar on medium speed. This process should take about 2-3 minutes and will help create a light, fluffy mixture. Creaming the butter and sugars together also creates air pockets, which aids in achieving a soft cookie texture.
4. **Add Egg and Vanilla**
Beat in 1 large egg and 1 teaspoon of vanilla extract until thoroughly combined. The egg acts as a binder, giving the cookies structure, while the vanilla extract enhances their flavor profile. Mix until the mixture appears smooth and uniform.
5. **Combine Wet and Dry Ingredients**
Gradually add the flour mixture to the butter mixture about a cup at a time. Stir until just combined, being careful not to overmix. Overmixing can lead to tough cookies, so just mix until you can no longer see flour streaks in the dough.
6. **Shape the Cookie Dough**
Using your hands or a cookie scoop, take approximately 2 tablespoons of dough and roll it into a ball. Place the dough balls on the prepared baking sheets about 2 inches apart. The dough will spread while baking, so spacing is essential.
7. **Bake the Cookies**
Place the baking sheets in the preheated oven and bake for about 8-10 minutes. You want the edges to be lightly golden while the centers remain soft. The cookies will continue to cook slightly even after coming out of the oven, so it’s better to take them out while they still look a little underbaked.
8. **Cool and Prepare for Icing**
Let the cookies cool on the baking sheets for about 5 minutes before transferring them to a wire rack to cool completely. It’s necessary for the cookies to be completely cool before icing, as warm cookies can cause the icing to melt and run off.
9. **Make Royal Icing**
To make the royal icing, beat together 2 large egg whites in a clean bowl until frothy. Gradually add 4 cups of powdered sugar until the mixture is thick and holds stiff peaks. If you’d like to tint the icing, divide it into separate bowls and add food coloring as desired.
10. **Decorate Your Melted Snowman Cookies**
Using a piping bag or a spoon, spread a generous amount of royal icing over the surface of each cookie to resemble a puddle of melted snow. Let this layer dry for about 10 minutes. Next, add smaller bits of icing to create snowman features such as eyes (using chocolate chips or mini candies), a nose (using orange frosting or candy corn), and buttons or a mouth. You can express your creativity here, letting each snowman have distinct expressions!
11. **Dry and Set**
Allow the decorated cookies to sit at room temperature until the royal icing fully dries and hardens, which may take a couple of hours. This step is crucial to creating a solid surface that will help maintain the look of your melted snowman.
12. **Enjoy and Share**
Once the icing has hardened, your Melted Snowman Cookies are ready to be enjoyed! They make a great gift for friends and family and are also a perfect addition to a holiday cookie platter. Don’t forget to share pictures of your creations on social media; these cookies are Instagram-worthy and sure to draw attention!
5 Variations & Substitutions
To customize your Melted Snowman Cookies further, consider the following variations and substitutions:
1. **Chocolate Chip Variation**
For a richer flavor, add ½ cup of semi-sweet or dark chocolate chips to the dough. Chocolate chip melted snowmen will provide an additional layer of indulgence, and the combination of chocolate and vanilla will tantalize your taste buds. This variation is perfect for chocolate lovers looking to mix things up.
2. **Gluten-Free Option**
Substitute the all-purpose flour with a 1:1 gluten-free flour blend to make these cookies gluten-free. Ensure that it contains xanthan gum or add a teaspoon of xanthan gum if it doesn’t. Friends and family who are gluten-intolerant will appreciate this option, allowing everyone to enjoy a sweet treat together.
3. **Different Shapes**
Instead of round cookies, use cookie cutters to shape dough into other winter-themed characters, such as stars, snowflakes, or even traditional gingerbread men. This allows more creativity while serving the same delicious flavor profile. These shapes can be decorated similarly with royal icing, aligning perfectly with the festive theme.
4. **Vegan-Friendly Version**
You can replace the butter with a dairy-free alternative and substitute the egg with a flaxseed egg (1 tablespoon of ground flaxseed mixed with 2.5 tablespoons of water, left to sit until thick) or applesauce (¼ cup). This will allow those following a vegan diet to indulge without compromising their dietary restrictions.
5. **Alternative Icing**
If you find royal icing daunting, you can use store-bought frosting instead. This option is ideal for beginners; simply spread a layer of frosting over the cooled cookie and decorate as desired. Using colored frostings can also provide a unique and playful look to your snowmen.
Common Mistakes to Avoid
When preparing Melted Snowman Cookies, there are pitfalls that can prevent your baking from being successful. Here we share some common mistakes you may encounter and helpful tips to avoid them:
– **Overmixing the Dough**: Combining the ingredients too much can result in tough cookies. When mixing the dry ingredients into the wet mixture, aim to mix until just combined. You may notice small lumps of flour, which is fine; they will bake out.
– **Not Chilling the Dough**: If you live in a warm climate or if your dough seems particularly soft, consider chilling it in the fridge for 15-30 minutes before rolling. Chilling helps the cookies keep their shape during baking and results in a thicker, somewhat denser cookie.
– **Using Warm Dough**: It’s important to let your cookies cool entirely before frosting. Frosting warm cookies can cause the icing to run off the sides, ruining the melted snowman effect. Patience is key here!
– **Incorrect Baking Time**: Keep an eye on your cookies as they bake. Ovens may vary widely in temperature, and it’s always better to err on the side of underbaking slightly. You want them to be set around the edges before removing them.
– **Icing Consistency**: If your royal icing is too runny, it may slide off the cookies instead of staying put. Conversely, if it’s too thick, it won’t spread easily. Aim for a consistency similar to toothpaste; it should hold its shape but still flow easily. Don’t hesitate to add a touch more powdered sugar or water to adjust as needed.
Storage, Freezing & Reheating Tips
To properly store your Melted Snowman Cookies and keep them tasting fresh, follow these guidelines:
– **Room Temperature Storage**: Once your decorated cookies are completely dry, store them in an airtight container at room temperature. They should retain their freshness for up to one week.
– **Freezing Cookies**: If you want to prepare these cookies in advance, you can freeze them. Bake and cool the cookies completely, then freeze them in a single layer on a baking sheet. Once frozen, transfer them to an airtight freezer-safe container with parchment paper between layers to keep them from sticking. They will last in the freezer for up to three months.
– **Icing and Freezing**: It’s best to freeze plain cookies and add the decorations when you are ready to serve them. This way, the icing will stay fresh and maintain its aesthetic appeal.
– **Reheating Tips**: If you need to revive your cookies after freezing, let them thaw in the container at room temperature for a few hours. If you’d like to warm them slightly, reheat in a microwave for about 10 seconds—be careful not to overdo it, as warm cookies can soften the royal icing.
Frequently Asked Questions
1. **Can I use store-bought cookie dough for these cookies?**
Yes, you can use store-bought sugar cookie dough for convenience! While making your dough from scratch offers a deeper flavor, using pre-made dough can save time without sacrificing too much on taste.
2. **How long does it take for the royal icing to dry?**
The royal icing typically takes about 1-2 hours to set completely, but this can vary based on humidity levels. It’s good practice to allow the cookies to dry overnight if possible, especially if you plan on stacking them for storage.
3. **Can I use meringue powder instead of egg whites for icing?**
Absolutely! If you’re concerned about raw egg whites, meringue powder is a great alternative. Mix 1 tablespoon of meringue powder with 2 tablespoons of water for equivalent egg whites in your icing.
4. **What can I do if my royal icing is too runny?**
If your icing is too runny, you can add more powdered sugar gradually until you reach the desired consistency. Conversely, if it’s too thick, add a few drops of water to thin it slightly, mixing well until you achieve a smooth, spreadable texture.
5. **How can I add flavor to the cookie dough?**
You can enhance flavor by incorporating extracts such as almond, lemon, or peppermint. A teaspoon or two of your favorite flavors added to the wet ingredients can elevate the cookie’s taste while adding a festive twist!
In conclusion, these Melted Snowman Cookies are not just a treat; they’re a winter celebration on a plate! They bring joy to the holiday season and are a fantastic way to create memories with family and friends. Whether you are making these adorable cookies for yourself, to share with others, or to bake with loved ones, I encourage you to give this recipe a go. Customize it, make it your own, and revel in the happiness these little snowmen can spread. Happy baking!


