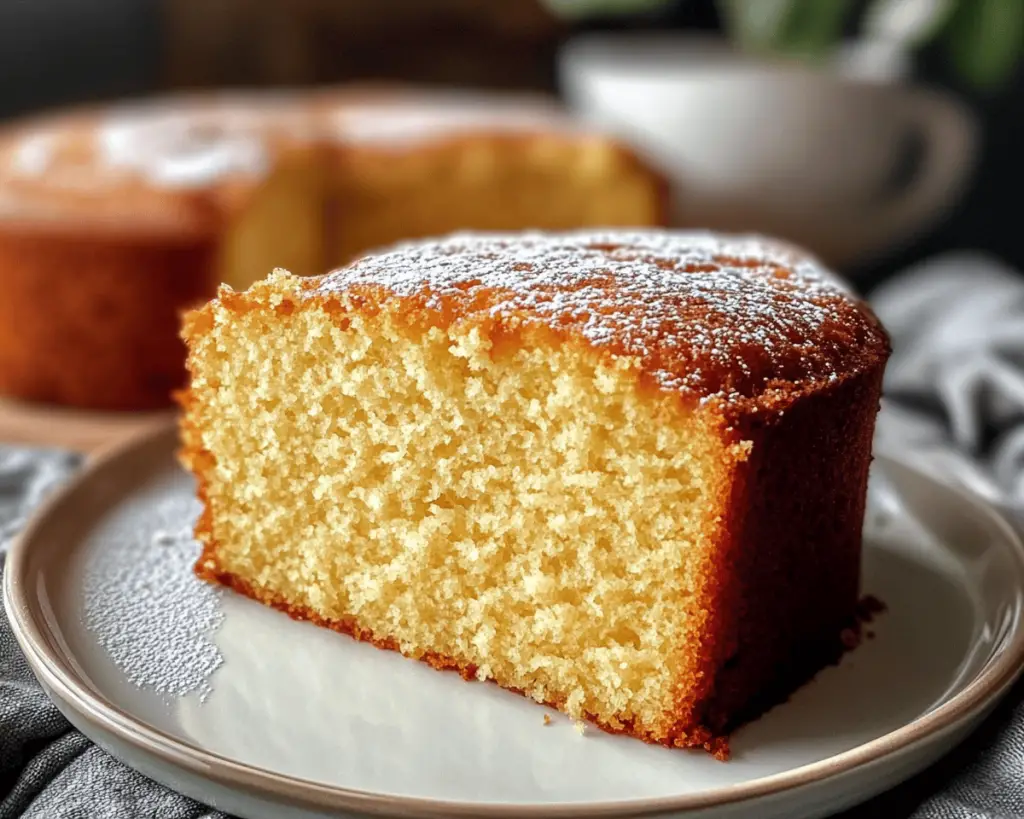
I remember the first time I made a vanilla buttermilk cake—it was a rainy Saturday, and I felt an unexplainable urge to fill my cozy kitchen with the sweet aroma of baking. Honestly, it was one of those days when the skies were gray, and the world felt a bit somber, but I knew that in some small way, I could brighten it up. There’s something magical about the act of baking that, for me, transforms not just the kitchen but also the heart.
I channeled a bit of my grandmother as I whisked together the ingredients. She was the queen of comfort food, and her vanilla cake recipe was legendary in our family. As I followed the handwritten notes filled with flour smudges and joyful doodles, I felt that familiar sense of warmth wash over me. This wasn’t just about the cake; it was about memories, love, and connection. And let me tell you, that first slice was nothing short of heavenly. It was moist, it was fluffy, and, most importantly, it tasted like a hug in cake form.
Through the years, I’ve baked countless vanilla buttermilk cakes, each one an adventure with its quirks and improvisations. I’ve refined the journey—finding joy in the mishaps and discovering a few secrets that guarantee perfection every time. There’s something thrilling knowing you’ve stumbled upon a method, a little tip that can elevate a humble cake into something divine. So, grab your mixing bowl, and let’s dive into the delightful world of making the perfect moist vanilla buttermilk cake!
What Goes Into Moist Vanilla Buttermilk Cake?
You might be wondering what really goes into making this glorious cake, and let me tell you, it’s a straightforward list with some little tricks that bring it to life. Here’s what I swear by:
All-Purpose Flour: This is your base. I always reach for a good quality brand. You could use cake flour if you want an extra-light cake, but it’s not necessary. Just don’t overmeasure, or you might end up with a dense disaster. I like to fluff my flour up first, aerating it a bit before I scoop it—small things like this can make a huge difference.
Granulated Sugar: The sweet symphony! Sugar not only sweetens the cake but also provides structure. I typically use a little less than what some recipes call for; you know, trying to strike that delicate balance between sweet and too sweet. But don’t leave it out—you’ll regret it!
Baking Powder and Baking Soda: Here’s your leavening dream team! They’re crucial in creating that fluffy texture we all love. I always check my baking powder for freshness. If you’ve had it for more than a year, it might be time to toss it. Nothing worse than a flat cake!
Salt: A pinch of salt is essential. It enhances all the flavors and balances the sweetness. I just sprinkle a bit into my dry ingredients. It might feel like a small thing, but it’s like adding a whisper of magic.
Buttermilk: This is one of my favorite secret weapons! It adds not only moisture but also a delightful tang that gives the cake flavor depth. I always have a carton on hand. If you’re ever out, a quick substitute of regular milk mixed with a tablespoon of vinegar will work as well—and trust me, you can totally make it work!
Unsalted Butter: I love the creaminess it adds. I use it at room temperature, ideally, to cream with the sugar correctly. If you ever forget to take it out ahead of time (guilty as charged!), a quick 10-second zap in the microwave can sometimes do the trick. But watch out—don’t melt it!
Eggs: They help in binding everything together and adding moisture. Room temperature eggs are the way to go, as they incorporate more smoothly into the batter. I’ve tried using cold eggs before, and the mixture didn’t come together as it should. Seriously, room temp for the win!
Vanilla Extract: Not just any vanilla extract will do; I like to use pure vanilla extract. It has a richness that imitation vanilla simply can’t match. A spoonful can whisk you away to a tropical paradise, where vanilla beans grow in sun-kissed fields.
That’s the lowdown on the ingredients, but don’t be afraid to play with them a little. This cake loves to be adapted, and sometimes it’s those little tweaks that make it yours.
Is Moist Vanilla Buttermilk Cake Actually Good for You?
Let’s be real here: this cake isn’t exactly health food. It’s a celebration and a comfort, and sometimes indulging is a part of what makes life delicious. That being said, there are a few little virtues hiding within this beauty. The **buttermilk** adds a unique tang and moisture that’s lighter than some heavy frostings or other decadent cakes. Plus, it contains probiotics that can be beneficial for gut health—score one for baking!
Of course, let’s not gloss over the sugar and butter—those lovers of sweetness that create the moisture and tenderness we all adore. Everything in moderation, right? It’s a treat, and treats are meant to be enjoyed. Share it, savor it, and if you’re feeling extra generous, consider adding some fruit on the side as a little health boost.
Here’s What You’ll Need
– **2 cups all-purpose flour** (plus extra for dusting the pan)
– **1 ½ cups granulated sugar**
– **1 tablespoon baking powder**
– **½ teaspoon baking soda**
– **½ teaspoon salt**
– **1 cup buttermilk**, room temperature
– **½ cup unsalted butter**, softened to room temperature
– **3 large eggs**, room temperature
– **2 teaspoons pure vanilla extract**
This is what I use for a simple, classic cake that serves about 8. If you’re having a gathering, you might want to double it. Trust me, you won’t have leftovers!
How to Make Moist Vanilla Buttermilk Cake Step-by-Step
1. **Preheat the Oven:** First thing’s first, preheat your oven to 350°F (175°C). I always make sure to do this before anything else. There’s nothing worse than having a cake batter sitting around because you forgot to crank up the heat.
2. **Prepare Your Cake Pan:** Grease and flour a 9×13 inch baking pan. I’ve learned that using the parchment paper trick—lining the bottom of the pan—is a game-changer for easy release. It’s a small step that saves you from tears when your cake sticks.
3. **Mix Dry Ingredients:** In a medium bowl, whisk together that lovely **flour**, **baking powder**, **baking soda**, and **salt**. This step is important because it ensures an even distribution of the leavening agents. A well-mixed dry ingredient base contributes to the magic!
4. **Cream the Butter and Sugar:** In a large bowl, use an electric mixer to cream the **butter** and **sugar** together on medium speed for about 3-4 minutes until it’s light and fluffy. Seriously, don’t rush this step; it pays off in texture. You want it to turn a pale yellow.
5. **Add the Eggs:** One by one, crack in those **eggs**, mixing well after each addition. This is often where I start to feel like a pro. Watching it transform into a luscious mixture is everything.
6. **Introduce the Vanilla:** Pour in the **vanilla extract**, and mix just until combined. The smell? Oh my gosh, it’ll make your heart swoon.
7. **Alternate the Dry Ingredients and Buttermilk:** Here comes the fun part! You’ll want to add the dry mixture to the butter mixture in three parts, alternating with the **buttermilk**. Start and end with the dry ingredients, mixing just until combined after each addition. Don’t overmix; it’s okay if a few lumps remain.
8. **Pour and Smooth:** Pour the batter into the prepared pan and use a spatula to smooth out the top. It’s not a beauty contest, but we want it to look welcoming!
9. **Bake:** Pop it in the preheated oven and bake for 30-35 minutes or until a toothpick comes out clean. Start checking at around 30 minutes, so it doesn’t dry out. Your kitchen is going to smell like heaven!
10. **Cool:** Let it cool in the pan for about 10 minutes, then gently turn it out onto a wire rack to cool completely. I sometimes dunk a fork in and sneak a bite when it’s still warm—you can’t help it!
Little Extras I’ve Learned Along the Way
Here are a few tricks and variations I’ve picked up while baking this cake over the years:
– **Frosting or Glaze:** While it’s perfectly delicious on its own (with a dusting of powdered sugar for a touch of elegance), a simple glaze made with powdered sugar and milk, or a cream cheese frosting, can take it to new heights. I sometimes add a hint of lemon to the glaze for a refreshing twist.
– **Add-ins:** Want to change things up? Toss in some **chocolate chips** or **nuts** for texture. Dried fruits like cranberries or cherries also add an unexpected burst of flavor.
– **Zest:** A bit of citrus zest—like lemon or orange—can brighten everything up. Just mix it in with the wet ingredients for that citrus kick.
– **Layering it Up:** If you’re in the mood for something fancy, consider making a layered cake by whipping up some extra batter and splitting the layers with frosting or fresh fruit.
– **Store it Right:** This cake keeps super well—just wrap it in plastic wrap and store at room temperature for 3 days, or in the fridge for up to a week. I’ve been known to freeze slices for a rainy day, too. Nothing beats pulling out a slice to enjoy with your coffee on a quiet morning!
I remember one time trying this cake at a family gathering, and someone suggested turning it into a trifle with layers of whipped cream, berries, and cake. Totally divine!
This recipe means a lot to me—so much more than just a delicious dessert. It has been present for birthdays, rainy afternoons, and even a few celebrations that felt too small to mention but were monumental nonetheless. If you haven’t tried it yet, I genuinely hope you give it a go. Don’t let the perfect image of a cake intimidate you; embrace the process and celebrate the imperfections, just like I did.
Let me know how yours turns out—I’d love to hear about your version or any special twists you added. Happy baking!