Prep time: 30 minutes
Cook time: 35 minutes
Total time: 1 hour 5 minutes
Servings: 12
Imagine the aroma of rich chocolate filling your kitchen, wafting through the air as you prepare a decadent cake that will undoubtedly become a treasured family recipe. As we celebrate special moments like Mother’s Day, the desire to create something beautiful and delicious is only natural. This classic chocolate cake is not just any recipe; it’s a legacy, a sweet symbol of love and tradition passed down through generations. You’ll learn not just how to make an amazing chocolate cake but also how to adapt it to suit various tastes, troubleshoot potential mishaps, and store it for future enjoyment.
From the playful hands of children challenging their culinary skills to busy parents wanting to whip up a special dessert, this chocolate cake is flexible and accommodating. Let’s dive into the world of this delightful dessert, exploring its origins, its rich texture, and how you can make it your own.
What Is Mother’s Day Classic Chocolate Cake?
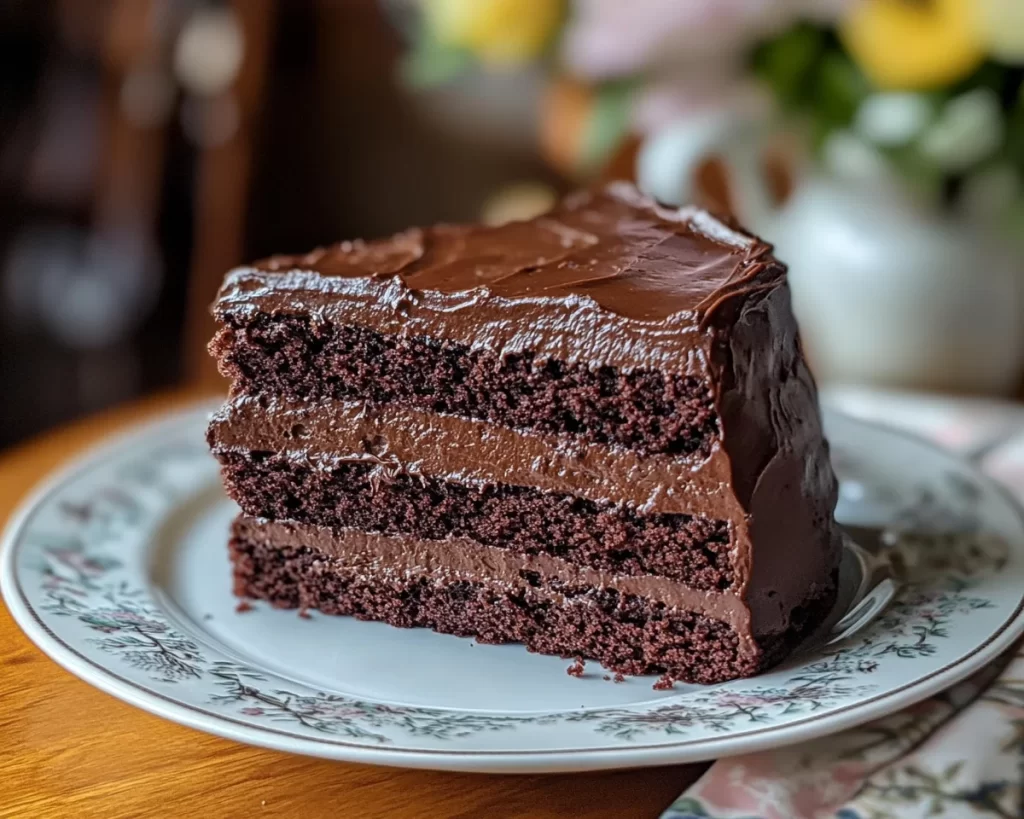
Mother’s Day Classic Chocolate Cake is not merely a dessert but a heartfelt creation that encapsulates warmth and nostalgia. Originating from traditional baking methods, this rich chocolate cake boasts a moist texture paired with an indulgent chocolate flavor that leaves a lasting impression on every palate. Its composition typically consists of flour, cocoa powder, sugar, eggs, butter, and a few key ingredients that elevate the cake to a delightful experience.
When you slice through this cake, you’ll notice its beautiful crumb structure, which complements its dense moisture. The chocolate flavor is deep and satisfying, striking a perfect balance between sweetness and richness. Wherever you serve it, whether at a family gathering or an intimate celebration, this cake has a universal appeal that makes it a much-loved choice. It is often adorned with creamy chocolate frosting, which only enhances its delightful essence.
The cake has evolved over the years, adjusting to various personal touches and new trends in the culinary world. From different types of chocolate to added flavors like vanilla or coffee, you can personalize it in ways that reflect your family’s unique tastes. Making this cake is not merely about baking; it’s about creating memories, connecting with loved ones, and embracing the joy of cooking.
Why You’ll Love This
There’s a multitude of reasons why you’ll fall head over heels for this classic chocolate cake. First and foremost, its taste is absolutely divine, with every bite delivering a chocolate experience that feels luxurious yet familiar. The ease of preparation makes it accessible for new bakers, allowing anyone to achieve spectacular results without hours of intricate work. Cooked within just over an hour, it stands as a practical dessert ideal for busy schedules, yet elegant enough to impress guests.
Moreover, the ingredients are generally cost-effective, ensuring you don’t break the bank while baking. This recipe allows for flexibility, with substitute options readily available for those who might face dietary restrictions or preference changes. You may choose to add ingredients like nuts, fresh fruits, or even switch to alternative sweeteners; the possibilities are endless!
While some may incorrectly assume homemade cakes are intimidating, this recipe proves otherwise. It demystifies baking, turning it into an enjoyable activity for families or even solo cooks wanting to unwind. This classic cake invites beginners to experiment without a fear of failure, giving you a rewarding experience.
Ingredients You’ll Need
- All-Purpose Flour: The backbone of the cake, providing structure. You can substitute with gluten-free flour blends if necessary.
- Cocoa Powder: Unsweetened cocoa powder gives depth to the chocolate flavor. Dutch-processed cocoa can provide a milder taste and a darker color.
- Sugar: Granulated sugar adds sweetness; you may use brown sugar for a hint of caramel flavor.
- Baking Powder: This leavening agent creates the cake’s fluffy structure. Ensure it is fresh for optimal rise.
- Baking Soda: Used in conjunction with acidic ingredients, it helps the cake rise and develop a tender crumb.
- Salt: Balances the sweetness while enhancing the flavor of chocolate.
- Butter: Unsalted butter adds richness and moisture. Substitute with oil or vegan butters if needed.
- Eggs: Integral for binding and moisture. If you require a vegan option, flax eggs or aquafaba can work as substitutes.
- Buttermilk: This adds tang and moisture; you can substitute with milk+vinegar or yogurt for similar effects.
- Vanilla Extract: A splash of vanilla enhances the overall flavor of the chocolate.
Knowing the roles of each ingredient gives you the power to make adjustments based on availability or dietary needs. For instance, opting for dark chocolate over cocoa powder can provide an even richer taste.
How to Make
1. **Preheat Your Oven**: Begin by preheating your oven to 350°F (175°C). This ensures that your cake bakes evenly and rises perfectly. Grease and flour two 9-inch round cake pans, or line them with parchment paper for easy removal later.
2. **Mix the Dry Ingredients**: In a large mixing bowl, combine the all-purpose flour, cocoa powder, baking powder, baking soda, and salt. Whisk them together to ensure an even distribution of the leavening agents. This crucial mixing process helps avoid any lumps of cocoa or flour in the final batter.
3. **Cream the Butter and Sugar**: In another bowl, beat the unsalted butter and granulated sugar together until light and fluffy. This can take about 3-4 minutes with an electric mixer on medium speed. The goal is to incorporate air into the mixture, resulting in a lighter cake.
4. **Add the Eggs**: Blend in the eggs, one at a time, ensuring each is fully incorporated before adding the next. This step adds the necessary moisture to the batter and helps create a well-emulsified mix.
5. **Incorporate the Buttermilk and Vanilla**: Mix in the buttermilk and vanilla extract until combined. This adds richness and moisture, crucial for a luscious cake texture.
6. **Combine Wet and Dry Ingredients**: Gradually add the dry ingredients into the wet mixture, alternating with the buttermilk. Begin and end with the dry ingredients. Mix until just combined; over-mixing can lead to a dense cake, which is a common mistake made by beginners. Your batter should be smooth with no visible lumps.
7. **Divide the Batter**: Pour the batter evenly into the prepared cake pans. Gently tap each pan on the counter to release any air bubbles that may be trapped.
8. **Bake**: Place the pans in the preheated oven and bake for 30-35 minutes or until a toothpick inserted into the center comes out clean. The cakes should spring back when lightly touched and will have a rich aroma filling your kitchen.
9. **Cool**: Once baked, remove the cakes from the oven and let them cool in the pans for about 10 minutes. Then, carefully remove from pans and transfer to a wire rack to cool completely before frosting. This cooling process is essential to avoid melting your frosting.
10. **Frost and Decorate**: Once cooled, frost with your favorite chocolate frosting, allowing the cake’s rich layers to shine through. You can also adorn the cake with chocolate shavings, berries, or even a sprinkle of sea salt for a sophisticated touch.
Following these steps thoughtfully not only yields a stunning cake but also immerses you in the therapeutic process of baking, turning what could be a simple task into a rewarding family activity.
Variations & Substitutions
Chocolate Mint Variation: Incorporating a mint infusion transforms your traditional chocolate cake into a refreshing dessert experience. To achieve this, simply add peppermint extract to your batter. Approximately 1 teaspoon is sufficient for a subtle yet impactful flavor. Mint chocolate lovers will appreciate this variation, especially when complemented with white chocolate frosting. The coolness of the mint pairs beautifully with the chocolate, refreshing the palate and pleasing the crowd.
Chocolate Coffee Variation: For the coffee enthusiasts, adding strong brewed coffee to your chocolate batter can intensify the chocolate flavor, creating a richer, more robust cake. Use a ratio of ½ cup of brewed coffee in place of buttermilk in the original recipe. The bitterness of the coffee will balance the sweetness of the chocolate, providing a sophisticated twist. This variation is excellent for adult gatherings or brunch events, and it can be paired with a light whipped cream for a wonderful finish.
Gluten-Free Chocolate Cake: For those with dietary restrictions, you can easily create a gluten-free version. Substitute all-purpose flour with a 1:1 gluten-free flour blend, ensuring it contains xanthan gum, which will help replicate the structure provided by gluten. Make sure other ingredients, like your baking powder and cocoa powder, are also gluten-free. The result will be equally delicious without sacrificing flavor.
Vegan Chocolate Cake: Crafting a vegan variant is straightforward. Substitute eggs with flax eggs (1 tablespoon of ground flaxseed mixed with 2.5 tablespoons of water per egg) and replace butter with vegan milk and oil (e.g., coconut oil or a plant-based butter). This allows everyone to enjoy a delicious chocolate cake while adhering to dietary preferences or restrictions.
Each of these variations allows you to explore and personalize your chocolate cake experience. Whether you want to decrease allergens, introduce exciting flavors, or follow dietary routines, the adaptability of this recipe ensures no one has to miss out on a delicious dessert.
Common Mistakes to Avoid
One of the most prevalent mistakes is **overmixing the batter**. While it’s essential to combine your ingredients, excessive mixing can lead to a dense cake. The incorporation of air is critical for a fluffy texture, so mix until just combined. Using an electric mixer can make this even easier, as it often leaves less room for overworking the batter.
Another common error is using cold ingredients. It’s crucial to let your eggs and buttermilk reach room temperature prior to use. This aids in better emulsification and creates a smoother batter. When cold ingredients are added, the batter can seize up, leading to uneven baking and a compromised texture.
Additionally, **incorrect oven temperature** can ruin even the best chocolate cake. Make sure to preheat the oven, utilizing an oven thermometer to verify its accuracy. An oven that’s too hot could scorch the cake, while one that’s not hot enough can lead to undercooking.
Finally, failing to properly cool the cakes before frosted can result in melting frosting. Always let your cakes cool completely; this ensures your final creation not only looks stunning but also tastes delectable. Baking should be a pleasure, and being aware of these simple mistakes can significantly enhance your experience.
Storage, Freezing & Reheating Tips
Proper storage is vital in maintaining the quality of your Mother’s Day Classic Chocolate Cake. If you’ve made the cake ahead of time or have leftovers, you can keep it at room temperature for up to two days, provided it’s covered with a cake dome or wrapped in plastic wrap. This will preserve its moisture and prevent it from drying out.
If you plan to store it longer than that, freezing is a great option. Wrap the cake tightly in plastic wrap, then place it in an airtight container or freezer bag to avoid freezer burn. It can be frozen for up to three months. When ready to enjoy, simply thaw the cake overnight in the refrigerator and bring it to room temperature before serving.
When it comes to reheating cake slices, do so carefully. A quick 10-15 second burst in the microwave may warm it gently, allowing you to enjoy that fresh-baked taste. However, be cautious not to overheat, as this can lead to dryness.
Always adhere to food safety best practices, ensuring that the cake has not sat out for more than two hours at room temperature. This will help prevent any potential foodborne illnesses.
Frequently Asked Questions
Can I use a different type of frosting for this cake?
Absolutely! While chocolate frosting complements this cake beautifully, you can certainly use cream cheese frosting, vanilla buttercream, or even a whipped ganache. The choice ultimately rests on personal preference; just remember that a contrasting flavor can elevate the overall dessert experience.
Is there a way to make this cake healthier?
You can modify the recipe to make it lighter by using unsweetened applesauce as a fat substitute. Additionally, you might consider using a natural sweetener like honey or maple syrup instead of granulated sugar. Keep in mind that these modifications may alter the original texture and flavor, but experimenting can lead to delightful results.
How do I know when my cake is done baking?
The best way to test a cake’s doneness is by performing the toothpick test. Insert a toothpick or cake tester into the center of the cake; if it comes out clean or with a few moist crumbs attached, it’s done. If the batter sticks to the toothpick, it likely needs more time in the oven.
Can I make this cake ahead of time for a special occasion?
If you’re planning ahead, this cake can be baked a few days in advance. Just make sure to wrap it well to keep it fresh. Frost it on the day of your celebration for the best results, especially if using cream-based frostings.
What type of chocolate should I use for the frosting?
For the frosting, high-quality semisweet or dark chocolate is often recommended. It enhances the richness of the frosting and balances beautifully with the cake. If you prefer a sweeter option, milk chocolate can also work, but it may alter the overall flavor profile slightly.
Conclusion:
This Mother’s Day Classic Chocolate Cake stands as more than just a dessert; it’s a celebration of flavors, memories, and love. With every bite, you’re not only indulging in a delightful treat but also crafting a tangible reminder of cherished moments spent together. I encourage you to try this recipe, customize it with flavors that resonate with your loved ones, and share the joy that comes with baking. Whether you’re marking a special occasion or simply want to spoil yourself, this chocolate cake is sure to leave a lasting impression. Dive in, enjoy the process, and don’t forget — sharing is the sweetest part of any recipe.


