Prep time: 30 minutes
Cook time: 20 minutes
Total time: 50 minutes
Servings: 10-12
When you think of Mother’s Day, what comes to mind? Perhaps the aroma of freshly baked goods wafting through your house or a smile on your mother’s face as she receives a heartfelt gift. One of the most delightful gifts you can make for your mum is a stunning bouquet of vanilla cupcakes, lovingly crafted to celebrate her special day. This Mother’s Day Vanilla Cupcake Bouquet not only looks beautiful but also tastes incredible. With fluffy, moist cupcakes topped with creamy buttercream, it’s a delightful treat that satisfies both the eyes and the palate. In this recipe, you will learn how to create this amazing treat from scratch, explore different flavors and toppings, and get to know some handy tips to make the process seamless.
The beauty of this bouquet is not just in its looks but in its versatility as well. Whether you’re a beginner in the kitchen or a seasoned baker, you’ll find this recipe approachable and enjoyable. Not only will you be creating a visual centerpiece, but you’ll also be filling your home with the warm, inviting scent of vanilla and sweetness. Join me on this delightful adventure as we explore the art of cupcake bouquets, sharing tips and tricks that will make your baking experience one to remember.
What Is Mother’s Day Vanilla Cupcake Bouquet?
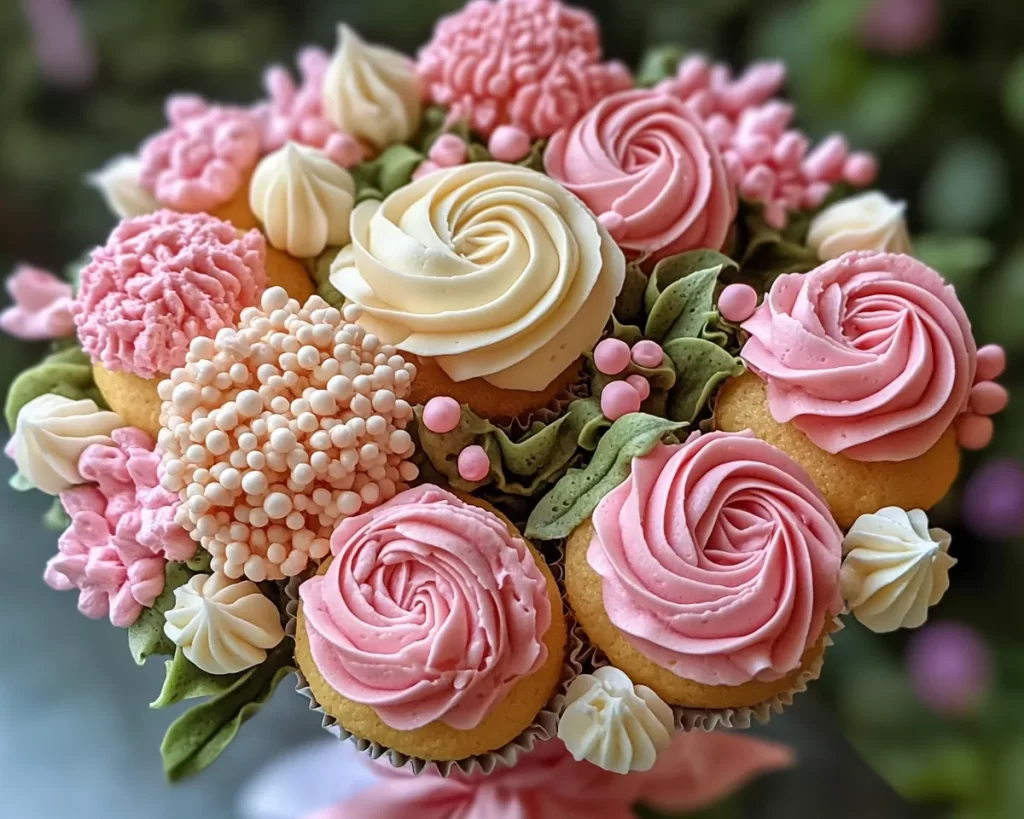
The Mother’s Day Vanilla Cupcake Bouquet is a creative and visually appealing dessert that serves as both a gift and a treat. This dish typically consists of several individual vanilla cupcakes that are arranged in a way that resembles a lovely bouquet of flowers. The magic lies in the **texture** of the cupcakes; they should be light and fluffy with a moist crumb that pairs beautifully with the rich flavor of **vanilla buttercream frosting**.
In a world where store-bought gifts can seem impersonal, the cupcake bouquet shines as a heartfelt, handmade option. Imagine decadent, vanilla-flavored cupcakes standing tall in a pot or a vase, each topped with a swirl of pastel-colored frosting and perhaps even adorned with edible flowers. This combination of deliciousness and aesthetics creates an experience that is not just about eating but about celebrating. Each bite evokes memories of love and care, making this bouquet a meaningful gift for Mother’s Day or any special occasion.
Why You’ll Love This
There are countless reasons to fall in love with the Mother’s Day Vanilla Cupcake Bouquet. First and foremost, the **taste** is simply out of this world. The airy softness of the cupcake combined with the sweet and creamy **buttercream frosting** creates an explosion of flavors that are hard to resist. Secondly, the recipe is incredibly easy to follow, making it perfect for those who may be new to baking. Don’t let the fancy appearance fool you; this delightful treat doesn’t require professional baking skills.
Another huge benefit is the **cost-effectiveness** of making your own cupcake bouquet compared to purchasing one from a high-end bakery. You can create a stunning arrangement using affordable ingredients, and the sense of accomplishment you’ll feel after making it yourself is priceless. Moreover, this recipe allows for lots of **variations**, so whether you’re catering to dietary preferences or simply want to mix things up, there are easy adjustments you can make.
Lastly, the Mother’s Day Vanilla Cupcake Bouquet is a versatile dessert. While it’s perfect for Mother’s Day, it can also be tailored for birthdays, anniversaries, or any celebratory occasion. One common misconception about baking is that it’s too complicated or time-consuming, but with this recipe, you’ll discover that the joy of baking can be accessible and fulfilling.
Ingredients You’ll Need
- All-purpose flour: This serves as the backbone of the cupcakes, providing structure. You can substitute it with gluten-free flour for a gluten-free version.
- Granulated sugar: This adds sweetness and helps with the overall texture. Brown sugar can be used for a richer flavor.
- Baking powder: This is essential for the rise in your cupcakes. Make sure it’s fresh for the best results.
- Salt: A pinch of salt enhances the sweetness and balances the flavors.
- Unsalted butter: This creates a rich flavor and helps in making the cake tender. If you’re dairy-free, consider coconut oil or dairy-free butter.
- Eggs: These add moisture and richness. You can use flaxseed meal mixed with water as a vegan substitute.
- Vanilla extract: This is the star of the show, providing that beautiful vanilla flavor. For a stronger taste, you may use vanilla bean paste.
- Milk: Milk contributes to the cupcake’s moisture; feel free to replace it with almond milk or another non-dairy option.
- Powdered sugar: Essential for the frosting, giving it that sweet fluffiness. You can experiment with flavored powdered sugar for unique icing flavors.
- Cream cheese: Optional for the frosting if you want a richer and tangier taste. Regular buttercream frosting is still a fantastic choice without it.
- Food coloring: Optional, to decorate your cupcakes beautifully. Gel food coloring works best for vibrant colors.
How to Make
Step 1: Gather all the ingredients and preheat your oven to 350°F (175°C). Grease your muffin tin or line it with cupcake liners. This step is crucial; proper greasing ensures easier removal of cupcakes after baking.
Step 2: In a medium-sized mixing bowl, whisk together the all-purpose flour, baking powder, and salt. This process is essential for evenly distributing the baking powder throughout the flour, which helps your cupcakes rise uniformly. Set this mixture aside as you move on to the wet ingredients.
Step 3: In a large mixing bowl, cream the softened unsalted butter and granulated sugar together until the mixture is light and fluffy. This usually takes about 3-5 minutes using an electric mixer, which helps to incorporate air into the batter.
Step 4: Add the eggs one at a time, ensuring that each is fully incorporated before adding the next. Follow this with the vanilla extract and mix thoroughly. You want to see a smooth, cohesive batter forming at this point; if your batter appears lumpy, continue mixing until it becomes smooth.
Step 5: Gradually add the dry flour mixture to the wet ingredients, alternating with milk. Start with a third of the flour mixture, then mix in half the milk, and repeat until everything is combined. Be careful not to over-mix; stopping when just combined will keep your cupcakes light and airy.
Step 6: Fill the cupcake liners about two-thirds full with batter. This will allow room for the cupcakes to rise without overflowing. Bake in the preheated oven for about 18-20 minutes, or until a toothpick inserted in the center comes out clean. Allow the cupcakes to cool in the pan for 5 minutes before transferring them to a wire rack to cool completely.
Step 7: While your cupcakes cool, prepare the frosting. In a mixing bowl, beat the softened butter until smooth, then gradually add powdered sugar. Mix until fluffy, incorporating milk slowly to reach your desired consistency. If you’re adding cream cheese, do it here for an extra rich flavor. Don’t forget to add vanilla extract for that essential flavor.
Step 8: Once the cupcakes are completely cool, it’s time to decorate! Use a piping bag fitted with a star nozzle to swirl the buttercream frosting onto each cupcake. If desired, use food coloring to add colorful swirls. Remember, take your time here; the visual aspect is just as important as the taste.
Step 9: Arrange the finished cupcakes in a pot or a cup, securing each one with a skewer if needed. This way, they not only look beautiful but are also easy to carry. You can add floral picks or edible decorations to enhance the bouquet effect.
Variations & Substitutions
Chocolate Cupcake Variation: For a decadent twist, you can easily turn your vanilla cupcake into a chocolate delight. Simply substitute a portion of the all-purpose flour with cocoa powder. This will give your cupcakes a rich chocolate flavor while still retaining that beautiful fluffy texture. Pair these cupcakes with chocolate buttercream for a delicious indulgence perfect for chocolate lovers.
Gluten-Free Variation: If someone in your family has a gluten intolerance, don’t worry! You can make these cupcakes gluten-free by using a quality gluten-free all-purpose flour blend in place of regular flour. Be sure to check the flour mix includes xanthan gum, as this will help achieve a better texture and structure in your cupcakes.
Vegan Variation: You can easily adapt this recipe for your vegan friends or family. Use flax eggs instead of regular eggs (1 tablespoon of flaxseed meal mixed with 3 tablespoons of water per egg), and replace the milk with a non-dairy milk like almond or oat. You can also use vegan butter or coconut oil for the frosting without sacrificing flavor.
Fruit-Flavored Variation: Want to add a fruity twist? You can incorporate lemon, orange or even raspberry flavor into your cupcakes. Substitute some of the milk with fruit juice and zest for a refreshing taste. You can also fold in fresh fruit pieces like blueberries or chopped strawberries into the batter before baking, which will give a lovely burst of flavor and moisture.
Nutty Variation: If you enjoy a bit of crunch in your dessert, consider adding ground nuts like almond or pecans into the batter. You can replace a portion of the flour with ground nuts for added flavor and texture. This would pair well with a buttercream frosting that has chopped nuts on top for extra embellishment.
Common Mistakes to Avoid
One common mistake when baking cupcakes is **overmixing the batter**. It can lead to dense and tough cupcakes, which is the opposite of what you want. To prevent this, mix your ingredients just until combined, and no more. The addition of air is essential, but too much can ruin the light and airy texture.
Another mistake is not **preheating the oven**. Failing to do so can result in undercooked cupcakes. Always give your oven adequate time to preheat to the correct temperature before putting in your batter. This ensures that the cupcakes rise properly and bake evenly.
Also, be cautious about **skipping the cooling time**. Cooling the cupcakes in the pan for the designated time is important; too short of a cooling period can lead to sagging or a collapse. Allow them to cool on a wire rack completely before adding your frosting for the best results.
Lastly, it’s essential to properly **measure out your ingredients**. Using too much flour will make your cupcakes dry. For the best outcome, consider using a kitchen scale for the most accurate measurements, especially with flour.
Storage, Freezing & Reheating Tips
Storing your Mother’s Day Vanilla Cupcake Bouquet correctly will ensure that they maintain their freshness. If you’re planning to enjoy them within a couple of days, store them in an airtight container at room temperature for up to three days. This method allows them to stay soft and moist.
For longer storage, cupcakes can be frozen. Wrap each cooled cupcake tightly in plastic wrap and place them in a freezer-safe container. They will keep for up to three months. When you’re ready to enjoy them, simply thaw them in the refrigerator overnight, then let them sit at room temperature for a few hours before frosting.
When it comes to reheating cupcakes, it’s best to enjoy them at room temperature. If you want to warm them slightly, do so in the microwave for 10-15 seconds to avoid drying them out. While they may not require reheating, this method can enhance their aroma, making them even more enticing when served.
Frequently Asked Questions
Can I use other flavors instead of vanilla?
Absolutely! You can easily replace vanilla extract with almond, lemon, or any other flavoring you prefer. Just remember that the flavor of the extract will be prominent, so choose according to your taste.
How can I make my frosting extra smooth?
To achieve ultra-smooth frosting, be sure to beat the butter well before adding the powdered sugar. Scraping down the sides of the bowl during mixing helps ensure everything is incorporated, resulting in a silky-smooth texture.
Can I make these cupcakes ahead of time?
Yes, you can make the cupcakes the day before and store them at room temperature in an airtight container. Frost them on the day you plan to serve them to ensure they look fresh and beautiful.
Do I need to use eggs in this recipe?
If you’re looking for a substitute, you can use flaxseed meal mixed with water, or even applesauce as an egg replacement. However, the texture might vary slightly, so do experiment to find what works best for you.
What is the best way to transport the cupcake bouquet?
For safe transportation, ensure these cupcakes are securely placed in a sturdy container. Using floral foam in the base of the pot can help keep the skewers in place, making it easier to carry without worry. Always put a cover on the container if possible to protect the frosting.
Conclusion:
The Mother’s Day Vanilla Cupcake Bouquet is an exquisite way to express your love and appreciation for the special women in your life. With its delightful taste, stunning presentation, and the joy of baking, it’s sure to become a treasured recipe in your collection. I encourage you to try making this delightful treat, perhaps experimenting with different flavors and designs to suit your taste or the preferences of your family. So gather your ingredients, unleash your creativity, and share the love through your baking—your loved ones are sure to be impressed!


