Prep time: 15 minutes
Cook time: 30 minutes
Total time: 45 minutes
Servings: 6
Indulging in Mother’s Day Vanilla Custard Dessert brings a wave of nostalgia, whisking you back to cozy family gatherings where love was served along with delightful food. This creamy, luscious custard captures the essence of warmth, evoking memories of kitchen experiments with dear ones. Each spoonful is a journey through a velvety texture, with a delicate sweetness that leaves you craving more. This recipe is not just a dessert; it’s an experience, bursting with flavor and simplicity. It’s perfect for busy parents who want to create a memorable dessert quickly or for beginners looking to master a classic dish.
In this article, you’ll learn how to whip up this delightful dessert effortlessly. You’ll discover tips for achieving that perfect custard consistency, explore variations that suit different tastes and dietary preferences, and gain insight into how to store and serve it. So grab your whisk and prepare for a culinary adventure that will surely impress family and friends alike!
What Is Mother’s Day Vanilla Custard Dessert?
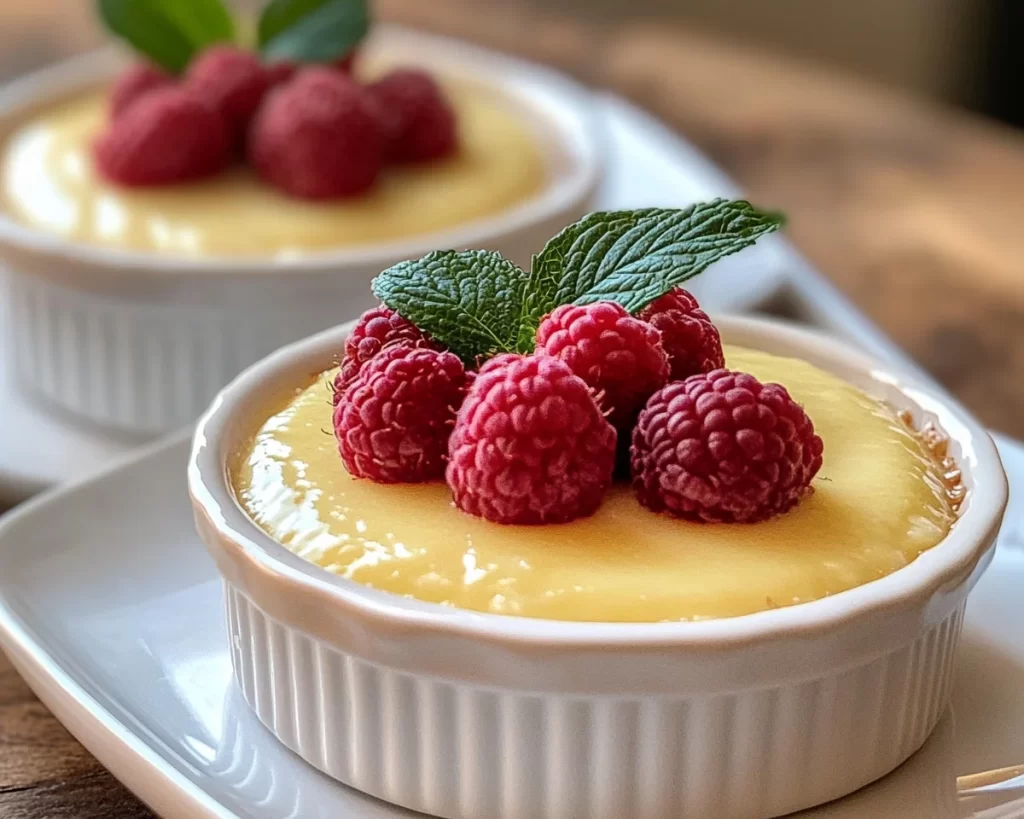
Mother’s Day Vanilla Custard Dessert is a classic treat with a rich history that finds its roots in traditional cooking methods from various cultures. This dish has evolved over the years, becoming a cherished staple in many households. The creamy custard is made primarily from milk, eggs, and sugar, creating a silky smooth texture that delights the palate. The addition of high-quality vanilla elevates the flavor, giving it a sweet and aromatic profile that makes it irresistible.
The beauty of this custard lies in its versatility. It can be served warm or chilled, making it a delightful option for any occasion. The flavors meld beautifully, creating a harmonious balance between the rich milk and eggs and the fragrant vanilla. Often embraced by families during special occasions like Mother’s Day, this dessert allows for personalization, from toppings like fresh fruit to chocolate shavings. Whether it’s enjoyed straight from the bowl or artfully plated, Mother’s Day Vanilla Custard Dessert is guaranteed to impress.
Why You’ll Love This
You will adore this recipe for several reasons: it strikes the perfect balance between indulgence and simplicity while being incredibly versatile. The delightful taste of vanilla paired with the creamy texture makes it a crowd-pleaser, even for those who typically shy away from desserts. Budget-conscious cooks will appreciate that this recipe utilizes simple ingredients, making it both affordable and easy to prepare.
Common misconceptions often arise around custards being difficult to make; however, this recipe dispels that myth. With a few simple techniques and an attentive eye, you can create a custard that rivals those found in upscale bakeries. Unlike many desserts that require complex techniques and endless baking, this custard requires minimal effort, making it accessible for beginners in the kitchen. With the right instructions, anyone can achieve that desired creamy consistency. So gather your ingredients and prepare to impress your loved ones with a homemade treat that speaks volumes about your culinary skills!
Ingredients You’ll Need
- Milk: The base of your custard. Whole milk is preferred for its richness, but you can substitute with 2% or non-dairy options for a lighter version.
- Heavy cream: Adds luxury and creaminess to the custard. Whipping cream can be used as a substitute if that’s what you have on hand.
- Granulated sugar: Sweetens the custard. You could experiment with brown sugar or honey, but monitor the quantities as they can change the flavor profile.
- Eggs: The foundation for a perfectly set custard. Use large eggs for consistent results; egg yolks are key for richness.
- Vanilla extract: Elevates the flavor, making it aromatic and sweet. Use pure vanilla extract rather than imitation for the best flavor profile.
- Salt: A pinch enhances all the flavors. Don’t skip it, as it balances the sweetness.
How to Make
- Start by gathering your ingredients. Make sure the milk and heavy cream are cold, as this will help in emulsifying them smoothly with the eggs. Preheat your oven to 325°F (160°C) to ensure it’s at the right temperature when the custard goes in.
- In a medium saucepan over medium heat, combine the milk, heavy cream, and sugar. Stir gently as the mixture heats up; you want the sugar to dissolve completely. Pay close attention and do not let the mixture boil, as high temperatures can curdle the cream, ruining the custard’s texture.
- While the milk and cream mixture is warming, in a separate bowl, whisk together the eggs, vanilla extract, and salt. Whisk vigorously until the mixture is well combined. This step is crucial as it incorporates air into the eggs, leading to a lighter custard.
- Once the milk and cream mixture is steaming (but not boiling), slowly pour it into the egg mixture while whisking constantly. This technique, known as tempering, prevents the eggs from scrambling. Be patient, and don’t rush this process—take your time to create a smooth custard base.
- After achieving a uniform mixture, strain the custard through a fine mesh sieve into a measuring cup or another bowl. This step removes any potential bits of cooked egg, ensuring a silky smooth texture.
- Prepare your baking dish by placing it in a larger roasting pan. Pour the custard into individual ramekins or a larger baking dish, depending on your serving preference. Fill the outer pan with hot water until it reaches halfway up the sides of the custard dishes. This water bath helps regulate the temperature and ensures even cooking.
- Bake in the preheated oven for about 30 minutes or until the custard is set but still slightly jiggly in the center. The edges should be firm while the center will firm up as it cools. If you’re using individual ramekins, check for doneness after 25 minutes.
- Once done, remove the custard from the oven and let it cool in the water bath for about 10 minutes. Then transfer them to a wire rack to cool completely before refrigerating.
- Once cooled, chill the custards in the refrigerator for at least 2 hours. This step allows the flavors to meld and creates a refreshing dessert that is perfect for any occasion.
Variations & Substitutions
Chocolate Custard Variation: For chocolate lovers, easily elevate your custard by incorporating unsweetened cocoa powder or melted dark chocolate into the mixture before baking. This variation transforms your vanilla custard into a deep, rich dessert, appealing to those who adore chocolate. It’s perfect for a dinner party or a special occasion when you want a touch of elegance. Ensure that the chocolate is melted and well combined for a smooth texture. Serve this version with whipped cream or chocolate shavings as a garnish.
Fruit-Infused Custard Variation: To add a fruity twist, consider infusing the milk with fruit. You can use fresh berries, citrus zest, or even pureed fruits like mango or strawberry. Simply add the fruit to the milk and cream mixture and allow it to steep for about 10-15 minutes before straining. This method adds a refreshing flavor and vibrant color to the custard, making it visually appealing and tasty. Ideal for spring and summer gatherings, this variation is a lovely way to highlight seasonal fruits.
Dairy-Free Custard Variation: For those with lactose intolerance or a dairy-free lifestyle, make this custard using almond, coconut, or oat milk instead. You can achieve a similar creamy texture by adding a bit of cornstarch or arrowroot powder to help stabilize the mixture. This variation maintains the delightful essence of custard while being inclusive for everyone. Sweeten with maple syrup or a sugar substitute for an even healthier option.
Spiced Nutmeg Variation: If you’re looking to add warmth to your custard, try incorporating a pinch of ground nutmeg or cinnamon into the egg mixture. It introduces a lovely aromatic flavor that’s perfect for cozy family gatherings and evokes feelings of home. This unique twist complements the vanilla beautifully and warms your spirit, especially during the cooler months.
Common Mistakes to Avoid
Many home cooks fear making custard because of the possibility of it curdling. To prevent this from happening, always remember to temper your eggs as explained in the preparation steps. Pour the hot milk mixture slowly into the eggs, whisking continuously to ensure even cooking without scrambling the eggs. This gentle process is key to achieving a smooth consistency.
Another mistake is rushing the baking time. It can be tempting to increase the oven temperature for a quicker set, but doing so will result in a grainy texture. Always bake at the recommended temperature, and check for doneness without disturbing the custard too much. A properly cooked custard should have a slight jiggle in the center, which is perfectly normal as it firms up while cooling.
Lastly, don’t skip the straining step. Straining ensures that any bits of cooked egg are removed, giving you a velvety custard. This small detail can make a significant impact on your final product, so take the extra minute to do this. Following these tips will help you avoid common pitfalls and achieve custard perfection.
Storage, Freezing & Reheating Tips
For optimal freshness, store any leftover custard in the refrigerator in an airtight container. It should keep well for up to 3-4 days. If you’re making the custard in advance for a special occasion, prepare it up to two days ahead, allowing convenient serving on the day of the event.
When it comes to freezing, you can freeze custard for up to 2 months. However, the texture may alter slightly after thawing, becoming a little grainy. For best results, freeze the custard in individual portions, which allows you to thaw only what you need. To thaw, simply move the custard to the refrigerator overnight and serve it chilled or gently reheated.
If you wish to reheat custard, aim to do it gently. Place your custard in a saucepan over low heat, stirring continuously until warmed through. Avoid high heat as it can cause curdling. Alternatively, you can use a microwave but be wary of uneven heating; use a lower wattage and heat in short increments, stirring in between.
Frequently Asked Questions
Can I make Mother’s Day Vanilla Custard Dessert ahead of time?
Absolutely! This dessert is perfect for making ahead of time, as it needs to chill in the refrigerator for optimal flavor. You can easily prepare it two days in advance. Just ensure it is stored properly in an airtight container to maintain freshness.
What can I serve with custard?
There are numerous delightful options! Fresh fruits, such as berries or sliced bananas, pair beautifully with the creamy texture of the custard. Additionally, consider topping it with whipped cream, chocolate shavings, or a drizzle of caramel sauce. You can also enjoy it alongside cookies or pastries for an added crunch.
How do I know when the custard is done baking?
To determine doneness, gently shake the baking dish; the center should jiggle slightly but not be liquid. The edges will seem set. The custard will continue to firm up as it cools. Always err on the side of slightly underbaking, especially if you plan to refrigerate it afterwards.
Can I use alternative sweeteners in this recipe?
Yes, you can experiment with alternative sweeteners like honey, agave syrup, or stevia. Be cautious with the quantity and taste as you go, as some sweeteners are sweeter than granulated sugar. Always remember to adjust the liquid components accordingly if you’re using liquid sweeteners.
Is this dessert suitable for a gluten-free diet?
Yes, Mother’s Day Vanilla Custard Dessert is inherently gluten-free! Just ensure any ingredients you use, particularly the vanilla extract and any garnishes, are marked gluten-free. This makes it a wonderful option for guests with gluten intolerances at your gatherings.
Conclusion:
This Mother’s Day Vanilla Custard Dessert is not just a recipe; it’s a cherished tradition that brings families together around the table. With its rich texture and sweet flavor, it’s bound to become a beloved dish in your home. Don’t hesitate to personalize it and make it your own by trying the variations provided, or serve it alongside your favorite toppings. So get started – you’ll create not just a dessert but joyful memories around food that you and your loved ones will treasure. Share your creations and experiences, and let this custard be a symbol of family love and warmth!


