Prep time: 15 minutes
Cook time: 20 minutes
Total time: 35 minutes
Servings: 4
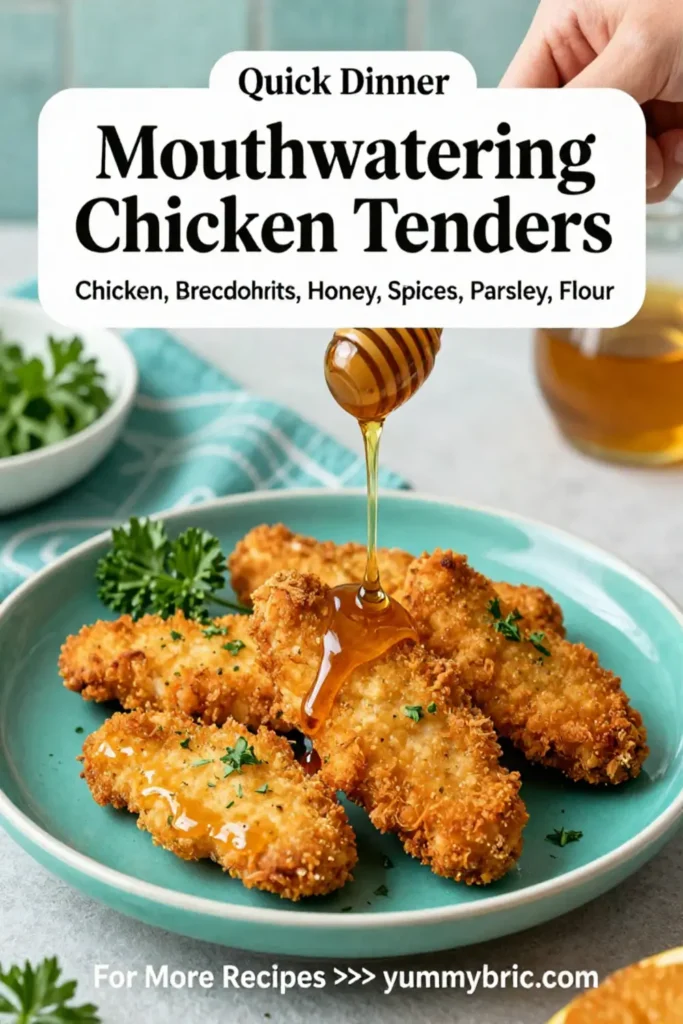
Mouthwatering Chicken Tenders are a delicious and versatile dish that will please the whole family. Whether you’re serving them for a weeknight dinner, a sports gathering, or simply craving a comforting meal, these tender, crunchy delights are bound to impress. Juicy chicken pieces coated in a flavorful, crispy crust make for a satisfying experience in every bite.
What Is Mouthwatering Chicken Tenders?
Mouthwatering Chicken Tenders are strips of chicken breast that are breaded and fried or baked until golden brown. Unlike other dishes, which can sometimes be heavy or greasy, chicken tenders offer a perfect combination of a crispy exterior and tender meat.
A fundamental aspect that sets these chicken tenders apart is the marinade. Often, they are soaked in buttermilk or seasoned mixtures, which tenderizes the meat and adds layers of flavor. This dish also lends itself to various cooking methods, from the stovetop frying technique that offers that classic crunch to an oven-baked version for a healthier twist.
Why You’ll Love This
There are several reasons why you’ll fall head over heels for these chicken tenders. First, they are incredibly simple to prepare. This dish is ideal for busy parents or kitchen beginners who might feel daunted by complex recipes. All you need is a few key ingredients and a willingness to get a little messy.
Second, chicken tenders are versatile. You can serve them as an appetizer with your favorite dipping sauce or as a main dish alongside a fresh salad or steamed vegetables. Finally, they are budget-friendly, making them a perfect choice for meal prep. You can cook a large batch and reheat them throughout the week, ensuring delicious meals are always at your fingertips.
Ingredients You’ll Need
- Chicken Breasts: 1 lb – Use boneless, skinless chicken breasts for tender meat.
- Buttermilk: 1 cup – This helps tenderize the chicken and contributes to its rich flavor.
- All-Purpose Flour: 1 cup – Essential for creating the crispy coating.
- Breadcrumbs: 1 cup – For additional crunch, use panko breadcrumbs for an extra crispy texture.
- Eggs: 2 – These act as a binding agent for the flour and breadcrumbs.
- Salt: 1 tsp – Enhances flavor; adjust to your taste.
- Pepper: 1/2 tsp – Provides seasoning; you can also add cayenne for a kick.
- Garlic Powder: 1 tsp – A wonderful aromatic spice that elevates the dish.
- Olive Oil: For frying – Adds flavor and helps achieve that golden color.

How to Make
- Begin by cutting the chicken breasts into strips, approximately 1 to 2 inches wide. This allows for even cooking and helps achieve a perfect crunch.
- Next, marinate the chicken strips in a bowl filled with buttermilk for at least 30 minutes. This step is crucial as it not only adds flavor but also tenderizes the meat.
- In a separate bowl, whisk together the flour, salt, pepper, garlic powder, and any additional spices you love. This mixture will serve as your first coating.
- In another bowl, beat the eggs. This will help the breadcrumbs adhere better to the chicken.
- Once marinated, remove each chicken strip from the buttermilk, allowing excess to drip off, and then dip it into the flour mixture, then into the beaten eggs, and finally coat with breadcrumbs. This triple-dipping technique ensures a thick and satisfying crust.
- Heat olive oil in a large skillet over medium-high heat. Carefully add the breaded chicken tenders to the pan, ensuring not to overcrowd it. Fry for about 4-5 minutes on each side, or until they are golden and cooked through. For a healthier option, preheat your oven to 400°F (200°C) and bake for 20-25 minutes, flipping halfway through.
- Once done, remove from the oil and place on a paper towel-lined plate to absorb excess oil. Allow them to cool for a few minutes, and then serve with your favorite dipping sauces and sides!
Variations & Substitutions
Baked Chicken Tenders: If you’re looking for a healthier option, try baking your chicken tenders instead of frying. Preheat your oven to 400°F (200°C), place the tenders on a baking sheet lined with parchment paper, and bake for about 20-25 minutes, flipping halfway through. This not only reduces the fat content but also ensures a crispy finish when using panko breadcrumbs.
Spicy Chicken Tenders: For those who enjoy a little heat, consider adding some cayenne pepper or chili powder to the flour mixture. You could also marinate the chicken in a mix of buttermilk and hot sauce for a fiery kick. Pair with a cooling ranch sauce for balance.
Gluten-Free Chicken Tenders: If you’re avoiding gluten, substitute the all-purpose flour and breadcrumbs with gluten-free alternatives. Almond flour, coconut flour, or gluten-free breadcrumbs work exceptionally well. As an added bonus, these alternatives can bring unique flavors to the dish.
Herb-Infused Chicken Tenders: Mix dried herbs such as thyme, oregano, or rosemary into the breadcrumb mixture for an aromatic twist. Fresh herbs can also be used, just be sure to finely chop them to distribute the flavor evenly.
Common Mistakes to Avoid
Overcrowding the Pan: Avoid adding too many chicken tenders to the pan at once, as this can lower the oil temperature and lead to soggy tenders. Fry in batches if necessary to maintain the temperature and achieve that desired crunch.
Not Allowing the Oil to Heat Properly: To avoid greasy and unappetizing chicken tenders, ensure the oil is hot enough before adding the chicken. A common test is to drop a breadcrumb into the oil; if it sizzles immediately, you’re ready to start frying.
Skipping the Marinade: Never underestimate the power of marination. Skipping this step will result in less tender and flavorful chicken. The buttermilk not only enhances the taste but ensures the chicken stays juicy throughout cooking.
Storage, Freezing & Reheating Tips
To store leftover chicken tenders, place them in an airtight container in the refrigerator for up to 3 days. For longer storage, freeze them in a single layer on a baking sheet. Once frozen, transfer to a freezer-safe container or bag, where they will keep for up to 3 months.
When reheating, the oven is your best friend. Preheat your oven to 375°F (190°C) and place the chicken tenders on a baking sheet lined with parchment paper. Bake for about 15-20 minutes or until heated through. This method ensures they retain their crispy texture.
If you must use the microwave, place them on a microwave-safe plate and cover them with a damp paper towel to prevent them from drying out. Heat in 30-second increments until they are warmed through, but be aware they may lose some of their crispiness.
Frequently Asked Questions
Can I use chicken thighs instead of breasts?
Yes, chicken thighs are a great alternative! They tend to be juicier and more flavorful than chicken breasts, making them an excellent choice for chicken tenders. Just keep in mind that cooking times may vary slightly as thighs can be thicker than breasts.
Do I need to use buttermilk?
While buttermilk is preferred for its tenderizing properties, you can substitute it with a mixture of regular milk and vinegar or lemon juice. Let it sit for 5-10 minutes before using. However, the flavor and tenderness won’t be quite the same as with buttermilk.
Can I make these chicken tenders ahead of time?
Absolutely! You can prepare the chicken tenders, coat them, and then refrigerate or even freeze them before cooking. Just make sure to thaw them in the refrigerator overnight if frozen and then cook them when you’re ready.
What are some good dipping sauces for chicken tenders?
There are countless delicious options! Classic choices include ranch dressing, honey mustard, barbecue sauce, or buffalo sauce. If you want something a bit different, try a yogurt-based dip with herbs or a creamy avocado sauce for a fresh twist.
Can I bake chicken tenders without frying?
Yes! Baked chicken tenders can be just as delicious. Ensure they are well-coated in breadcrumbs and lightly spray them with cooking oil before baking. This will help to achieve a crispy texture without the extra calories from frying.
Conclusion: Chicken tenders are not just a meal; they have become a beloved classic for families everywhere. Easy to make and adaptable to various tastes and dietary requirements, they work perfectly for busy weeknights or leisurely weekends. With flavors that can be customized to suit any palate, these mouthwatering chicken tenders are sure to become a staple in your home. Try them out, and prepare for the compliments that will undoubtedly follow!