Prep time: 20 minutes
Cook time: 0 minutes
Total time: 2 hours 20 minutes (including chilling time)
Servings: 12
Christmas is a season of joy, laughter, and delightful treats. If you’re looking for a show-stopping dessert that requires no baking and will satisfy a crowd, look no further than **No-Bake Christmas Oreo Lasagna**. This delightful layered dessert harmonizes rich creaminess with the iconic flavors of Oreo cookies, making it a holiday favorite. Easy to assemble and even easier to enjoy, this treat is perfect for busy parents, beginners in the kitchen, or anyone looking to impress without the hassle of baking.
What Is No-Bake Christmas Oreo Lasagna?
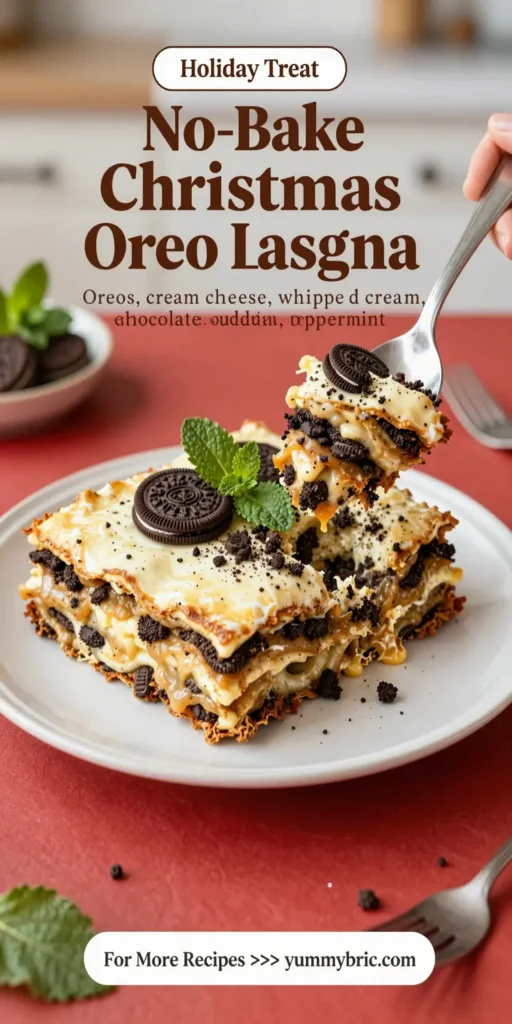
No-Bake Christmas Oreo Lasagna is a delightful confection that combines layers of crushed Oreos, a creamy cheesecake filling, and whipped topping. It’s a delicious take on traditional lasagna with a sweet twist. The dessert is served chilled, allowing the flavors to meld beautifully while ensuring each layer remains distinct. Ideal for holiday gatherings, it offers a rich, satisfying flavor without requiring an oven, making it simple and convenient for any festive occasion.
Why You’ll Love This
This dessert is perfect for a number of reasons:
- No baking required: Simply layer and chill—no oven needed!
- Quick and easy: Prepare it ahead of time and let it set in the fridge.
- Creative and customizable: Personalize it with different flavors and toppings.
- Kid-approved: Oreo cookies are a universal favorite, making it a hit with children and adults alike.
Ingredients You’ll Need
To make this festive treat, gather the following ingredients:
- 36 Oreo cookies: Crushed for the crust and for layering.
- 1/2 cup unsalted butter: Melted, to bind the crust together.
- 8 oz cream cheese: Softened, for a creamy filling.
- 1/2 cup powdered sugar: For sweetness, blended with the cream cheese.
- 1 tsp vanilla extract: For flavor enhancement.
- 2 cups whipped topping: To create a light, airy layer in the lasagna.
- 1 cup milk: To soften the filling and help create the layers.
How to Make
1. **Prepare the Oreo crust:** Begin by crushing 36 Oreo cookies into fine crumbs. You can do this by placing them in a zip-top bag and rolling a rolling pin over them until they’re uniform. Next, combine the crumbs with 1/2 cup of melted unsalted butter. Mix until everything is evenly coated. Press this mixture firmly into the bottom of a 9×13-inch pan to form the crust layer.
2. **Make the cream cheese layer:** In a mixing bowl, beat 8 oz of softened cream cheese using an electric mixer until smooth and creamy. Add 1/2 cup powdered sugar and 1 tsp vanilla extract, and continue mixing until well combined. The mixture should be fluffy and free of lumps.
3. **Incorporate whipped topping:** Gently fold in 2 cups of whipped topping into the cream cheese mixture. This adds volume and a lighter texture. Be careful not to deflate the whipped topping; use a spatula to fold instead of stirring aggressively.
4. **Layer the dessert:** Spread half of the cream cheese mixture over the prepared Oreo crust. Next, drizzle 1 cup of milk over the cream cheese layer, ensuring an even distribution. This helps to create a moist texture that pairs beautifully with the cookies.
5. **Add more layers:** Crush an additional 12 Oreo cookies and sprinkle them evenly over the cream cheese layer. Top this with the remaining cream cheese mixture, smoothing it out for an even finish.
6. **Chill and Serve:** After layering, cover the lasagna with plastic wrap and refrigerate for at least 2 hours (or overnight, if desired) to allow the layers to set. When ready to serve, cut into squares and garnish with additional whipped topping and crushed Oreos if desired.
Variations & Substitutions
Peppermint Oreo Variation: For a festive twist, use Peppermint Oreos instead of regular ones. The peppermint flavor adds a holiday flair and complements the creamy layers beautifully. Just crush the Peppermint Oreos and follow the same layering process for a refreshing seasonal treat.
Chocolate Pudding Layer Variation: Incorporate a layer of chocolate pudding between the cream cheese layers. Simply prepare the pudding according to package instructions, let it set slightly, and spread it over the first cream cheese layer before adding the second. This adds an extra layer of flavor and richness that chocolate lovers will adore.
Fruit Layer Variation: Add a fruit layer using fresh strawberries or raspberries between the layers for a refreshing touch. Consider macerating the berries beforehand with a little sugar to enhance their sweetness and create a delicious balance with the creaminess of the cheese layer.
Nut-Free Version: For those with nut allergies, ensure all ingredients used (like whipped topping and cream cheese) are labeled nut-free. Substitute crushed graham crackers for Oreos if looking for a different texture and flavor while keeping the crust nut-free.
Common Mistakes to Avoid
When preparing No-Bake Christmas Oreo Lasagna, some common pitfalls can lead to less-than-ideal outcomes.
Using stale ingredients: Always check the freshness of your cookies and dairy products. Stale ingredients can affect the overall taste and texture.
Not chilling long enough: Failing to refrigerate the dessert for an adequate amount of time will result in a gooey mess instead of firm layers. Plan to chill for at least 2 hours, or overnight for best results.
Over-mixing the cream cheese: When combining cream cheese with sugar and whipped topping, be sure to mix just until smooth and combined. Over-mixing can incorporate too much air, leading to a less desirable texture.
Not pressing the crust firmly: Properly pressing the crust mixture into the dish is crucial to ensuring it holds together. Use the back of a measuring cup to compress it evenly to avoid a crumbly base.
Storage, Freezing & Reheating Tips
To store the No-Bake Christmas Oreo Lasagna, keep it covered in the refrigerator where it will maintain its freshness for up to 3 days. Make sure to use plastic wrap or an airtight container to prevent it from taking on other odors from the fridge.
For longer storage, you can freeze the lasagna. Wrap it tightly in plastic wrap followed by aluminum foil for better protection against freezer burn. When ready to serve, allow it to thaw in the refrigerator for about 24 hours before slicing. Note that the texture may slightly change upon freezing, but the delicious flavor remains intact.
If you’ve made a large batch and have leftovers, there’s no need to reheat; this dessert is best enjoyed cold straight from the fridge.
Frequently Asked Questions
Can I make this dessert ahead of time?
Absolutely! In fact, making No-Bake Christmas Oreo Lasagna ahead of time can enhance the flavors. Preparing it the day before allows the layers to meld and sets the texture beautifully.
Can I use a different type of cookie?
Yes, you can certainly substitute Oreos for another type of cookie, such as chocolate graham crackers or even a gluten-free cookie variety. Just keep in mind that it may alter the flavor profile slightly.
How many layers can I make?
Typically, this dessert features three layers. However, feel free to experiment by adding more layers of cream cheese filling or toppings, just ensure you have enough base and cooling time for stability.
Can I add toppings before serving?
Yes! Whipped cream, crushed Oreos, or festive sprinkles can be added just before serving for that extra wow factor. It’s an excellent way to dress up the dessert for holiday gatherings.
What if I can’t find Oreos?
If Oreos are unavailable, any chocolate sandwich cookie can serve as an excellent alternative. Just check if they have a similar texture and flavor profile to create that classic taste for your lasagna.
Conclusion:
No-Bake Christmas Oreo Lasagna is a delightful, crowd-pleasing dessert that is simple to make and requires no baking. With its creamy layers and rich cookie crust, it’s a perfect addition to holiday celebrations or any time you need a quick and delicious treat. Adjust the ingredients and flavors to suit your tastes, and enjoy making memories as you share this delicious dessert with family and friends. Happy Holidays!