Let’s Get Real
So, let’s talk about cheesecakes. I mean, who doesn’t dream of rich, creamy, decadence in a single bite? But you know what’s even better? Cheesecakes that don’t make you break a sweat during the sweltering summer months! I grew up in a household where my mom believed the only dessert worth making was one that required at least half a day in the kitchen. After years of suffering through elaborate baking marathons that often ended in disaster (shoutout to the time I mistook salt for sugar), I swore off complicated desserts for good when I discovered the wonder of no-bake cheesecakes.
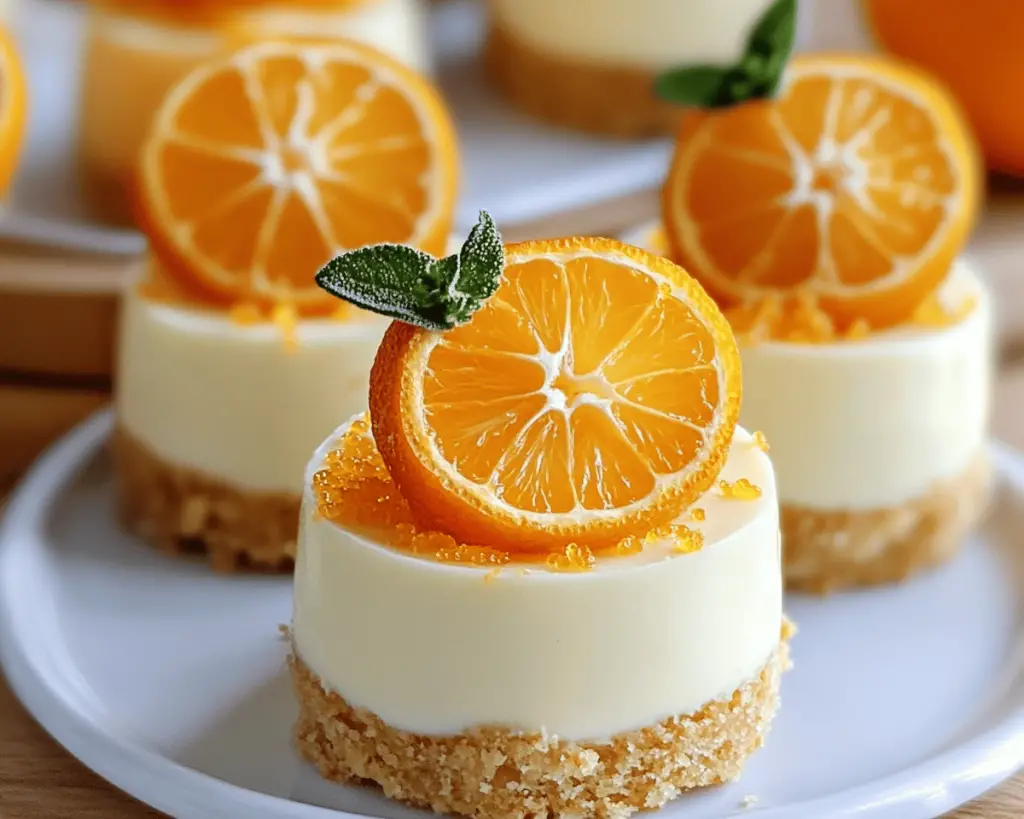
Now, enter the world of mini no-bake orange cheesecakes — a whimsical twist on a classic that’s not just easy but also an absolute showstopper. Trust me, one bite of these adorable, individual desserts, and you’ll feel like you’ve just strolled through a sunlit orchard in high summer. It’s fresh, fruity, and a little bit classy — all without requiring an oven. I made these for a barbecue last week, and if I had a dollar for every time someone asked for the recipe, I could probably fund my entire dessert-making habit (which is saying something considering the number of kitchen gadgets I have).
Now, the weather around here has been ridiculously hot. Like, ‘walk outside and feel like you’re in a sauna’ hot. Hot enough that even my air conditioning is like, “Lady, I can’t help you.” In such conditions, who in their right mind wants to turn on the oven? Not me! I want something cool, refreshing, and easy to throw together. So perfect timing, because these no-bake mini orange cheesecakes are my latest obsession and you’re about to join me on this creamy citrus ride.
Are you ready? Let’s dive into these delightful little cups of sunshine!
Ingredients, Unfiltered
Let’s break down the ingredients you’ll need to whip up these little dreams:
What’s Really in No-Bake Mini Orange Cheesecakes
**Graham cracker crumbs:** The unsung hero of so many desserts. Not only do they add texture, but they also work their magic by providing that buttery crust we all know and love. I sometimes find that using generic brands can be hit or miss, so go for what you know will deliver that crispy crunch.
**Butter:** Is there anything butter can’t do? It’s like the best friend in the cooking world. I melted down half a stick because we’re not skimping on flavor here. If you really want to live on the edge, you could try coconut oil…but let’s keep it real, butter is king in this context.
**Cream cheese:** Needing no introduction, this velvety dream needs to be at room temperature. Ain’t nobody got time for lumpy cheesecakes! I often grab the full-fat version because I believe in going big or going home when it comes to cheesecake. Don’t even think about the low-fat stuff — it’s like bringing a spoon to a butter knife fight.
**Powdered sugar:** We want a bit of sweetness, but nothing too overpowering. Plus, powdered sugar mixes in seamlessly, saving you from that awkward lump situation. Pro tip: always sift it if you want your texture to be as dreamy as you imagined.
**Vanilla extract:** This is the secret component that elevates everything! I’m partial to the good stuff. If you have pure vanilla extract sitting in your pantry, hold onto it for dear life. No imitation nonsense here, please.
**Whipped cream:** And by whipped cream, I mean the fluffy cloud-like goodness that you can either make from scratch or buy pre-made. I won’t judge you either way, but if you do make it yourself, please add a dash of vanilla for good measure. You’ll feel like a superstar.
**Fresh orange juice:** This isn’t your average OJ, folks. We’re talking about real, zesty, citrusy bliss that packs a flavor punch. Squeeze those oranges yourself — it’s worth it for that burst of freshness.
**Orange zest:** This is where the magic happens! A sprinkle of zest gives you the cheery, aromatic notes that take these cheesecakes from “meh” to “oh-my-gosh, yes!” Use a microplane and zest until you’ve hit that sweet spot — it’s all about the fresh flavor.
**Gelatin:** Who knew something so unassuming could stabilize our cheesecakes and keep them from collapsing into sad puddles? Gelatin is your silent partner in this beautiful dessert crime. And if you want to play it vegetarian or vegan, look for agar-agar.
Let’s Talk Health (or Not)
Is This Even Healthy? Let’s Discuss
I mean, let’s be real: it’s cheesecake. It’s not a health food and I wouldn’t dare pretend that it is. Like, nobody’s going to be posting this in their “healthy snack” list on Pinterest. But guess what? We’re also not eating cardboard, flavor-less snacks either. This little treat is a savory indulgence that’s meant for special moments (or, you know, just Tuesday if you’re feeling fancy).
Sure, there’s cream cheese, butter, and possibly whipped cream in the picture. But there’s also vitamin C from the orange juice and zest — think of it as your health insurance for enjoying a ridiculously tasty dessert. So, if it brings a smile to your face and joy to your taste buds, who cares if it isn’t kale? Life’s all about balance, right? And today, balance means treating yourself to a *mini* cheesecake that won’t leave you feeling like you need to jog a mile afterwards.
Also, here’s a fun thought: when I was a kid, I genuinely believed the more chocolate you added, the healthier your dessert became. (Spoiler alert: not even close.) So basically, we’re making progress here, even if my inner child is still kicking and suggesting sprinkles.
Your Grocery List
Here’s What You’ll Need
– 1 ½ cups of graham cracker crumbs
– ½ cup of unsalted butter, melted
– 8 oz. of cream cheese, softened
– 1 cup of powdered sugar
– 1 tsp of pure vanilla extract
– 1 cup of whipped cream (store-bought or homemade, your call)
– ½ cup of fresh orange juice
– Zest of 1 medium orange
– 1 tsp of gelatin (or agar-agar for a vegan version)
This should yield about 6–8 mini cheesecakes, depending on how generous you’re feeling with your portion sizes. Make ’em small for fun, or fill them to the brim for that “life is short, eat dessert first” approach.
The Actual Cooking Part
Okay, Let’s Make This
Now for the fun part! Grab your favorite apron or, if you’re like me, the one with a charming stain from your last chaotic cook-off. Spoiler alert: it’s still my favorite.
1. **Prepare your crust:** In a mixing bowl, combine the graham cracker crumbs and melted butter. (Note: don’t forget to let the butter cool a bit — nobody wants scalding hot crumbs.) Mix until it holds together but isn’t a clumpy mess. If it feels too dry, add a bit more melted butter.
2. **Press into cups:** Grab your mini dessert cups or a muffin tin (please go for the cupcake liners unless you want to spend an hour cleaning up; you’ll thank me later). Spoon the crumb mixture into the bottom of each cup evenly, pressing down firmly with your fingers or the bottom of a shot glass — yes, I always have a few of those lying around for occasions just like this.
3. **Make the filling:** In a large mixing bowl, combine the softened cream cheese and powdered sugar until smooth. Add in the orange juice, orange zest, and vanilla extract. Mix until you’re convinced it’ll be the best thing you’ve tasted all week!
4. **Whip it good:** Gently fold in the whipped cream until you see swirls of fluffy deliciousness. This step is crucial — treat this whipped cream like it’s a delicate butterfly. You do not want to deflate it like a sad balloon.
5. **Bloom that gelatin:** Here’s where I sprinkle my magical dust. If you’re using gelatin, warm a tablespoon of water in a small bowl, sprinkle the gelatin over it and let it bloom for about 5 minutes. Then gently heat it until it dissolves, stirring to combine. If using agar-agar, you’ll want to follow similar instructions based on the packaging.
6. **Incorporate the gelatin:** Add your melted gelatin mixture to the cream cheese filling and mix gently until fully incorporated. Now, pop that in the fridge for 10 minutes to set up a bit.
7. **Fill those cups!** Spoon or pipe the filling into your prepared cups atop the crust like the culinary Picasso that you are. This is where the magic happens! You can get fancy and do layers, or just dump it in — it’ll taste amazing either way.
8. **Chill out:** Cover the mini cheesecakes and let them chill in the fridge for around 4 hours (or for a little craving, even just an hour is fine, if you’re really impatient). The longer they sit, the more the flavors meld.
9. **Top it off:** Right before serving, feel free to add more whipped cream and zest. Trust me; it makes for a fabulous presentation. You can even throw in some fresh orange slices if you want to go all out and wow your friends.
Side Notes & Sassy Hacks
Bonus Tips You Didn’t Ask For
– **Didn’t have gelatine?** You can skip it altogether for an even softer, mousse-like texture! But don’t say I didn’t warn you about the risk of potential meltdown — you might want to only take that approach if you’re planning to eat them immediately.
– **Fruitastic options:** If orange isn’t your jam, feel free to swap in other flavors! Lemon, berry, or even chocolate are equally sinful. Just keep the liquid ratio balanced, okay?
– **Portion size:** These can get way cuter if you use tiny shot glasses. I wouldn’t judge you if you finished off three of those bad boys.
– **Even fewer dishes:** Dirty fewer dishes by mixing straight in a Ziploc bag and using it to pipe the cheesecake filling into cups. Genius, right? But again, make sure to clean up those streaks before it hardens in your fridge!
Final Words of (Culinary) Wisdom
Alright, you lovely humans, that’s it — your guide to no-bake mini orange cheesecakes! If you try this recipe, I genuinely want to hear from you! Tag me on social media or just send me a mental high-five. I promise you’ll feel like a genius in the kitchen without breaking a sweat or making a complicated mess. So, the next time you’re staring down a dessert dilemma, remember: there’s no need to bake your troubles away when you can whip up something so simple yet irresistibly delicious! Happy cheesecaking, friends!


