Let’s Get Real
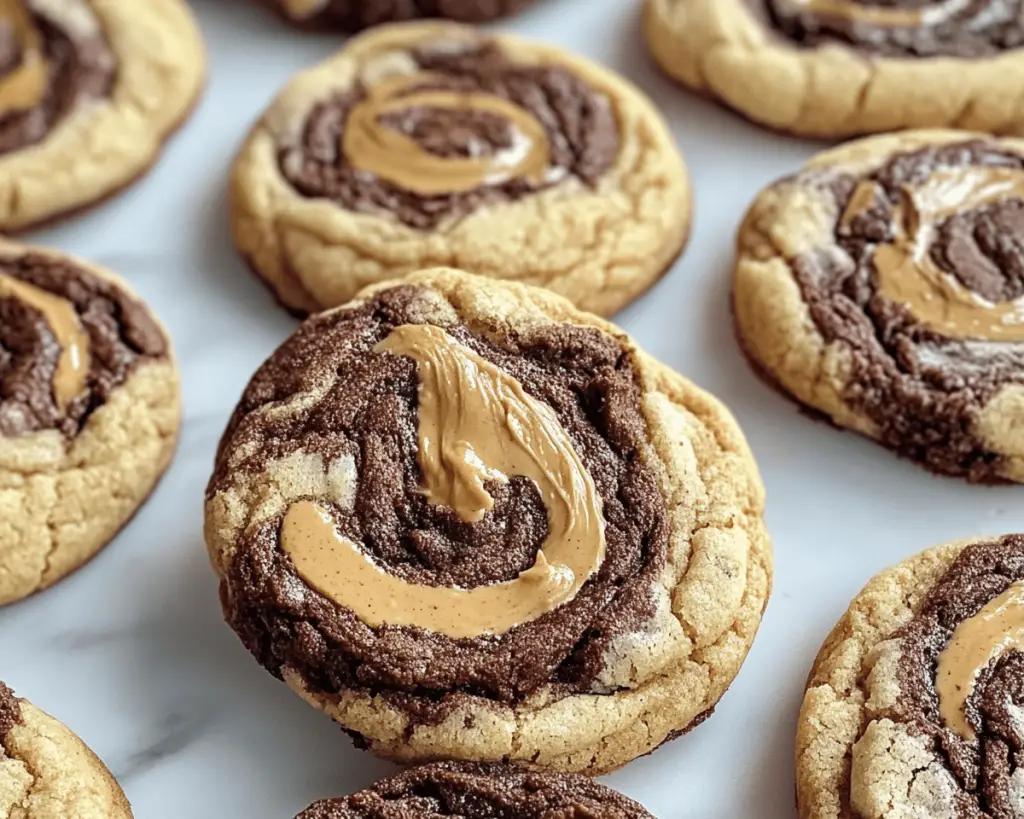
So, I was casually scrolling through Tasty TikTok videos while cradling yet another cup of coffee (Do I have a problem? No. Do you? No. But we can suffer through this together!), and I stumbled upon these luscious Peanut Butter Brownie Swirl Cookies. Suddenly, my brain went into overdrive. I mean, who wouldn’t want to be swept away in a swirl of decadent brownie layered with creamy peanut butter goodness? If you’re a cookie-lover like me, the thought alone sends shivers down your spine – the happy kind, not the “I forgot the oven was on” kind.
Back in my younger days, I was never a fan of peanut butter, and don’t even get me started on brownies. I know, I know—you can pick your jaw up off the floor. The irony is that now I can’t get enough. Reading that sentence just made me realize I am indeed capable of redemption. These Peanut Butter Brownie Swirl Cookies represent the best of both worlds that I definitely missed in my childhood. They look like something out of a baking magazine and taste like a warm hug, and honestly, who wouldn’t want that in cookie form?
If you’re salivating like I am right now, you’re in for a treat. Seriously! I’ve concocted a blend of my personal zest, kitchen chaos, and a few practical tips for creating these beauties in your own home. Buckle up, my fellow sweet tooth enthusiasts—this ride is about to get deliciously messy.
Ingredients, Unfiltered
What’s Really in Peanut Butter Brownie Swirl Cookies
Let’s take a deep dive into the ingredients that will make our taste buds dance and our hearts flutter.
Flour: The backbone of cookies! It holds everything together like the friend who always has the snacks at a party. I usually grab all-purpose flour, but if you’re feeling funky, go gluten-free!
Cocoa Powder: Ah yes, the silent hero of every chocolate dessert. I like to use Dutch-processed cocoa for deep flavor and color. Just don’t try to skip it, or you’ll end up with a sad cookie that thinks it’s a muffin.
Baking Soda: This little guy is what elevates your cookies to soft, chewy perfection. It’s the magic ingredient that works better than a motivational speaker at a conference. Don’t skip it unless you want flat disks of regret!
Sugars (Granulated and Brown): The duo that’ll give your cookies that lovely sweetness and complex flavor. The brown sugar brings the chewiness (think “warm hug”), while granulated sugar helps with spreading. It’s like a team that works together but totally almost breaks up in the 9th grade because of feelings (or too much homework).
Salt: Ah, the underrated hero! A sprinkle of salt enhances the sweetness and balances everything out. Don’t be heavy-handed like I once was, thinking I was making a “gourmet” cookie. Spoiler Alert: we don’t need dessert that reads like a salt lick.
Butter: Unsalted, of course! We’re not looking to send anyone into cardiac arrest with cookie overload. I usually stick with the good ol’ sticks from the fridge. Fun fact: If you forget to soften it beforehand, they’ll still be passable if you use a microwave but keep the time minimal or you’ll have a melted puddle of goo. Not that I speak from experience or anything…
Eggs: They act as the glue to hold everything together. Make sure not to overbeat them; remember, they’re not the star of the show but definitely part of the supporting cast.
Peanut Butter: My love. My obsession. My first true love after Nutella. Use creamy or chunky based on your preference, and feel free to be generous. I’ll shout out for natural peanut butter with no added sugar, but I’m a forgiving soul. Go for what you love.
Chocolate Chips: Because one kind of chocolate is never enough! I go dark chocolate all the way because it feels luxurious, but you do you! Milk chocolate loafing around in your pantry? Use it! Don’t waste those sweet morsels.
Vanilla Extract: Just a splash for flavor. Think gold! Just don’t substitute vanilla essence; those two are not interchangeable. They have separate hats at parties.
Let’s Talk Health (or Not)
Is This Even Healthy? Let’s Discuss
Alright, so listen up because this is where it gets real. If you’re asking whether these cookies are healthy, you’re coming at it from the wrong angle. Yes, there’s butter. Yes, there’s sugar. Yes, I sleep just fine at night. These are cookies, not kale chips.
But maybe, just MAYBE, we can find some balance. Look, if you want health and fiber, grab a salad and take it to heart. But on days when your heart yearns for sweetness, this cookie is the comforting hug wrapped snugly in a blanket of chocolate and peanut butter swirl.
Sure, you won’t win any health badges for downing these, and if you scoff them down like you’re in a competitive eating contest (which I may have done once), then maybe you’re in trouble. But if you savor each bite slowly, and pair it with a lovely cup of coffee (I’m sensing a theme here), you’re doing just fine.
Your Grocery List
Here’s What You’ll Need
Here’s your shout-out to the grocery list! Ready?
– 1 cup all-purpose flour
– 1/2 cup unsweetened cocoa powder
– 1 tsp baking soda
– 1/4 tsp salt
– 1/2 cup unsalted butter, softened
– 1/2 cup granulated sugar
– 1/2 cup brown sugar
– 1 large egg
– 1 tsp vanilla extract
– 1 cup creamy or chunky peanut butter
– 1/2 cup chocolate chips (dark or milk, your call)
This recipe will yield approximately 24 cookies, depending on how much you “sample” during the baking process.
The Actual Cooking Part
Okay, Let’s Make This
Let me just say right off the bat that home baking can sometimes look like a tornado blew through your kitchen. But remember, chaos produces great art—or cookies in this case! So grab your favorite bowl, your snazziest apron, and let’s dive in!
1. **Preheat your oven.** Get that oven buzzing at 350°F (175°C), and line your baking sheets with parchment paper. Seriously! You want those cookies to slide off like they’re on a rollercoaster ride.
2. **Mix the dry ingredients.** In a medium bowl, whisk together flour, cocoa powder, baking soda, and salt. It’s okay if it looks like a dirt pile at a construction site. You’re just getting everything well-mixed and ready to party.
3. **Cream the butter and sugars.** In a separate large mixing bowl, add your softened butter and both sugars. Use a mixer or your own two hands if you’re feeling brave—just be careful not to start a butter war. Beat until the mixture is light and fluffy. So may your arm feel a slight burn (bonus workout!).
4. **Let’s get eggy!** Add your egg and vanilla extract to the butter-sugar mix. Keep mixing until everything is well-combined. It should remind you of a relaxing, beachy vacation. Not that I’m avoiding the beach, but cookies have a different vacation vibe.
5. **Combine the dry and wet ingredients.** Slowly add your flour mixture into the wet mix. This is where the magic happens! Don’t overmix; we’re not looking for gluteny rubber, just a nice fold until it looks like a masterpiece waiting to be baked.
6. **In comes the peanut butter.** Scoop out your peanut butter into the mix. Don’t even consider it a ‘big dollop‘—just slather it in there. You may need to use some muscles here because it can be a battle of strength, but I believe in you!
7. **Swirl in the chocolate chips.** Now’s the time to add the chocolate chips! Use a spatula to gently fold them into your dough. Visualize a chocolate waterfall raining into that gooey goodness!
8. **Scoop it out!** Use a cookie scoop (or simply two spoons if you don’t want to get fancy) and drop your cookie dough onto the baking sheets. Make sure they’re spaced apart because, trust me, there’s going to be some serious expansion going on here.
9. **Time to bake!** Pop those glorious blobs into your preheated oven for about 10-12 minutes. Don’t panic if they look underbaked at 10 minutes; they will firm up as they cool.
10. **Cool down.** Once they’re out, let them cool on the baking sheets for a few minutes before transferring them to a wire rack. Take a moment to breathe it all in because, honestly—wow. Just wow! You did it!
Side Notes & Sassy Hacks
Bonus Tips You Didn’t Ask For
Let’s sprinkle some wisdom on this budding cookie adventure, shall we?
– **Time for creativity:** You don’t need to limit yourself to chocolate chips! Swap half of them for chopped peanuts for a crunch, or even throw in some white chocolate chips if you’re feeling cheeky. Crunchy bits mixed with smooth peanut butter cookies? That’s a whole new world of flavor, my friends!
– **Storage:** These cookies store beautifully! Keep them in an airtight container for up to a week (if they last that long). Or freeze them for future munchies—pop them in the microwave for 20 seconds to revive that warm, fresh-baked feeling.
– **Baking disasters are part of the fun:** Spoiler alert: I have had baking disasters that could fill a cookbook. I’ll never forget the time I mistook powdered sugar for flour. The cookies came out as something resembling those biscuits you get at fast-food places (not exactly gourmet!). But hey, even disasters have happy endings—laughter is a fabulous ingredient.
– **Share the love:** If you’re feeling generous (or just need to get these amazing cookies out of your house before you devour them all), package them up for your neighbors, friends, or even that cranky guy down the street. Who can resist a delicious cookie? Everyone deserves a little sweetness (sometimes even that grumpy neighbor)!
Final Words of (Culinary) Wisdom
And there you have it, my fellow bakers! Peanut Butter Brownie Swirl Cookies that will fulfill your chocolate-peanut butter dreams while allowing you to embrace the chaotic side of baking. You went from zero to cookie hero in a matter of minutes!
If you try this recipe, tag me! I’m dying to see your cookie creations! Or just send me a mental high-five because, honestly, I can use all the motivation I can get! Keep baking, keep laughing, and most importantly—keep enjoying those cookies. Now, if you’ll excuse me, I think I hear a fresh batch calling my name.


