Prep time: 20 minutes
Cook time: 25 minutes
Total time: 45 minutes
Servings: 16
Peppermint Sugar Cookie Bars are the perfect festive treat to bring a delightful harmony of flavors to your holiday gatherings. Bursting with the invigorating essence of peppermint and a mouthwatering sweetness, these bars provide a hassle-free dessert option without the fuss of traditional cookies. They can be easily cut into squares for serving—making them great for parties and family gatherings. Plus, they deliver a satisfying crunch on the outside while remaining soft and chewy on the inside. Whether you’re a busy parent looking to whip up something quick or a kitchen beginner eager to impress, these cookie bars are sure to become a favorite!
What Is Peppermint Sugar Cookie Bars?
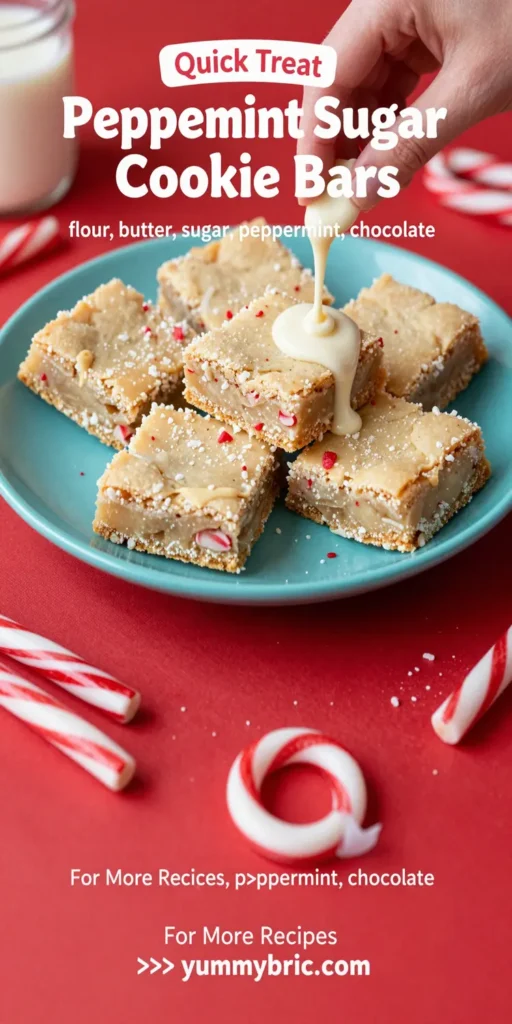
Peppermint Sugar Cookie Bars are a delightful twist on the classic sugar cookie. Instead of rolling out dough and cutting shapes, this recipe simplifies the process by baking a single batch in a pan. Topped with a luscious peppermint frosting, they embody the essence of the holiday season. The bars aren’t just cookies; they’re a sweet, creamy concoction adorned with a touch of peppermint that makes them stand out during festive occasions.
Why You’ll Love This
You’ll absolutely love these Peppermint Sugar Cookie Bars for several reasons. Firstly, they are incredibly **easy to make**, perfect for busy parents or those just starting in the kitchen. Secondly, they offer a wonderfully nostalgic flavor that can transport you back to your childhood holiday celebrations. Thirdly, these bars are incredibly versatile and can be dressed up or down depending on your preferences. Lastly, their vibrant presentation and delightful taste make them a **crowd-pleaser** at any holiday gathering or festive event.
Ingredients You’ll Need
- 2 1/2 cups all-purpose flour: This forms the base of your cookie bars, giving them structure and texture.
- 1 teaspoon baking powder: Helps the bars rise, providing a soft and chewy consistency.
- 1/2 teaspoon salt: Enhances flavor and balances the sweetness of the sugar.
- 1 cup unsalted butter, softened: Adds richness and moisture, crucial for that deliciously soft bite.
- 1 1/4 cups granulated sugar: For sweetness and a lovely golden crust.
- 1/4 cup powdered sugar: Used in the frosting for a smooth and creamy texture.
- 1 egg: Binds the ingredients together and adds moisture.
- 2 teaspoons vanilla extract: Provides a warm, sweet flavor that complements the peppermint.
- 1 teaspoon peppermint extract: This makes the bars truly shine with a refreshing minty flavor.
- 1 cup peppermint candy, crushed: Adds texture and visual appeal to the final frosting.
How to Make
- Begin by preheating your oven to 350°F (175°C). Grease a 9×13 inch baking dish. This step ensures your bars won’t stick to the pan, making for easy removal when they are finished baking.
- In a large bowl, whisk together the all-purpose flour, baking powder, and salt. Mixing these dry ingredients first helps to evenly distribute the leavening agent and prevents clumping when combined with wet ingredients.
- In another bowl, beat the softened butter and granulated sugar with an electric mixer on medium speed until the mixture is fluffy and light—this can take about 2 minutes. The air incorporated into this mixture is vital for achieving soft, chewy bars.
- Add the egg, vanilla extract, and peppermint extract to the creamed mixture. Mix until everything is well combined, paying attention to scrape down the sides of the bowl to ensure even mixing.
- Gradually add the dry flour mixture to the wet batter, mixing just until combined. Overmixing can lead to tough bars, so be gentle to maintain the desired texture.
- Spread the batter evenly in the greased baking dish, using a spatula for an even layer. Bake for 22-25 minutes, or until the edges are golden and a toothpick inserted in the center comes out clean.
- Once baked, remove the pan from the oven and allow it to cool completely in the pan on a wire rack. This cooling time is essential for the bars to set up properly before frosting.
- For the frosting, beat together the softened butter and powdered sugar until smooth. Add in crushed peppermint candy for that delightful crunch, and a splash of milk to achieve your desired consistency. Frost the cooled cookie bars generously.
- Cut into squares and enjoy! These bars can be stored at room temperature or in the fridge if you prefer them cold.
Variations & Substitutions
Chocolate Peppermint Bars: For a rich twist, consider swirling in melted chocolate into the batter before baking. The addition of chocolate complements the peppermint beautifully, creating a delectable treat for chocolate lovers.
Gluten-Free Option: If you or a loved one requires a gluten-free diet, you can replace the all-purpose flour with a 1:1 gluten-free baking blend. Ensure that the blend includes xanthan gum for proper texture. These bars will be just as tasty while meeting dietary restrictions.
Less Sweet Option: To create a less sugary treat, reduce the granulated sugar to 1 cup and the powdered sugar to 3/4 cup for your frosting. You’ll still enjoy the fresh peppermint flavor, without being overwhelmed by sweetness.
Holiday Themed Topping: You might also consider topping the frosting with seasonal sprinkles or small edible stars. This can add a visual appeal and a festive touch, which is perfect for celebrations or parties.
Common Mistakes to Avoid
One of the most **common mistakes** is not properly measuring the flour. This can lead to dry bars. Use the spoon and level method, where you spoon flour into the measuring cup and then level it off with a knife.
Another mistake is **overmixing** the dough once you add the flour. Overmixing can activate the gluten in the flour, leading to tough bars. Mix just until no flour streaks remain.
A third point to watch for is improperly cooling the bars before frosting. If you frost them while they’re still warm, the frosting can melt and become messy. It’s essential to let them sit and cool completely.
Storage, Freezing & Reheating Tips
These Peppermint Sugar Cookie Bars can be **stored** at room temperature in an airtight container for up to five days. For longer storage, consider freezing them. To freeze, wrap them tightly in plastic wrap and then aluminum foil to prevent freezer burn. They can be frozen for up to three months.
When reheating, let them thaw in the fridge overnight, then enjoy them at room temperature or warm them up briefly in the oven at 350°F (175°C) for about 5-10 minutes. Always recheck the texture upon reheating, since you want to maintain that delightful chewiness.
Frequently Asked Questions
Can I use other extracts in place of peppermint? Yes, if you prefer a different flavor, vanilla or almond extract can be substituted for the peppermint extract. However, you might want to adjust the amount based on the strength of the flavors.
Can kids help with this recipe? Absolutely! Baking can be a fun family activity. Kids can help by measuring ingredients, mixing the batter, or crushing the peppermint candies (with supervision). It’s an excellent way to engage them in the kitchen!
What should I do if my frosting is too runny? If the frosting turns out too runny, add a little more powdered sugar until it thickens to your desired consistency. Start with a tablespoon at a time to avoid making it overly thick.
Can I make these bars ahead of time? Yes, you can prepare the cookie bars a day in advance. Just ensure to store them in an airtight container. This way, the flavors can meld together even more.
What do I serve with Peppermint Sugar Cookie Bars? These bars pair wonderfully with a cup of hot tea or coffee during the holidays. You can also serve them alongside a scoop of vanilla ice cream for an indulgent treat.
Conclusion: Peppermint Sugar Cookie Bars are more than just a dessert; they create moments of joy during the festive season. With their nostalgic flavor and delightful crunch, they’re bound to be a hit at any gathering. Whether you’re baking for a holiday party or looking for a sweet treat to enjoy at home, these bars deliver both satisfaction and simplicity. Enjoy your baking adventure!