There’s something incredibly special about the first time you make your own gyoza. I still remember the moment when I rolled the dough, filled those tender pockets, and breathed in the aroma wafting from the sizzling pan. I mean, let’s be honest—these little dumplings are not just food; they’re tiny bites of joy that bring back memories of family gatherings, cozy friend nights, and even quiet Sunday afternoons spent experimenting in the kitchen.
But I’ll let you in on a little secret: my gyoza journey was not smooth sailing at first. There were sticky dough disasters, overly ambitious fillings, and let’s not even talk about the multiple times I had to convince my dog to stop sniffing around the kitchen island while I tried to maintain some semblance of a sanitary workspace. To put it simply, gyoza didn’t just magically appear on my table. They emerged from a blend of mistakes, giggles, and a lot of love—and oh, the joy when they turned out just right!
The sheer delight of biting into a perfectly cooked gyoza—with that crispy bottom giving way to a succulent filling—makes all the minor kitchen blunders worth it. So, I’m here to share my perfect homemade gyoza recipe with you. With just a few ingredients and a sprinkle of patience, you’ll impress your friends in no time. Trust me; they won’t even realize you whipped these up in your own kitchen instead of a trendy dumpling shop!
### What Goes Into Gyoza?
Now, let’s chat a little about the ingredients. I’ve spent many delightful hours tinkering with different combinations, so here are the key players you’ll need in your gyoza-making adventure:
– **Ground Pork**: This is the classic filling for gyoza. I always grab some high-quality ground pork because it has the right amount of fat to keep things juicy. If you feel adventurous, feel free to swap it for chicken or even tofu for a vegetarian version.
– **Green Onions**: They add a fresh kick! I slice them pretty finely—about a quarter-inch is my go-to. Depending on your taste, you can use less or more. Just remember: the more you add, the more vibrant your filling will be!
– **Garlic**: Ah, garlic, my faithful kitchen companion! One or two cloves, minced finely, gives a lovely aromatic base to the filling—but don’t get too crazy, okay? You want a hint of its flavor, not to be knocked over by it.
– **Ginger**: Just a teeny bit, finely grated! It brings a warmth to the filling that’s downright comforting.
– **Soy Sauce**: A splash or two for umami goodness. I usually lean towards lower sodium soy sauce so I can control the salt more accurately.
– **Sesame Oil**: This stuff is liquid gold. Just a teaspoon adds a nutty flavor your gyoza will thank you for.
– **Wonton Wrappers**: This is where my pasta-making days really come in handy! The wrappers may seem intimidating, but I promise you, they’re so much easier to work with than they look. Just find the round ones—most grocery stores carry them!
### Is Gyoza Actually Good for You?
Okay, let’s get real for a moment—are gyoza the epitome of health? Not exactly. I won’t sugarcoat this for you. They’re a bit indulgent, and that’s part of their charm! But hear me out: they do include some wholesome ingredients. You get protein from the pork, vitamins from the veggies, and if you pan-fry rather than deep-fry them, you can keep things on the lighter side.
I like to balance it out by serving mine with a cheeky side of steamed veggies or a crisp salad. It makes the whole meal feel less guilty—plus, greens make everything look more colorful on your plate, right? Just keep in mind that a little indulgence is okay; food is about enjoyment and connection above all.
### Here’s What You’ll Need
– **1 lb. ground pork**
– **2 green onions, finely sliced**
– **2 cloves of garlic, minced**
– **1 tsp. fresh ginger, grated**
– **2 tbsp. soy sauce**
– **1 tsp. sesame oil**
– **1 package of round wonton wrappers (around 40-50)**
– **Optional: a bit of water to seal the wrappers and oil for frying**
### How to Make Gyoza Step-by-Step
1. **Prepare the Filling**: In a large bowl, mix together the **ground pork**, **green onions**, **garlic**, **ginger**, **soy sauce**, and **sesame oil** until well combined. I find it enjoyable to use my hands to mix everything together—it’s like giving the meat a big hug! Just be sure not to overmix; you want the filling to be light and fluffy, not dense.
2. **Assemble the Gyoza**: Grab a wonton wrapper and place a teaspoon of the filling in the center. It’s kind of satisfying, like crafting little works of art! Moisten the edges of the wrapper with a little water (this helps seal it nicely). Fold the wrapper in half to create a half-moon shape and pinch the edges together firmly. If you’re feeling extra fancy, you can pleat the edges for that authentic look—there’s no right or wrong way here!
3. **Heat the Pan**: In a large frying pan, heat a tablespoon of oil over medium-high heat. You want just enough to coat the pan lightly. The secret here is patience—wait until the oil is nice and hot!
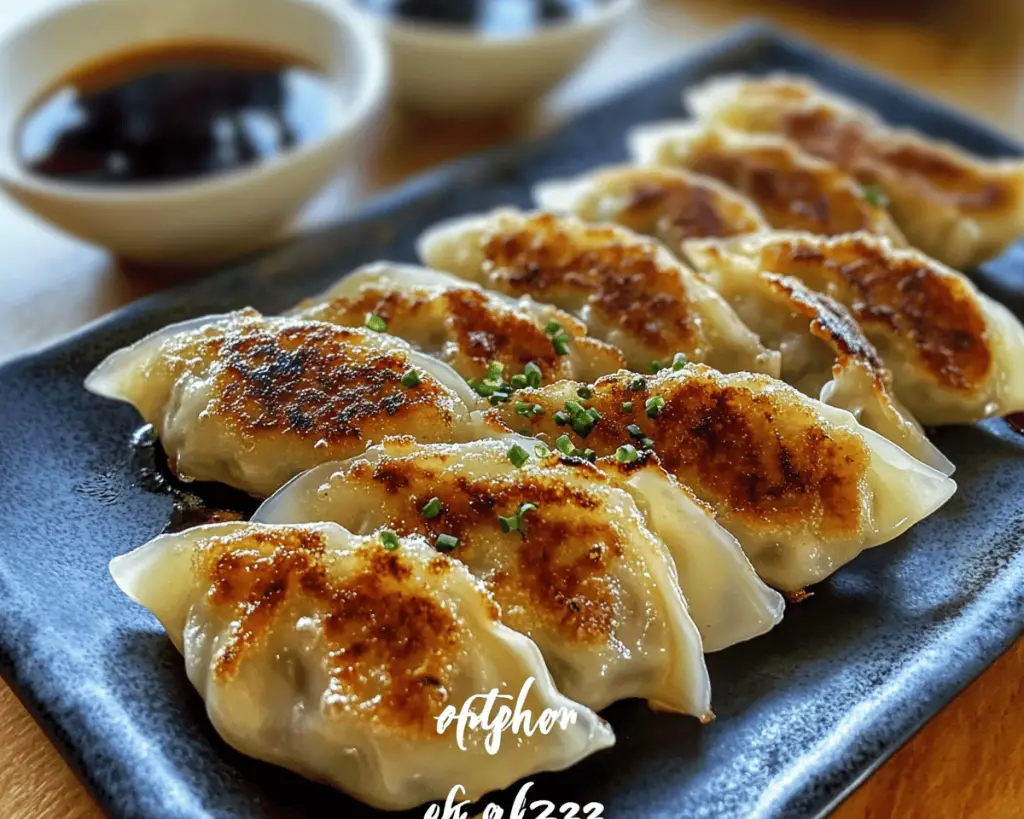
4. **Pan-Fry the Gyoza**: Place your gyoza in the pan in a circular pattern—leave a little space in between each one so they don’t stick together. Cook for about two to three minutes, or until the bottoms are golden brown and crispy.
5. **Add Water and Steam**: Here’s where the magic happens! Pour in about half a cup of water to the pan and quickly cover it with a lid. The water will steam the tops of the gyoza while keeping the bottoms nice and crispy. This takes about five minutes—let them do their thing!
6. **Check for Doneness**: After five minutes, carefully lift the lid (watch out for steam!) and check the gyoza. If all goes well, the water should have evaporated, leaving you with perfectly crispy gyoza! If not, just give them a minute longer.
7. **Serve and Enjoy**: I love to serve mine with a drizzle of soy sauce mixed with a hint of rice vinegar and some chili oil if I’m feeling spicy. Set the dipping sauce in a little dish alongside the gyoza, and watch your friends dive in like it’s the last plate on Earth!
### Little Extras I’ve Learned Along the Way
– **Make Ahead**: If you’re planning a gathering, gyoza can be prepped in advance. I often assemble them the day before and keep them in the fridge, so when guests arrive, I just pop them in the pan. It makes me feel like a culinary magician!
– **Freezing**: Feeling like you need a dumpling stash? Once they’re assembled, place them on a baking sheet lined with parchment paper and freeze until solid. Then, transfer them to a ziplock bag. They’ll keep well for a couple of months. Cooking frozen ones is just as easy—no need to thaw; just add a couple of extra minutes to the cooking time!
– **Get Creative**: The filling is a blank canvas! I’ve swapped out ground pork for shrimp, chicken, or even mushrooms for a veggie version. Some friends add shredded cabbage or carrots into the mix, too! Just be sure to keep that balance with flavors.
Honestly, every time I make gyoza, it feels like a hug from the inside out. They’re perfect for cozy nights in, celebrations, or simply as a delicious way to use up what’s lingering in your fridge. Plus, they’re just downright fun to make! So, gather your friends (or keep it low-key with a solo gyoza night; no judgment here), and dive into this delicious experience.
And here’s the kicker: don’t forget to share your progress with me! I’d love to hear your thoughts, your funny stories, or that twist you decided to add in. This one means a lot to me, and I hope it brings joy to your kitchen as it has mine. Let’s keep the dumpling love alive!