Prep time: 20 minutes
Cook time: 35 minutes
Total time: 55 minutes
Servings: 12
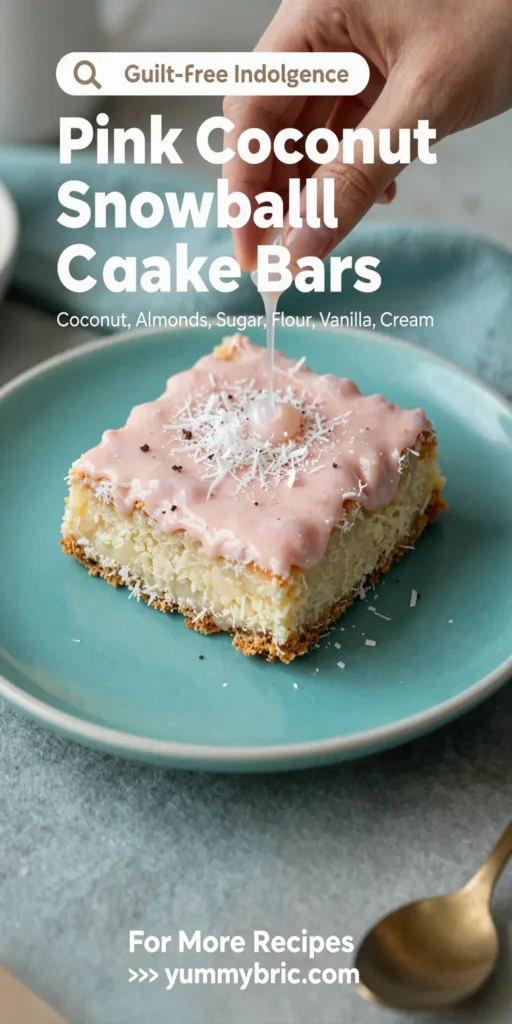
Pink Coconut Snowball Cake Bars are a delightful dessert that combines the whimsical flavors of coconut and the vibrant hue of pink, creating a treat that’s not only delicious but also visually appealing. These dreamy bars are soft, moist, and perfect for any occasion—whether it’s a backyard picnic, a birthday celebration, or simply a sweet indulgence on a cozy afternoon. If you find yourself enamored with the idea of cake bars that are both easy to prepare and fun to enjoy, this recipe is custom-made for you.
What Is Pink Coconut Snowball Cake Bars?
Pink Coconut Snowball Cake Bars are an innovative dessert that takes the traditional cake to a new level. Instead of a layered cake, this recipe transforms the classic flavor profile of coconut and vanilla into bars that have the perfect balance of sweetness and texture. These bars can be topped with a light cream cheese frosting infused with coconut flavor, giving it a rich, smooth finish. The beautiful pink color can come from natural food coloring or raspberry puree, making it a vibrant addition to any dessert table.
Why You’ll Love This
There are several reasons why Pink Coconut Snowball Cake Bars will quickly become a favorite in your home:
- Easy to Make: This recipe is straightforward, making it ideal for busy parents or kitchen beginners.
- Flavor Packed: The combination of coconut and a hint of vanilla creates a taste explosion that delights the senses.
- Versatile: Perfect for any occasion, these bars can be served at birthday parties, family gatherings, or enjoyed as a treat during meal prep.
- Visually Appealing: The bright pink hue and fluffy texture make these bars an eye-catching dessert that is sure to impress your guests.
Ingredients You’ll Need
To create these delicious Pink Coconut Snowball Cake Bars, gather the following ingredients:
- 1 ½ cups all-purpose flour: This will be the base of your bars, providing the structure and texture.
- 1 cup granulated sugar: The sweetness that balances the flavors.
- ½ cup unsalted butter (softened): Adds moisture and richness to the bars.
- 2 large eggs: These help bind the ingredients together for a fluffy texture.
- ½ cup coconut milk: Adds a rich coconut flavor and moisture.
- 1 teaspoon baking powder: This gives the bars the lift they need to be light and airy.
- 1 teaspoon vanilla extract: Enhances the flavor of the bars.
- 1 cup shredded coconut (unsweetened): Provides the signature coconut flavor and texture.
- Food coloring (optional): To achieve that beautiful pink hue.
- 1 cup cream cheese (softened): For the frosting, creating a smooth finish.
- ½ cup powdered sugar: Sweetens the frosting without the heaviness of granulated sugar.

How to Make
Follow these detailed instructions to create the Pink Coconut Snowball Cake Bars:
- Preheat the oven: Begin by preheating your oven to 350°F (175°C). This ensures that the bars bake evenly and rise properly.
- Prepare the pan: Grease a 9×13 inch baking pan or line it with parchment paper for easy removal of the bars later.
- Mix the wet ingredients: In a large bowl, beat together the softened butter and granulated sugar until light and fluffy. Gradually add the eggs one at a time, followed by the coconut milk and vanilla extract. Mix until well combined.
- Combine the dry ingredients: In a separate bowl, whisk together the all-purpose flour, baking powder, and shredded coconut. Gradually fold the dry ingredients into the wet mixture. Be careful not to overmix—just combine until no flour streaks remain.
- Add color: If you want to enhance the visual appeal, add a few drops of food coloring to the batter, mixing gently until you reach your desired shade of pink.
- Bake: Pour the batter into the prepared baking pan, spreading it evenly. Bake for 30-35 minutes, or until a toothpick inserted in the center comes out clean. The edges should be golden brown.
- Cool the cake: Allow the cake to cool in the pan for about 15 minutes, then transfer it to a wire rack to cool completely.
- Prepare the frosting: In a medium bowl, combine the softened cream cheese and powdered sugar, mixing until smooth and creamy. Spread the frosting evenly on top of the cooled cake.
- Slice and serve: Once frosted, slice the bars into squares. Enjoy them as a delightful treat or store them for later!
Variations & Substitutions
Chocolate Coconut Snowball Bars: For a chocolate twist, swap out ½ cup of the all-purpose flour with unsweetened cocoa powder. This will give your bars a rich chocolate flavor while maintaining the coconut richness.
Berry Coconut Snowball Bars: Instead of using standard food coloring, try adding very finely chopped raspberries or strawberries into the batter. This will provide a natural sweetness and vibrant color, creating a fresh, fruity version of the bars.
Nut-Free Version: If you’re looking for a nut-free option, simply ensure that the coconut products are certified nut-free. You can also use unsweetened almond milk as a substitute for coconut milk for a different flavor profile while keeping it allergen-friendly.
Vegan Coconut Snowball Bars: Replace the eggs with flaxseed meal mixed with water (1 tablespoon flaxseed + 2.5 tablespoons water = 1 egg). Use vegan butter and coconut yogurt in place of the cream cheese for the frosting.
Common Mistakes to Avoid
When creating your Pink Coconut Snowball Cake Bars, be mindful of the following pitfalls:
Overmixing the batter: This can lead to tough bars. Mix just until the dry ingredients are incorporated, as too much mixing develops gluten.
Skipping the cooling process: Allowing your cake to cool before cutting is crucial. If cut too soon, the bars may crumble or fall apart.
Improperly measuring flour: Spoon the flour into your measuring cup and level it off rather than scooping directly from the bag to avoid densely packed flour, which can lead to denser bars.
Not testing for doneness: Always test your bars with a toothpick—if it comes out clean, they are done baking. Underbaked bars may fall apart, while overbaked ones will be dry.
Storage, Freezing & Reheating Tips
To keep your Pink Coconut Snowball Cake Bars fresh and delicious, follow these guidelines:
For storage: Place the bars in an airtight container lined with parchment paper to absorb any excess moisture. They can be kept in the refrigerator for up to 5 days, though they are best served fresh.
For freezing: These bars freeze well! Wrap them tightly in plastic wrap and then in aluminum foil to prevent freezer burn. They can be frozen for up to 2 months. Thaw them in the refrigerator overnight when ready to serve.
Reheating: To enjoy them warm, place a bar on a microwave-safe plate and heat for 15-30 seconds until warmed through. Be careful not to overheat, as they can become too soft and lose their structure.
Frequently Asked Questions
Can I make these bars gluten-free?
Yes! You can easily substitute all-purpose flour with a gluten-free flour blend. Just ensure that the blend includes xanthan gum, which helps provide structure and moisture in gluten-free baking.
Why are my cake bars dense?
A dense texture can often result from overmixing the batter or using too much flour. Proper measuring and gentle mixing are key to achieving the right texture. Make sure to spoon and level the flour for accuracy.
Can these bars be made ahead of time?
Absolutely! In fact, they can taste even better after a day in the fridge, as the flavors meld together. Just store them in an airtight container and frost them just before serving.
What can I do with leftover frosting?
Leftover frosting is great for spreading on other baked goods like cookies or even as a dip for fresh fruits. You can also store it in an airtight container in the fridge for up to one week.
Can I add more coconut?
Yes! Feel free to use additional shredded coconut to top your bars or even mix in extra for a more pronounced coconut flavor. Toasting the coconut before using can add an enticing dimension to your bars.
Conclusion:
Making Pink Coconut Snowball Cake Bars is an enjoyable experience full of delightful flavors and textures. This recipe brings joy and sweetness to any occasion and is sure to leave a lasting impression. With simple instructions and versatile variations, these bars are a wonderful addition to your baking repertoire. Enjoy sharing them with friends and family, or savor them as a personal indulgence.