Prep time: 30 minutes
Cook time: 30 minutes
Total time: 1 hour
Servings: 12
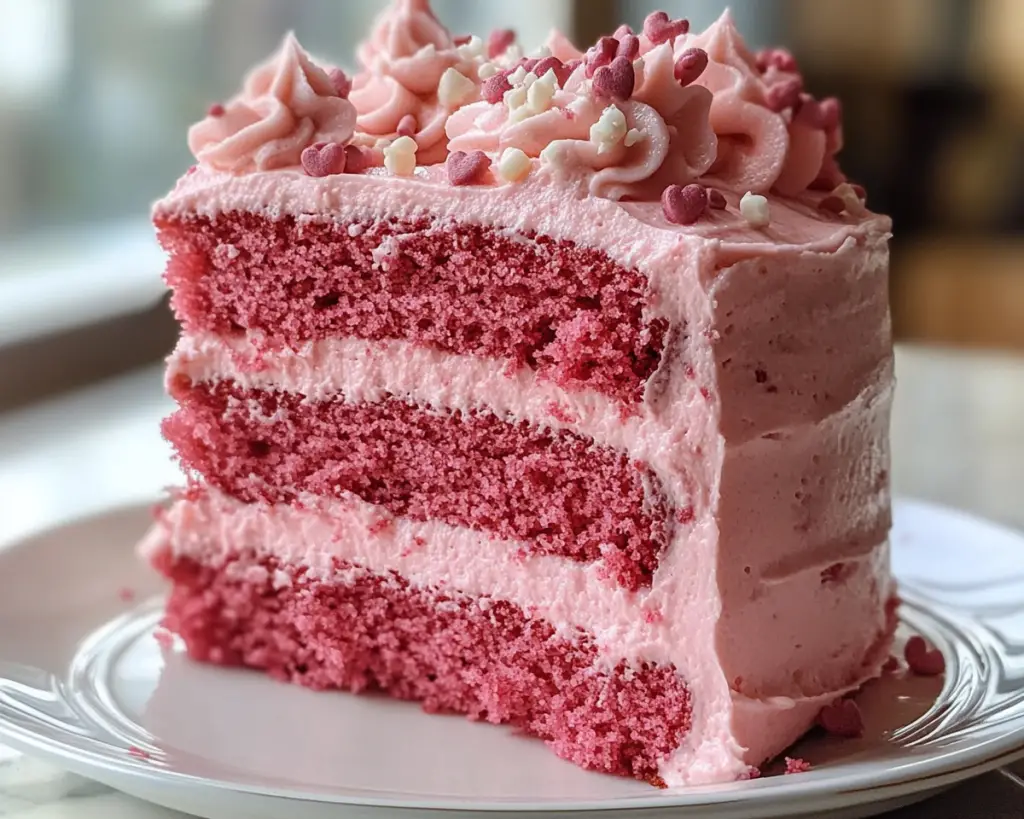
When it comes to *celebratory treats*, few desserts shine quite like a pink velvet cake. This delightful dessert is not just a feast for the eyes, but it also delivers a moist, tender cake with a subtle hint of cocoa flavor that makes each bite absolutely irresistible. Whether you’re preparing a special birthday celebration, a baby shower, or simply want to impress loved ones, this **pink velvet cake** is bound to steal hearts.
Imagine cutting into a beautifully layered cake, and discovering its luscious pink interior complemented by creamy frosting. The vibrant color exudes joy and warmth, akin to a summer’s day. Throughout this article, you will learn how to make this stunning cake, gather tips for decorating it beautifully, and explore various **variations** to brighten up your celebrations even more.
What Is Pink Velvet Cake?
The **pink velvet cake** is a lovely twist on the classic red velvet cake that incorporates *buttermilk*, *cocoa powder*, and *vegetable oil*, giving it a distinct texture and flavor profile. While traditional red velvet cake relies on red food coloring to achieve its hue, pink velvet cake offers a softer rose tint, often achieved with a mix of white and pink coloring. This enchanting dessert originally hails from the Southern United States, where cakes have long been celebrated for their vibrant colors and rich flavors.
The texture of pink velvet cake is velvety smooth and light, creating a delightful contrast with the creamy frosting, which usually comprises cream cheese or buttercream. The **subtle notes of cocoa** add a depth of flavor that balances the sweetness, making each mouthful delicious. This dessert is not merely eye-catching; it’s a joyful experience that evokes warmth and love, making it a *perfect choice* for celebrations and gatherings.
Why You’ll Love This Pink Velvet Cake
There are numerous reasons to fall head over heels for this pink velvet cake. Firstly, its stunning presentation is sure to impress your guests, making it an ideal centerpiece for any celebration. The light, moist texture is comforting, while the flavor holds a perfect balance between sweet and slightly tangy, especially when paired with a cream cheese frosting.
Moreover, this cake is surprisingly easy to make, making it accessible even for beginners in the kitchen. With only a few key ingredients and simple steps, you can create a cake that looks like it was crafted by a professional baker. Additionally, the fact that it can be customized with various frostings or fillings makes it versatile for any occasion.
If you’ve ever been concerned about the time and effort needed for baking, rest assured; this cake can be made comfortably within an hour, and the techniques used are straightforward and easy to replicate. Whether your kitchen experience extends to seasoned cooks or enthusiastic novices, this pink velvet cake can be a delightful addition to your baking repertoire.
Ingredients You’ll Need
To produce a delectable pink velvet cake that’s *as delicious as it is beautiful*, you will need the following key ingredients:
- All-purpose flour: Essential for structure; you can substitute with cake flour for a finer texture.
- Cocoa powder: Adds a subtle depth of flavor; use unsweetened cocoa powder for best results.
- Baking soda: Key for leavening, helping the cake to rise.
- Salt: Enhances the flavors of the other ingredients.
- Granulated sugar: Sweetens the cake; brown sugar can be used for a different flavor profile.
- Vegetable oil: Keeps the cake moist; melted butter can be used as an alternative for richer flavor.
- Buttermilk: Contributes to the unique tanginess and moisture of the cake; you can substitute with milk mixed with a little vinegar if you don’t have buttermilk.
- Eggs: Adds structure and richness; for a vegan alternative, consider using flax eggs.
- Pink food coloring: Achieves that lovely hue; gel food coloring works best as it doesn’t alter the cake’s moisture.
- Vanilla extract: Enhances the overall flavor; you can replace it with almond extract for a unique twist.
With these essential ingredients gathered, you’re all set to create something special that celebrates sweetness and color.
How to Make Pink Velvet Cake
Ready to dive into making your **pink velvet cake**? Gather your ingredients, and let’s get started with these easy step-by-step instructions:
- Preheat the oven: Start by preheating your oven to 350°F (175°C). Prepare two 9-inch round cake pans by greasing them and lightly dusting with flour, or you may line them with parchment paper for easy removal afterward.
- Mix the dry ingredients: In a medium bowl, sift together 2 cups of all-purpose flour, 1 tablespoon of cocoa powder, 1 teaspoon of baking soda, and 1/2 teaspoon of salt. Whisk them together to ensure they are thoroughly combined. Setting dry ingredients aside helps avoid any clumping when combined with wet ingredients later.
- Cream the sugar and oil: In a large mixing bowl, combine 1 and 1/2 cups of granulated sugar and 1 cup of vegetable oil. Using an electric mixer or whisk, beat the mixture on medium speed until it’s light and fluffy, typically around 2–3 minutes. This step incorporates air, which will contribute to a lighter cake texture.
- Add the wet ingredients: Into the sugar and oil mixture, add 2 large eggs, 1 cup of buttermilk, and 1 tablespoon of vanilla extract. At this point, pour in a few drops of pink food coloring—gradually add until the desired pink hue is reached. Beat the mixture until well combined.
- Combine wet and dry ingredients: Gradually add the dry mixture to the wet mixture, mixing on low speed until just combined. It’s important to avoid over-mixing to keep the cake light and fluffy. Scrape down the sides with a spatula to ensure even mixing.
- Bake the cakes: Divide the batter evenly between the prepared cake pans and smooth the tops. Bake them in the preheated oven for 25–30 minutes, or until a toothpick inserted into the center comes out clean. Keep an eye on the cakes during the last few minutes to avoid over-baking.
- Cool the cakes: Once baked, remove the pans from the oven and let them cool in the pans for about 10 minutes. After that, carefully transfer the cakes onto a wire rack to cool completely. This step is crucial as frosting warm cakes can lead to melting frosting.
- Prepare the frosting: While the cakes cool, prepare your choice of frosting. A classic cream cheese frosting works beautifully. For this, beat together 8 ounces of cream cheese, 1/2 cup of unsalted butter, and 4 cups of powdered sugar with 1 teaspoon of vanilla extract. Beat until light and fluffy. Adjust the consistency with a bit of milk if needed.
- Assemble the cake: Once the cakes are completely cooled, place the first layer on a cake stand or platter. Spread an even layer of frosting on top, then place the second layer on top. Apply a thin layer of frosting all over the cake to create a crumb coat, sealing in crumbs. Chill in the refrigerator for about 15 minutes, then apply the final layer of frosting, smoothing it out for a polished look.
- Decorate: Feel free to get creative! Top it with *sprinkles*, fresh fruit, or edible flowers for an extra touch. You could also pipe some frosting decorations if you’d like to get a more elegant design.
With these detailed steps, you will make a stunning pink velvet cake that is not just a delight to eat, but also a joy to behold!
5 Variations & Substitutions
This pink velvet cake is incredibly versatile! Here are some fun variations to consider:
1. Chocolate Pink Velvet Cake: For those who can’t resist chocolate, add more cocoa powder to the batter while retaining the pink hue. Use 2 to 3 tablespoons of cocoa powder to amplify the chocolate flavor. This cake becomes an indulgent treat without taking away from its striking appearance.
2. Red Velvet Cake Twist: If you prefer a more classic rendition, swap pink food coloring for red. The flavor and texture will remain largely the same, while the visual contrast of red and white frosting keeps it festive for holidays or events.
3. Vegan Pink Velvet Cake: Substitute the buttermilk with almond milk mixed with apple cider vinegar and replace eggs with flax eggs (1 tablespoon of ground flaxseed mixed with 3 tablespoons of water). Use vegan frosting alternatives to complete this animal product-free cake.
4. Pink Velvet Cupcakes: Turn the cake into cupcakes for individual servings! Fill cupcake liners about two-thirds full with batter, and bake for about 18–20 minutes. They are ideal for parties or gatherings where guests may appreciate a portable dessert option.
5. Layered with Fruit: For a refreshing twist, consider layering the cake with fresh raspberries or strawberries between the layers or even incorporating them into the frosting. The tartness complements the sweetness of the cake beautifully, providing a delightful contrast.
These variations allow you to cater to different tastes while keeping the essence of the original pink velvet cake.
Common Mistakes to Avoid
When crafting your pink velvet cake, even a slight misstep might alter the final product. Here are some common mistakes and tips to avoid them:
1. **Overmixing the Batter**: Incorporating too much air can lead to a dense cake rather than a light, airy one. Mix until combined, but do not go beyond that.
2. **Not Sifting Flour**: Failing to sift your flour before measuring can lead to *over-measuring flour*, which can make the cake heavy. For best results, always sift your dry ingredients.
3. **Incorrect Oven Temperature**: Ensure your oven is preheated properly and accurate. Investing in an oven thermometer can assist in avoiding temperature variations that may lead to uneven baking.
4. **Using Warm Ingredients**: All refrigerated ingredients, including butter and eggs, should come to room temperature. This helps in achieving a uniform batter texture, resulting in a more even bake.
5. **Ignoring Cooling Times**: Don’t frost the cake while it’s still warm; allow it to cool completely. Warm cake may lead to a melted frosting disaster, which you want to avoid at all costs.
By being mindful of these pitfalls, you’ll enhance your chances of creating a beautiful and delicious pink velvet cake that shines at any gathering.
Storage, Freezing & Reheating Tips
If you find yourself with leftover pink velvet cake (which can be rare because it’s so delicious!), here’s how to store, freeze, and reheat it:
– **Storage**: Store leftover cake in an airtight container in the refrigerator. It should remain fresh for 3–5 days. If the cake has been frosted, place a layer of plastic wrap over it to prevent the frosting from hardening or absorbing other odors in the fridge.
– **Freezing**: To freeze, wrap the cake layers individually in plastic wrap and place them in a resealable freezer bag. It can be stored for up to 3 months. For best results, freeze without frosting as this maintains flavor and texture.
– **Reheating**: When ready to enjoy, let the cake thaw overnight in the refrigerator. For a quick warmth, you can gently microwave individual slices for about 15-20 seconds. Be cautious not to overheat, as doing so can affect the texture.
These storage options ensure you can savor every bite of your love-filled pink velvet cake well beyond its initial creation.
Frequently Asked Questions
Can I use another type of flour in this recipe?
Yes! While all-purpose flour is the go-to for this recipe, you can use cake flour for an even lighter texture. If you prefer a gluten-free option, substitute with a 1:1 gluten-free flour blend.
How can I make sure my cake doesn’t sink in the middle?
Ensure you are not overmixing and check that your baking powder and soda are fresh. Proper oven temperature is also crucial, as too low a temperature can lead to underbaked centers.
Can I make this cake ahead of time?
Absolutely! You can bake the cake layers a day or two in advance and store them wrapped in plastic wrap at room temperature. Frost the cake just before serving for the best results.
What type of frosting can I use?
While cream cheese frosting is a classic choice, you may opt for buttercream, whipped cream, or even a fondant for a more polished finish. Each will complement the cake beautifully, allowing some creativity in styling.
Is this cake suitable for dietary restrictions?
Yes! The pink velvet cake can be modified for various dietary needs, including gluten-free, vegan, and reduced-sugar versions with a few substitutions. Always take care to check individual ingredient labels to accommodate specific allergies or intolerances.
Conclusion:
This delightful pink velvet cake is a celebration of color, flavor, and creativity. With its tender texture and creamy frosting, it becomes an instant favorite for anyone who tries it. You have the opportunity to innovate with your own variations, ensuring that every gathering can have its touch of love. So gather your ingredients, bake with joy, and share this heart-stealing cake with everyone you care about. Let this recipe inspire you to create beautiful memories filled with sweetness and love. Happy baking!


