Prep time: 20 minutes
Cook time: 25 minutes
Total time: 45 minutes
Servings: 12
Imagine a dessert that captures the essence of spring, where the sun shines brightly and vibrant colors burst through the blooms. The perfect treat for any gathering or simply for your own delight, Raspberry Coconut Magic Bars are a heavenly combination of rich, buttery crust, creamy layers of coconut, and the tartness of fresh raspberries. This delightful recipe is not only quick to prepare, but it also offers a feeling of indulgence that is often associated with baking that takes hours. Perfect for busy parents, beginners in the kitchen, or anyone looking to make a sweet treat with minimal fuss, these bars are a go-to for entertaining throughout the warmer months.
In this article, you will learn how to create Raspberry Coconut Magic Bars that are both easy and incredibly satisfying. From step-by-step instructions to a comprehensive list of variations, you’ll find everything you need to make this dessert a stunning success. Whether you’re celebrating a special occasion or simply wanting something sweet in your life, this recipe will illuminate your kitchen with delightful aromas and vibrant flavors.
What Is Raspberry Coconut Magic Bars Recipe – Easy Spring Dessert Ideas?
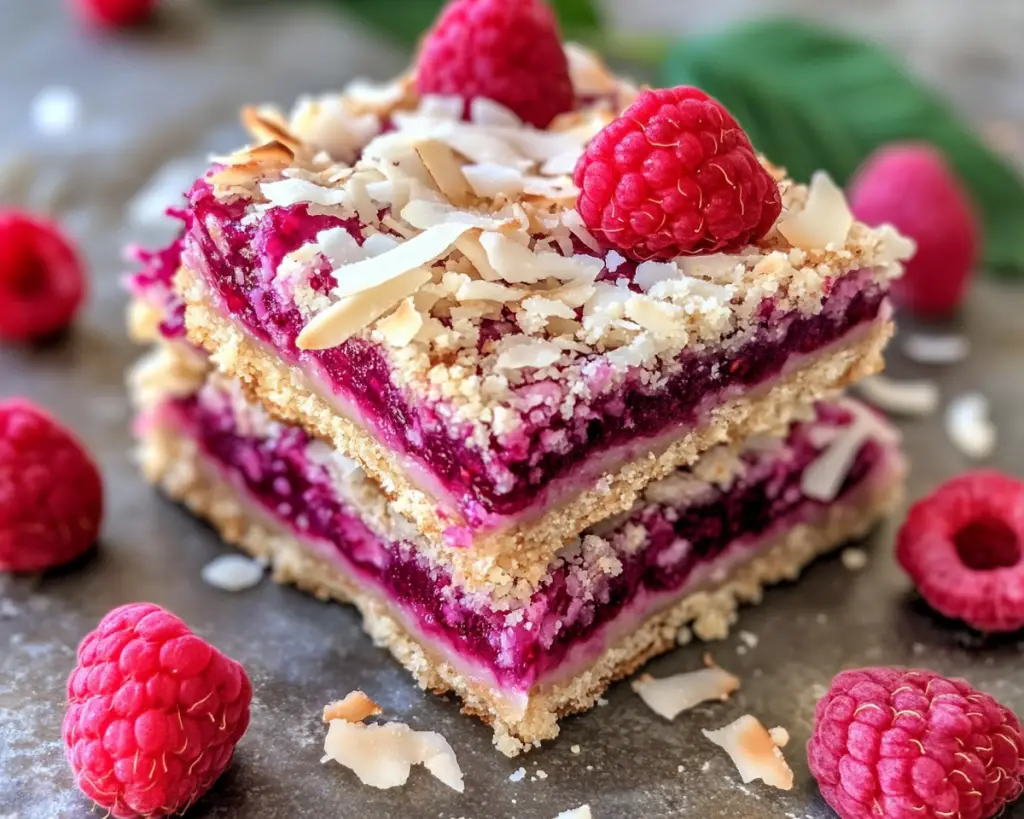
Raspberry Coconut Magic Bars are often referred to as “Hello Dolly Bars,” a name that captures their delightful and inviting nature. These luscious layers combine a delicately baked base of graham crackers with a creamy, rich filling comprised of sweetened coconut flakes, condensed milk, and tangy raspberries. The texture is a delightful balance between a crunchy base and a chewy top, creating an irresistible bite each time.
The bars can be traced back to classic American treats that gained popularity in the mid-20th century. Their charm lies not only in their taste but also in their versatility — they can be customized based on seasonal fruits, flavors, or dietary preferences. Each bite offers a perfect harmony of sweet and tart, with a moist filling that contrasts beautifully with the slightly crumbly base. The use of raspberries adds a fresh note, turning these magic bars into a refreshing dessert choice for spring and summer gatherings.
What makes these bars particularly special is their visual appeal. The vibrant red of the raspberries nestled among the white of the coconut offers an attractive presentation that tempts anyone who walks by. The combination of textures, from buttery crust to soft filling, makes for a dessert that feels indulgent yet remains comforting — the essence of home baking at its finest.
Why You’ll Love This
There are countless reasons to fall in love with Raspberry Coconut Magic Bars. The first is the unbelievable taste; the combination of flavors works together beautifully. The sweetness of the coconut and the tartness of the raspberries create a striking contrast that’s simply mouthwatering. The ease of preparation makes these bars even more appealing. With a handful of ingredients and minimal instruction, you’ll be able to whip up a batch in no time.
Many people mistakenly believe that desserts like these require extensive culinary skills or years of baking experience. This is far from the truth! This recipe is designed to be accessible for everyone, including novice cooks. In fact, it’s an excellent opportunity to get kids involved in the kitchen, teaching them the joy of baking without the fear of complicated steps or techniques.
Cost is another factor to love about this dessert. The primary ingredients are simple and budget-friendly, allowing you to prepare an impressive dish without breaking the bank. Not only do these bars provide a delightful sweet experience, but they can also be made ahead of time for gatherings or meal prep.
Since they are customizable, you can modify the recipe to fit various dietary needs. You might opt for gluten-free graham crackers or even swap out the raspberries for other berries like blueberries or blackberries. This flexibility ensures that anyone, regardless of dietary restrictions, can enjoy a little slice of heaven.
Ingredients You’ll Need
- Graham cracker crumbs: 1 ¾ cups. This serves as the base and provides a delicious crunchy texture.
- Unsalted butter: ½ cup (1 stick), melted. Adds richness and helps bind the crust together.
- Sweetened shredded coconut: 2 cups. Provides sweetness and adds the signature coconut flavor.
- Sweetened condensed milk: 1 can (14 ounces). This creates a chewy, gooey texture that holds everything together.
- Fresh raspberries: 1 cup. Adds tartness and a burst of fruity flavor.
- Chopped nuts: ½ cup (optional). You can use walnuts or pecans for added crunch and depth.
Each ingredient plays a crucial role in crafting the final product. The graham cracker crumbs act as a sturdy yet tender foundation, while the melted butter binds them, creating a satisfying crunch when baked. The addition of sweetened shredded coconut brings a tropical nuance, elevating these bars beyond the typical dessert. Meanwhile, the sweetened condensed milk not only adds sweetness but also melds with other ingredients to create that luscious filling you’ll crave.
If you don’t have sweetened coconut on hand, you can use unsweetened coconut; just know that you may need to adjust sugar levels slightly. For a nut-free version, simply omit the nuts or substitute them with seeds if desired. And if fresh raspberries are unavailable, consider using frozen ones — just ensure to thaw and drain them before adding to the mix.
How to Make
- Preheat your oven to 350°F (175°C). This ensures a perfectly baked crust and filling. Line a 9×13 inch baking dish with parchment paper for easy removal later.
- In a mixing bowl, combine the graham cracker crumbs and melted butter. Mix until the crumbs are well-coated and resemble wet sand. Press this mixture firmly into the bottom of the prepared baking dish to create an even layer.
- Bake the crust in the preheated oven for about 10 minutes. You are looking for a light golden color, which indicates that it’s ready. Keep an eye on it to avoid overbaking, as it can become too hard.
- While the crust is baking, prepare the filling. In a medium bowl, combine the sweetened condensed milk and shredded coconut. Stir them together until they are evenly mixed, ensuring the coconut is well-distributed throughout the mixture.
- Once the crust is out of the oven, allow it to cool for a few minutes. Then, pour the coconut mixture over the crust, spreading it evenly across the surface.
- Evenly distribute the fresh raspberries over the coconut layer, gently pressing them in slightly. If you’re using nuts, sprinkle them on top of the raspberries for an extra crunch.
- Bake the combined layers in the oven for an additional 15 minutes. You want the top to be golden and set. Keep an eye on it during this part of the baking to ensure the coconut doesn’t become too browned.
- Once baked, remove the dish from the oven and allow it to cool completely on a wire rack. This will help the bars set and makes cutting them easier.
- Once cool, use the parchment paper to lift the bars from the baking dish. Cut into squares for serving. Enjoy this delightful treat either warm or at room temperature.
As you bake, pay attention to the transformation occurring in your kitchen. The initial scents of melted butter and graham crackers will soon give way to a delightful aroma of toasty coconut and sweet raspberries. These sensory cues not only heighten the experience but also make your home feel warm and inviting.
Variations & Substitutions
Coconut-Almond Magic Bars: For a slightly different flavor profile, you can substitute almond extract for vanilla in the coconut layer. Additionally, consider using slivered almonds in place of or alongside the nuts for an added crunch. This variation will give you a nutty twist that complements the coconut beautifully. The aroma of almond brings a warm sophistication to this already delightful recipe.
Chocolate Raspberry Magic Bars: If you or your loved ones are chocolate lovers, this variation is for you! Simply add a layer of chocolate chips (about one cup) over the graham cracker crust before you spread on the coconut mixture. The richness of the chocolate paired with the tart raspberries creates a decadent flavor experience. You can use semi-sweet, dark, or even white chocolate chips depending on your preference.
Gluten-Free Magic Bars: For those adhering to a gluten-free lifestyle, simply replace traditional graham crackers with gluten-free graham cracker crust or any gluten-free cookies that crumble well. Ensure all ingredients, including the sweetened condensed milk and coconut, are certified gluten-free. This adaptation allows everyone to enjoy these bars while still being mindful of dietary restrictions.
Berry Bomb Magic Bars: Instead of just raspberries, mix and match various berries! Consider a mixture of blueberries, blackberries, and strawberries along with the raspberries for a fruit-forward explosion of flavor. Adjust the quantity according to your preference, letting the vibrant hues of the berries create a visually stunning dessert.
Vegan Raspberry Magic Bars: You can make these magic bars vegan by replacing the sweetened condensed milk with coconut cream mixed with a bit of maple syrup or an alternative vegan sweetened condensed milk product. Additionally, use plant-based butter or coconut oil for the graham cracker crust. This variation ensures that those following a vegan diet can still indulge in their favorite treats.
Each variation brings a unique twist to the original recipe while providing opportunities to cater to different tastes and dietary needs. Don’t hesitate to experiment with your own ideas and create a version that resonates with you!
Common Mistakes to Avoid
When making Raspberry Coconut Magic Bars, there are a few common mistakes that can affect the outcome. It’s important to avoid using stale graham crackers, as this could result in an undesirable texture. Always check the freshness before starting to ensure a crispy and flavorful crust.
Another critical cooking warning is not to overbake the bars. The filling should be just set and lightly golden on top, which will ensure a chewy texture. Overbaking can lead to the final product being dry and crumbly. Pay close attention when timing the second bake, making sure to remove the bars from the oven as soon as they look appropriately baked.
Also, don’t skimp on letting them cool completely before cutting. This cooling period allows the filling to set properly, preventing the bars from falling apart when you slice them. Aim for at least 30 minutes, or better yet, let them chill in the refrigerator for a bit for easier cutting.
Lastly, make sure the raspberries are fresh or thawed properly if using frozen. If you leave large ice crystals on the fruit, they can introduce unwanted moisture into the filling. This will affect the texture of your magic bars, turning them soggy instead of delightfully chewy.
Storage, Freezing & Reheating Tips
Storing Raspberry Coconut Magic Bars is easy. Once they have cooled completely, use an airtight container to keep them fresh. They can typically be stored at room temperature for up to three days, but for longer shelf life, storing them in the refrigerator is advised. This not only keeps them fresh for up to a week but also enhances their chewy texture.
If you wish to extend the enjoyment even further, consider freezing them! Cut the bars into squares and place them on a baking sheet in the freezer for about two hours until they are firm. Afterward, transfer the squares into a freezer-safe container with layers of parchment paper in between to prevent sticking, and they can last for up to two months in the freezer. When you’re ready to enjoy them again, simply leave them at room temperature for about 30 minutes or microwave them for a few seconds to soften.
As for reheating, if you desire the bars warm, pop them in the microwave for about 10-15 seconds. This will bring back their delightful aroma and soft texture, reminiscent of freshly baked bars. Just be careful not to overheat, as they can become too hot and lose their pleasant texture.
Always remember food safety best practices when it comes to storage and reheating — ensure that containers are sealed tightly and do not leave them out at room temperature for extended durations.
Frequently Asked Questions
Can I use frozen raspberries instead of fresh ones?
Yes, frozen raspberries can be used in place of fresh ones. Make sure to thaw them first and drain any excess liquid before adding them to prevent moisture from affecting the final texture of the bars.
Can I make these bars ahead of time?
Absolutely! These bars are perfect for making ahead of time. They can be made a day before serving and stored in the refrigerator to enhance the flavors. This is a great time-saver for parties or gatherings.
What can I use as a substitute for sweetened condensed milk?
If you prefer a dairy-free option, look for a vegan sweetened condensed milk alternative made from coconut milk. Alternatively, you can make your own version by cooking down coconut cream with sugar.
How do I know when the bars are baked perfectly?
You want to look for a light golden top and a slight jiggle in the filling. The center should not be overly firm; a little softness indicates that they will set up nicely as they cool.
Can I add chocolate chips to the recipe?
Yes! Chocolate chips are a fantastic addition. Consider layering them over the crust before adding the coconut mixture or mixing them directly into the coconut filling for a chocolate raspberry delightful experience.
Conclusion:
Raspberry Coconut Magic Bars are a celebration of spring flavors and delightful texture, making them an irresistible treat for any occasion. With their ease of preparation and room for customization, you can create a version that perfectly suits your taste or dietary requirements. From family gatherings to quiet nights at home, these bars offer the sweetness and satisfaction everyone craves. I encourage you to give these a try, share them with those you love, and perhaps even create your own variations or traditions around this delightful recipe. Happy baking!


