Let’s Get Real
So, picture this: it’s a dreary Monday afternoon, the sky is overcast, and I’m staring deep into my fridge, pondering the meaning of life and why my life choices led me to be standing in front of a shipping container filled with expired condiments and leftover pizza. I don’t know about you, but some days just call for a serious dessert intervention, and boy, could I use a sweet escape right now. That’s when the wild idea popped into my mind—Red Velvet Cheesecake Bites. The magic words. It’s like someone hit me over the head with a velvet mallet of inspiration.
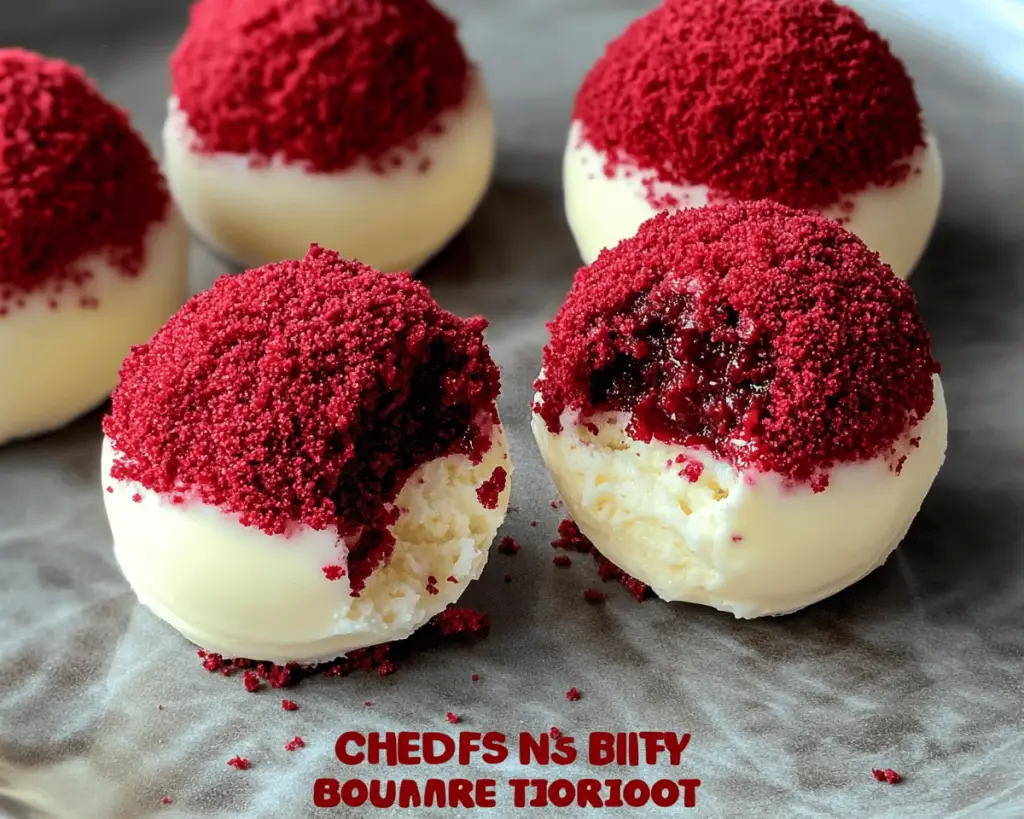
Just let that sink in for a moment: tiny, mouthwatering bites of rich red velvet cake combined with smooth, creamy cheesecake, all made even more spectacular by being portioned out in adorable little circles. Like little bombs of happiness! And who doesn’t want miniature desserts in a world full of glorious chaos? I mean, if you haven’t heard of these delectable bites yet, welcome to my sugary playground where every turn feels like Valentine’s Day, except you’re single, and you’re living your best life with a plate of cheesecake bites.
Now, here’s the kicker—I secretly despised red velvet anything as a kid. I don’t know if it was the weird food coloring or the realization I was missing out on chocolate cake; all I know is that my palate was not refined enough back in the day to appreciate it. But fast-forward to reality: I’ve slowly but surely come to adore these festive little bites of bliss. Who would’ve thought that a dessert could change my perspective on life? But here we are, ready to dive into the world of Red Velvet Cheesecake Bites.
Ingredients, Unfiltered
So we’re about to make some culinary magic here, but before we go gaga over the process, let’s break down the essential players in this dessert escapade. Spoiler alert: there are some ingredients involved that are not just your average supermarket staples.
What’s Really in Red Velvet Cheesecake Bites
Red Velvet Cake Mix: This is your base for the entire operation. I like to use the box mix because life is too short for complicated from-scratch cakes when a glorified pantry helper will do. Plus, let’s be real: I can never get that perfect red color without making an unholy mess with food dye, so I keep it simple.
Eggs: You’re going to need these little gems for binding everything together. The more eggs, the merrier; just like my love for breakfast. By the way, if you’re feeling fancy, use farm-fresh eggs. Trust me, they make everything taste like a million bucks.
Vegetable Oil: This is the secret to moistness. You want that cake to be fluffy and decadent, and oil is your best friend. Also, feel free to use coconut oil if you’re feeling hipster-ish. It’ll give you that coconut essence without requiring you to bring out your Hawaiian shirt.
Water: Just your good old H2O. Unless you’re trying to make some sort of potion – then maybe not. This ingredient helps be the solvent in this equation and joins forces with your eggs and oil. So while it seems inconsequential, it’s a key player.
Cream Cheese: Ah, the star of the cheesecake show. Use the full-fat kind; we are here for a rich experience, people! If we wanted low-fat, we’d just eat a saltine cracker. Whip that bad boy creamy.
Sugar: This is like the proverbial cherry on top, the sugar that’s going to sweeten your cheesecake filling. No sugar? No thank you, not today.
Vanilla Extract: Adds that depth and warmth essential in every beautiful dessert. I opt for real vanilla extract because I’m not here to roll with the imitation wannabes in my baking life. Run, don’t walk, to get the real deal.
Heavy Cream: Because we’re extra, and honestly, there’s no going back once you taste what heavy cream does to desserts. It’s like velvet for your mouth, and who wouldn’t want that?
Powdered Sugar: For the cheesecake mixture, creamy, smooth, and oh-so-dreamy. You can use it to taste—it adds sweetness without the graininess of granulated sugar.
Cocoa Powder: Just a tablespoon or so in your cheesecake mix provides an extra layer of depth. I mean, we want red velvet, but we also want to keep things interesting, right?
Let’s Talk Health (or Not)
Is This Even Healthy? Let’s Discuss
Okay, let’s get one thing straight: we’re not fooling anybody here—these beauties are not what I would classify as “health food.” But do I care? Not one bit. Sure, there’s cream cheese and enough sugar to power a small army, but if you’re looking for a healthy dessert, you might want to start a fruit salad blog instead of reading about my epic Red Velvet Cheesecake Bites.
The reality is, every now and then, it’s fine to throw caution to the wind and indulge—especially in a bite-sized format. I mean, if you can only eat one at a time, it’s like you’re actually practicing restraint. Plus, they say a little sugar is good for the soul, and if that’s true, then I’m ready for die-hard soul food mode. My motto? Life’s too short to skip dessert—especially dessert this fun.
Your Grocery List
Here’s What You’ll Need
– 1 box red velvet cake mix (typically 15.25 oz)
– 2 large eggs
– ½ cup vegetable oil (or coconut oil)
– 1 cup water
For the cheesecake filling:
– 8 oz cream cheese, softened
– ½ cup sugar (or adjust to your sweet tooth)
– 1 tsp vanilla extract
– ½ cup heavy cream
– 1 cup powdered sugar (for fluffiness)
– 1 tbsp cocoa powder (for that extra flair)
Yields: About 24 to 30 cheesecake bites, depending on how generous or stingy you are while scooping.
The Actual Cooking Part
Okay, Let’s Make This
Now that we’re all set with our grocery haul and have thoroughly dissected the ingredients—let’s get this party in motion! Preheat your oven to 350°F (that’s 175°C for my metric friends). I like to think of this step as setting the stage for our decadent performance.
1. **Mixing the Cake Batter:** In a large bowl, go ahead and toss in your red velvet cake mix, eggs, vegetable oil, and water. Whisk it like it owes you money! Make sure you don’t leave any clumps behind; we want velvety smoothness. If it looks too thick, add a splash more water.
2. **Baking the Cake:** Get your cupcake pan ready—don’t forget those nifty cupcake liners (or if you’re feeling wild, grease the pan like your great-aunt Edna suggests). Fill each cupcake liner about ⅔ full with cake batter (or more if you’re feeling generous).
3. **Into the Oven:** Pop them in the oven for about 15-18 minutes, or until a toothpick comes out clean. I know this sounds like an eternity in dessert years, but patience is a virtue… your reward will be soooo worth it. While those are baking, let’s get crackin’ on the cheesecake layer!
4. **Making the Cheesecake Filling:** First things first, whip up that cream cheese until it’s fluffy. You don’t want any lumps in your cheesecake! If you have a stand mixer, now is the time to show off. Add in the sugar and vanilla extract and keep mixing until it’s smooth and dreamy.
5. **Adding the Heavy Cream and Cocoa Powder:** Take your heavy cream and whip it until stiff peaks form. I usually do this by hand because I have too much joyful rage to expend after baking but the stand mixer works too if you want to take it easy. Gently fold the whipped cream into the cheesecake mixture, followed by the cocoa powder. This is the moment where you whisper sweet nothings to your mixture—don’t skip the love!
6. **Filling Those Bites:** Once the cupcake bites are cool enough to handle, take a small scoop of the cheesecake mixture and plop it on top of each red velvet bite. Just like putting frosting on a cake, smother those bites with rich cream cheese goodness.
7. **Chill Out:** It’s time to give those bad boys some time to chill out in the fridge for at least an hour. Trust me; this is key to holding everything together. Do something productive with this downtime—maybe binge-watch a show or plan how you’re going to Instagram these bites later.
8. **Serving:** Once they’re chilling and firm, serve them up on a cute platter. You’re going to want to eat these right away, but maybe be a good friend and share with others (though this is highly negotiable). Om nom nom!
Side Notes & Sassy Hacks
Bonus Tips You Didn’t Ask For
– **Substitution Shenanigans:** If you’re feeling frisky, you can substitute the red velvet mix with chocolate cake mix. Trust me, if they’re down for chocolate, they’ll be down for anything.
– **Wild Variants:** Want to switch things up? Add crushed Oreos to the cheesecake mixture or throw in some sprinkles because let’s face it, sprinkles are life. Also, if you wanted it to be a bit boozy, a splash of bourbon or Kahlúa could really elevate the experience.
– **Plating:** Always plate on a colorful or festive platter because who doesn’t love a good photo op? Additionally, topping with a drizzle of chocolate or white chocolate syrup will take these bites from “meh” to “OH MY GOSH, YES!”
– **Make Ahead:** If you’re prepping for a gathering, don’t sweat it—a day in advance works fine. Just keep them in the fridge. But be prepared for everyone to hound you for the recipe afterward; you might as well hand out business cards for good measure.
Final Words of (Culinary) Wisdom
Alright, friends. We’ve been on this whimsical, sweet journey together, and now the only thing left is for you to dive into making these scrumptious miniature indulgences! If you tie on an apron, channel your inner mad scientist, and whip up these Red Velvet Cheesecake Bites, tag me. Or just send me a mental high-five as you succumb to dessert bliss. Honestly, these bites are nothing short of life-changing, and once you share them, you’ll find friendships blooming like crazy—everyone loves a food hero! So go forth, create deliciousness, and remember: calories don’t count when you’re having this much fun, right? Bon appétit!


