Prep time: 20 minutes
Cook time: 25 minutes
Total time: 45 minutes
Servings: 12
Red Velvet Cookie Bars are a delicious twist on the classic red velvet cake, combining the rich flavors of cocoa and vanilla in a chewy, cookie-bar format. These bars are perfect for any occasion, whether you’re celebrating a birthday, hosting a gathering with friends, or simply indulging yourself. They offer the same vibrant color and delightful taste you love from traditional red velvet desserts but with a fun, easy-to-eat shape that everyone will love.
What Is Red Velvet Cookie Bars?
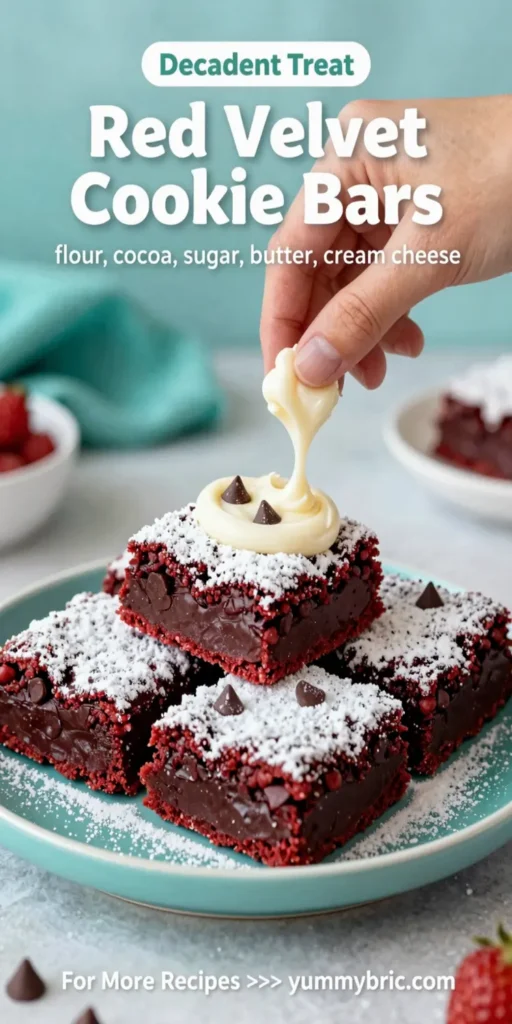
Red Velvet Cookie Bars are a decadent dessert made from a rich red velvet batter, infused with cocoa for a chocolatey undertone, and finished with a cream cheese frosting. They combine the moistness of cake with the pull-apart texture of a cookie, creating a delightful treat that’s both chewy and soft. Bake them in a rectangular pan, and once cooled, cut them into squares for a stunning dessert that showcases that signature red hue.
Why You’ll Love This
You’ll love these Red Velvet Cookie Bars for several reasons:
- Easy to Make: Unlike traditional cakes, these bars require just one bowl and a few simple steps.
- Perfect for Sharing: Their cut-and-serve format is ideal for parties, potlucks, or classroom treats.
- Customizable: Top them with your choice of icing or even a sprinkle of festive decorations for special occasions.
- Rich Flavor: The combination of cocoa and vanilla creates a flavor profile that’s simply irresistible.
Ingredients You’ll Need
To create these delicious Red Velvet Cookie Bars, gather the following ingredients:
- 2 ½ cups all-purpose flour: This is the base of your cookie bars, giving them structure.
- 1 cup granulated sugar: For sweetness that balances the cocoa.
- ½ cup brown sugar: Adds moisture and depth of flavor.
- 1 cup unsalted butter: Provides richness and helps keep the bars chewy.
- 2 large eggs: Essential for binding the ingredients together.
- 1 teaspoon vanilla extract: Boosts flavor and complements the chocolatey taste.
- 1 tablespoon red food coloring: Gives these bars their classic red hue.
- 2 tablespoons unsweetened cocoa powder: Introduces a mild chocolate flavor.
- 1 teaspoon baking soda: Helps the bars rise and achieve the right texture.
- ½ teaspoon salt: Enhances the overall flavor.
- 8 oz cream cheese: For frosting, it adds a tangy sweetness that pairs perfectly with the bars.
- 3 cups powdered sugar: Sweetens the frosting to counterbalance the slight tang from the cream cheese.
- 1 teaspoon milk: Adjusts the consistency of the frosting to make it spreadable.
How to Make
Follow these steps to create your Red Velvet Cookie Bars:
- Preheat your oven to 350°F (175°C) and line a 9×13-inch baking pan with parchment paper for easy removal. This ensures your bars won’t stick to the pan.
- In a large mixing bowl, cream together the unsalted butter, granulated sugar, and brown sugar until the mixture is light and fluffy. This step takes about 3-5 minutes and helps incorporate air for a softer texture.
- Add in the eggs one at a time, mixing well after each addition. Then, stir in the vanilla extract and red food coloring until fully combined. At this point, your batter should take on a vibrant red hue.
- In a separate bowl, whisk together the all-purpose flour, cocoa powder, baking soda, and salt. Gradually add this dry mixture to your wet ingredients, mixing until just combined. Avoid overmixing, as this could lead to tough cookie bars.
- Spread the batter evenly in the prepared pan. Use a spatula to smooth the surface, ensuring even baking.
- Bake in the preheated oven for 25-30 minutes, or until a toothpick inserted in the center comes out clean. The edges should begin to firm up, while the center remains slightly soft.
- Once baked, remove from the oven and let the bars cool completely in the pan before frosting.
- To make the cream cheese frosting, beat together the cream cheese, powdered sugar, and milk in a mixing bowl until smooth and creamy. This should take about 2-3 minutes.
- Spread the cream cheese frosting evenly over the cooled cookie bars. You can get creative and sprinkle some chocolate shavings or festive decorations on top if desired.
- Cut into squares and serve! Enjoy the delightful combination of chewy texture and rich red velvet flavor.
Variations & Substitutions
Nut Free Variation: Omit any nuts that could be added to your frosting or directly into the batter. These cookie bars are still delicious without them, maintaining a rich and flavorful experience.
Gluten-Free Version: Swap the all-purpose flour with a gluten-free baking blend. Ensure that the blend contains xanthan gum to help bind the ingredients better. This way, you can enjoy the same great texture without the gluten.
Chocolate Chip Red Velvet Bars: For a fun twist, add 1 cup of semi-sweet chocolate chips to your batter. The chocolate enhances the flavor and adds an extra layer of deliciousness. Sear the chocolate chips on top right before baking for a melting chocolatey topping.
Common Mistakes to Avoid
One frequent error when making these bars is overmixing the batter. Overmixing can lead to tough cookie bars rather than the desired chewy texture. Mix until just combined to keep them soft.
Another common mistake is not using enough food coloring. If the bars turn out more brown than red, you may need to increase the amount of food coloring to achieve that striking color. Don’t hesitate to experiment with different reds until you get the desired result.
Finally, ensure your bars are cooled completely before adding the frosting. Otherwise, the heat can cause the frosting to melt and run off. Patience is key!
Storage, Freezing & Reheating Tips
To store your Red Velvet Cookie Bars, keep them in an airtight container at room temperature for up to 3 days. If you live in a warmer climate, you may want to refrigerate them to preserve freshness.
For longer storage, these bars freeze well. Cut them into squares and wrap each piece tightly in plastic wrap, then place them in a freezer-safe container. They can last up to 3 months in the freezer. When you’re ready to enjoy, thaw them in the refrigerator overnight before serving.
If you need to reheat them, simply pop the bars in the microwave for about 15-20 seconds. This will make them warm and soft, enhancing the flavors and textures.
Frequently Asked Questions
Can I make Red Velvet Cookie Bars ahead of time?
Yes, you can make these cookie bars up to 2 days in advance. Store them in an airtight container at room temperature. You can also freeze them as mentioned above and thaw them when you’re ready to serve.
What can I serve with Red Velvet Cookie Bars?
These bars pair well with a scoop of vanilla ice cream or a dollop of whipped cream. A cup of coffee or a glass of milk also complements the richness of the cookie bars beautifully.
Can I use a different frosting?
Absolutely! While cream cheese frosting is traditional, you can use chocolate frosting or even a simple glaze if you prefer. Get creative and personalize your dessert!
Why are my cookie bars dry?
Dry cookie bars may be a result of overbaking. Make sure to monitor the baking process closely and pull them out when a toothpick inserted into the center comes out with a few moist crumbs rather than being completely clean.
Are these cookie bars suitable for a crowd?
Yes! These Red Velvet Cookie Bars are perfect for gatherings. The easy cut-and-serve format makes them ideal for parties, potlucks, or family events. They are sure to be a hit with both kids and adults!
Conclusion:
Red Velvet Cookie Bars are an indulgent, vibrant dessert that’s easy to make and perfect for any occasion. With rich flavors and a delightful texture, they offer a fun twist on a classic favorite. Enjoy experimenting with variations and make them your own!