Prep time: 20 minutes
Cook time: 25 minutes
Total time: 45 minutes
Servings: 12
Red Velvet Cookie Bars combine the rich flavors of classic red velvet cake with the chewy texture of cookies in a delightful treat that is perfect for any occasion. The warm, buttery aroma of these bars will fill your kitchen, inviting everyone near. Whether it’s a holiday gathering, a birthday party, or a cozy evening at home, these cookie bars are sure to please your family and friends. Plus, they’re easy to make, even for those who may not consider themselves bakers!
What Is Red Velvet Cookie Bars?
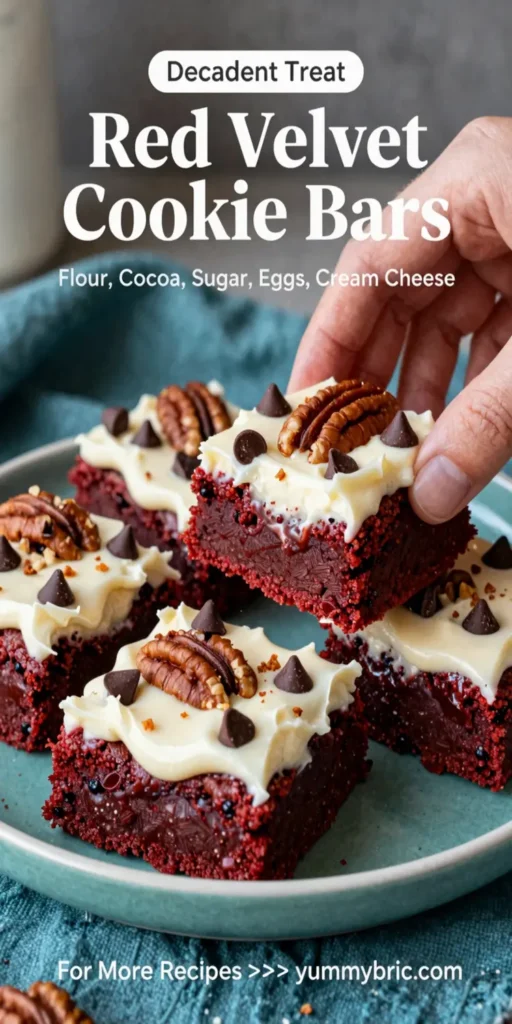
Red Velvet Cookie Bars are a delicious hybrid of two beloved desserts: red velvet cake and cookie bars. The vibrant red color comes from cocoa powder mixed with buttermilk and vinegar, creating a moist and rich flavor profile that’s both unique and appealing. Baked in a rectangular pan, these bars are soft, chewy, and topped with a cream cheese frosting, making them an irresistible treat. They can be served warm or at room temperature, drawing in anyone with their sight and scent.
Why You’ll Love This
There are several reasons why Red Velvet Cookie Bars are sure to become a favorite in your household. First, they’re genuinely easy to make; you don’t have to worry about layering a cake, making them perfect for busy individuals or families. Second, the combination of textures—a crispy outside complemented by a soft, chewy inside—is utterly satisfying. Finally, the striking bright color makes for a show-stopping dessert that will impress guests without requiring advanced baking skills.
Ingredients You’ll Need
- 2 ½ cups all-purpose flour: This forms the base of your cookie bars, providing structure. Be sure to measure accurately to avoid overly dense bars.
- 2 tbsp cocoa powder: Adds depth of flavor and helps achieve the iconic red velvet color when combined with baking soda.
- 1 tsp baking soda: This leavening agent helps the bars rise, giving them that desired fluffy texture.
- ½ tsp salt: Enhances the overall flavor and balances the sweetness.
- 1 cup unsalted butter, softened: Creates a rich flavor and tender texture; make sure it’s at room temperature for easy mixing.
- 1 ½ cups granulated sugar: Sweetens the bars and helps create a nice crust on the outer layer.
- 2 large eggs: Acts as a binder, helping to give the bars their moist texture.
- 1 tbsp red food coloring: This is what gives your cookie bars their signature vibrant color; use more or less depending on your color preference.
- 1 tsp vanilla extract: Adds warm notes of flavor that pairs beautifully with the red velvet.
- 1 cup cream cheese frosting: Ideal for spreading on top once the bars are cooled, offering a tangy sweetness that complements the cookie bars.
How to Make
- Preheat your oven to 350°F (175°C). Prepare a 9×13 inch baking dish by lining it with parchment paper or greasing it with butter. This will keep your cookie bars from sticking and make for easy removal.
- In a medium bowl, whisk together the all-purpose flour, cocoa powder, baking soda, and salt. This ensures that your dry ingredients are well-combined and strikes a perfect balance of flavors.
- In a large mixing bowl, cream the softened butter and sugar together until light and fluffy—about 3-4 minutes. This step is crucial; it helps to incorporate air into the batter, giving your bars a lighter texture.
- Add the eggs one at a time, mixing well after each addition. Then, stir in the red food coloring and vanilla extract. The mixture should become vibrant and smooth, representing the classic red velvet color.
- Gradually mix in the dry ingredients until just combined. Avoid overmixing to keep the cookie bars soft and fluffy.
- Pour the batter into the prepared baking dish, smoothing the top with a spatula. Bake for 20-25 minutes or until a toothpick inserted in the center comes out clean. Keep an eye on them, as overbaking can lead to dry bars.
- Let the bars cool in the pan for about 10 minutes, then lift them out using the parchment paper. Allow to cool completely on a wire rack.
- Once cooled, spread the cream cheese frosting generously on top of the bars. Cut them into squares and serve. The creamy frosting adds an irresistible tanginess, making each bite utterly delicious.
Variations & Substitutions
Chocolate Chip Variation: If you want a little extra sweetness, consider adding 1 cup of chocolate chips to the batter before baking. The combination of red velvet with chocolate is heavenly, offering bursts of rich chocolate flavor in every bite. This variation not only enhances the flavor but also provides a delightful visual contrast with the vibrant red.
Nutty Red Velvet: Add ½ cup of chopped walnuts or pecans into the batter for a nutty crunch that elevates the texture of your cookie bars. Nuts complement the softness of the red velvet and give an added layer of flavor, perfect for those who enjoy a bit of crunch.
Gluten-Free Option: For a gluten-free version, substitute all-purpose flour with a 1:1 gluten-free flour blend. Make sure your baking powder and other ingredients are also gluten-free. This way, everyone can enjoy these delicious bars without compromising on flavor or texture.
Frosting Swap: Try frosting with a vanilla or chocolate buttercream instead of cream cheese frosting if you prefer a sweeter option. Each frosting brings its unique flair to the bars and can be customized by adding extracts like almond or peppermint for a different flavor profile.
Common Mistakes to Avoid
Overmixing the Batter: It’s crucial to mix the batter just until combined. Overmixing can lead to tough, dense bars. Always stop mixing as soon as the flour is incorporated for maximum softness.
Not Using Room Temperature Ingredients: Make sure your butter and eggs are at room temperature. Cold ingredients can lead to uneven mixing and affect the texture of your bars, making them less fluffy and airy.
Skipping the Cooling Stage: Allowing the cookie bars to cool in the pan is essential. If you frost them while they are warm, the frosting will melt, resulting in a gooey mess rather than a picturesque treat. Patience is key here!
Storage, Freezing & Reheating Tips
To store your Red Velvet Cookie Bars, place them in an airtight container at room temperature. They will last for about 3-4 days. If you want to keep them longer, consider freezing them. To freeze, ensure they are completely cooled, then slice into individual bars and wrap them in plastic wrap and aluminum foil. They can be frozen for up to 3 months.
When you’re ready to enjoy, simply thaw at room temperature or reheat in the microwave for about 10-15 seconds. This will bring back the soft, chewy texture that everyone loves. Always be cautious when reheating not to overdo it, as it can make them dry.
Frequently Asked Questions
Can I make these cookie bars ahead of time?
Absolutely! Red Velvet Cookie Bars are great for make-ahead treats. You can bake them a day in advance, frost them later, and store in the fridge in an airtight container. This way, you can save time and impress guests with fresh bars during your event.
What can I use if I don’t have red food coloring?
If you’re out of red food coloring, you can substitute it with beet juice for a more natural option. However, the color may not be as vibrant. Alternatively, skip the food coloring entirely for a chocolate version of the bars.
How can I make these bars less sweet?
If you wish to reduce the sweetness, you can cut down the sugar in the recipe by about 50-100 grams. You can also use a tangier frosting, such as a cream cheese frosting, to balance out the sweetness of the bars.
Can I use a different frosting?
Definitely! While cream cheese frosting is traditional, other options like chocolate ganache or vanilla buttercream work perfectly. You can even try a simple glaze for a lighter topping that won’t overpower the bars.
Conclusion: Baking Red Velvet Cookie Bars is a simple yet rewarding experience, perfect for any occasion. With their vibrant color, chewy texture, and delectable frosting, these bars are sure to be a hit! Whether for a special occasion or just a sweet treat, try making these delightful cookie bars to bring joy to your kitchen and delight those you share them with.