Prep time: 30 minutes
Cook time: 30 minutes
Total time: 2 hours
Servings: 10 slices
There’s something truly special about the smell of freshly baked bread wafting through your home. It evokes cherished memories, whether it’s from childhood when a family member would bake on weekends or from that quaint little bakery down the street where you enjoyed breakfast. If you’re looking to recreate such warm memories, let me introduce you to the delightful world of Soft and Fluffy Homemade Milk Bread. This recipe not only fulfills a craving but also offers an unparalleled ease of preparation. You’ll be enchanted by its fluffy texture and subtly sweet flavor that makes it perfect for sandwiches, toast, or simply enjoying on its own with a dab of butter.
In this article, you will discover the magic behind Soft and Fluffy Homemade Milk Bread. From understanding its origins to mastering the art of kneading and baking, I will guide you through every step. You will also learn essential tips for achieving the perfect loaf every single time, delectable variations to explore, and answers to FAQs that will make your baking adventure smooth and enjoyable.
What Is Soft and Fluffy Homemade Milk Bread?
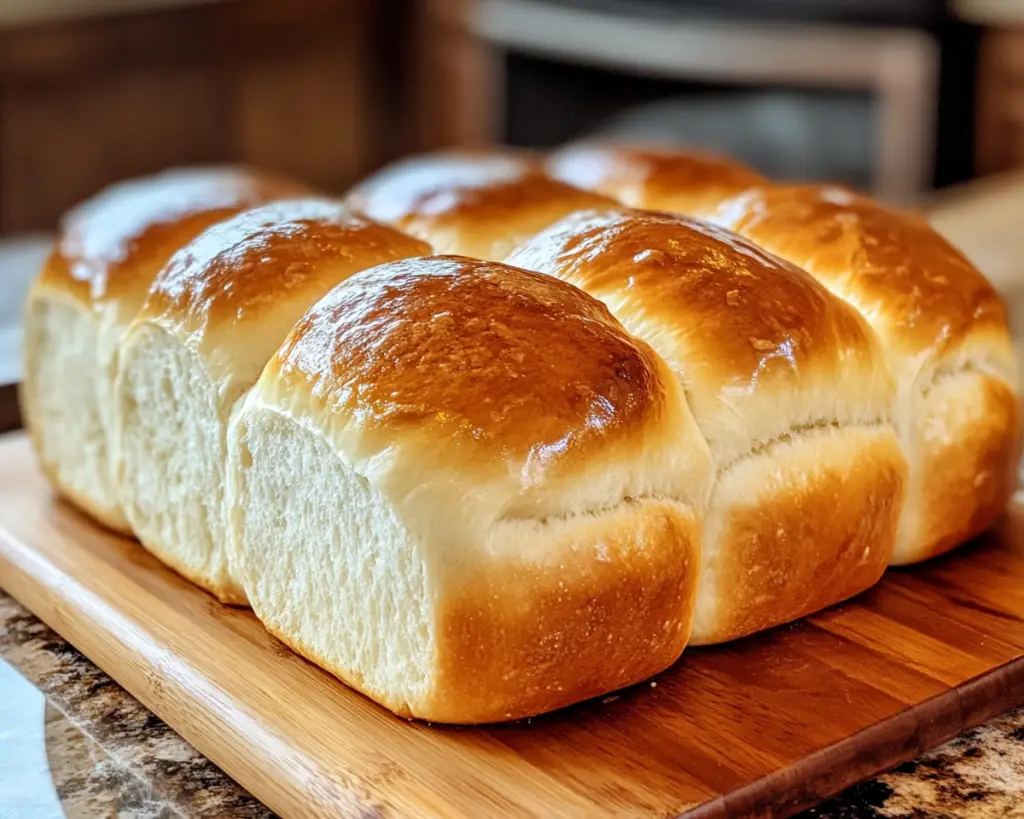
Soft and Fluffy Homemade Milk Bread is a treasured Asian baked good known for its pillowy texture and slightly sweet flavor. Originating in Japan, this type of bread is characterized by its use of milk and a unique, time-honored technique of kneading that involves incorporating air to create those delightful air pockets. This results in a loaf that is not only soft to the touch but also tender when bitten into, making it a favorite choice for both families and gourmet cafes alike.
The key ingredient in this recipe is, of course, milk. It enhances the bread’s moisture content and contributes to its rich flavor, giving it an almost custard-like quality. Whether you serve it as breakfast, a snack, or part of a meal, this bread tends to bring joy and comfort in every bite. Its ability to retain moisture means that it stays fresh for longer, making it a practical choice for busy households.
Another charming aspect of Soft and Fluffy Milk Bread is its versatility in usage. Be it for a morning toast topped with jam, a classic grilled cheese sandwich for lunch, or even a sophisticated French toast for brunch, this bread elevates any dish it accompanies.
Why You’ll Love This
This Soft and Fluffy Homemade Milk Bread isn’t just another baking project; it’s an adventure into the heart of culinary warmth and satisfaction. First and foremost, the taste is simply divine. Its subtle sweetness makes it a multi-functional loaf suitable for both savory and sweet dishes. Pair it with honey, use it for sandwiches, or savor it plain—the options are endless.
Ease of preparation is another important factor. Even if you’re a beginner in the kitchen, you can successfully navigate through this recipe with minimal difficulty. The ingredients are straightforward, and the steps are easy to follow. Plus, the kneading process, though seemingly daunting, is actually quite forgiving—perfect for honing your baking skills without pressure.
Worried about cost? This recipe helps you save money compared to store-bought alternatives. The ingredients are commonplace and inexpensive, ensuring that you can bake at home without breaking the bank. You also get the added benefit of knowing exactly what’s in your bread, which is particularly reassuring for health-conscious eaters.
Furthermore, this milk bread is incredibly versatile. You can experiment with different dairy options, sweeteners, and add-ins to make it uniquely yours. From dairy-free alternatives for those with lactose intolerance to whole-grain flours for healthier variations, there’s a customization path for everyone.
Ingredients You’ll Need
- All-Purpose Flour: The base of your bread and provides structure. If desired, you can substitute it with bread flour for even more chewiness, but all-purpose works great.
- Milk: Whole milk is preferable for its creaminess, which adds richness. Non-dairy alternatives like almond or oat milk can also be used.
- Sugar: Provides slight sweetness and helps in browning the crust. You can adjust the quantity or use honey or maple syrup instead.
- Active Dry Yeast: Essential for leavening the bread. Ensure your yeast is fresh for the best results.
- Salt: Enhances flavor and strengthens gluten structure. Use sea salt or table salt, but be cautious of overusing it.
- Butter: Adds richness and flavor. You can use unsalted butter; a substitute could be vegetable oil for a dairy-free option.
Each ingredient plays a specific role in creating the perfect loaf of Soft and Fluffy Milk Bread. Using high-quality ingredients can significantly lift the overall flavor and texture.
How to Make
1. **Prepare the Yeast Mixture:** Begin by heating the milk in a saucepan until it is warm but not boiling—around 110°F (43°C) is perfect. Remove from heat, add the desired amount of sugar, and sprinkle the active dry yeast on top. Allow this mixture to sit for about 10 minutes, or until it becomes frothy. This ensures your yeast is active.
2. **Combine Dry Ingredients:** In a large mixing bowl, sift the all-purpose flour and salt together. Doing this step helps to aerate the flour and mix in the salt evenly. The combination of both will create the right foundation for your soft dough.
3. **Mix Wet and Dry Ingredients:** Create a well in the center of your dry ingredients and pour in the yeast mixture along with melted butter. Using a spatula or wooden spoon, mix until a shaggy dough forms. The dough should start coming together; don’t worry if it looks somewhat sticky.
4. **Knead the Dough:** Transfer the dough onto a lightly floured surface. Start kneading the dough for about 8-10 minutes. You want to stretch and fold, incorporating more flour as needed to prevent sticking. The dough should become smooth and elastic. A trick to determine if it’s ready is the “windowpane test”: stretch a small piece between your fingers, and if it forms a thin translucent film without tearing, you’re good to go.
5. **First Rise:** Shape the kneaded dough into a ball and place it in a greased bowl. Cover it with a clean kitchen towel or cling film, and let it rise in a warm, draft-free area for approximately 1-1.5 hours or until it has doubled in size. This step is crucial as it develops flavor and texture.
6. **Shape the Bread:** Once the dough has risen, punch it down gently to release air. Flatten it on a floured surface and shape it into a rectangle. Depending on the pan you’re using, you may want to divide the dough into smaller pieces and roll them up or shape them into a single loaf. Ensure all seams are well sealed.
7. **Second Rise:** Place the shaped dough into a greased loaf pan. Cover it again and let it rise for another 30-45 minutes, until it has puffed significantly. This phase ensures that your bread remains fluffy.
8. **Preheat the Oven:** While the dough is rising, preheat your oven to 350°F (175°C). It’s essential to have the oven hot before putting the bread in for optimal crust development.
9. **Bake:** Once the dough has risen sufficiently, place it in the oven and bake for about 25-30 minutes. You will know it’s done when the top is golden brown and it sounds hollow when tapped on the bottom.
10. **Cool and Enjoy:** Once out of the oven, allow the milk bread to cool in the pan for about 10 minutes before transferring it to a wire rack. Let it cool completely before slicing. This step prevents the interior from becoming soggy.
With each slice, you’ll experience the sublime combination of fluffy texture and slightly sweet flavor. You may find it hard to resist devouring a whole loaf!
Variations & Substitutions
Milk Bread with Whole Wheat Flour: If you’re looking for a healthier alternative, replacing part or all of the all-purpose flour with whole wheat flour adds additional fiber and nutrients. Keep in mind that whole wheat flour absorbs more moisture, so you may need to adjust the liquid content slightly. The result will yield a denser loaf but still incredibly soft.
Herb Infused Milk Bread: For those who enjoy savory flavors, incorporating fresh or dried herbs such as rosemary, thyme, or even garlic powder can elevate your milk bread. Simply add herbs during the mixing stage with the flour. The aromatic qualities will transform your bread into a delightful side for dinners or a fantastic base for sandwiches.
Chocolate Chip Milk Bread: If you have a sweet tooth, tasters young and old will fall for a chocolate chip variation. Add semi-sweet or dark chocolate chips when mixing in the wet ingredients. The sweet, melty surprise in each bite will make it perfect for breakfast or dessert.
Milk Bread Rolls: Rather than shaping your dough into a loaf, consider making rolls. Divide the dough into equal-sized pieces, shape them into balls, and place them in a greased baking dish close together. Bake in the same manner. Fresh rolls add a delightful element to family dinners or gatherings.
Gluten-Free Milk Bread: For a gluten-free version, use a gluten-free all-purpose flour blend that contains xanthan gum. Remember that gluten-free breads might not achieve the same fluffiness as traditional bread, but with the right mixture, you can achieve a good texture. Always check the labels carefully for any hidden gluten in other ingredients.
Making alterations not only keeps the recipe fresh but also prepares you for any dietary restrictions or personal preferences your family may have.
Common Mistakes to Avoid
One common mistake in bread baking is not ensuring your yeast is active. Always check the expiration date and perform a yeast test by proofing it in warm milk with sugar. If it doesn’t bubble or froth, it’s best to start with new yeast.
Another critical warning is the use of incorrect flour measurements. Too much flour can lead to a dry loaf, while too little can prevent the dough from rising properly. Measuring by weight instead of volume can yield better accuracy.
Additionally, avoid over-kneading the dough. While it’s important to develop gluten, too much kneading can lead to a tough crust. Go by feel to ensure the dough is just right: smooth and elastic.
Finally, being tempted to open the oven while baking can alter the temperature drastically, affecting your bread’s overall rise and texture. Wait until at least 20 minutes into baking before peering at your masterpiece.
Storage, Freezing & Reheating Tips
To keep your Soft and Fluffy Homemade Milk Bread fresh, it’s best stored in an airtight container at room temperature for up to 3 days. For longer storage, consider freezing it. Slice the bread, wrap it in plastic wrap or aluminum foil, and then place it in a freezer-safe bag. It can be frozen for up to 3 months.
When you’re ready to enjoy, defrost it at room temperature or pop it in the oven at a low temperature for a few minutes until warmed through. If you want to refresh the crust, sprinkle a little water on it before reheating; this will help revive its delightful crustiness without drying it out.
Always ensure to practice safe food handling methods to avoid spoilage, especially if you’re storing leftover homemade bread.
Frequently Asked Questions
Can I use instant yeast instead of active dry yeast?
Yes, you can easily substitute instant yeast for active dry yeast. There’s no need to proof instant yeast; simply mix it directly with your dry ingredients. You may want to slightly lower the amount of instant yeast since it is more concentrated.
Why is my bread dense?
A dense loaf often results from using too much flour, insufficient kneading, or baking at a temperature that is too low. Be sure to measure flour accurately and knead until the dough is smooth and elastic. Furthermore, ensure the oven is fully preheated before baking.
Can this recipe be doubled?
Absolutely! If you want to make more bread, simply double the amounts of each ingredient. Make sure you have a sufficiently large bowl for mixing and a bigger baking pan if you wish to bake it all at once.
How can I tell if my bread is done baking?
A reliable method to check for doneness is to tap the bottom of the loaf; if it sounds hollow, it’s ready. Internal temperature should reach around 190°F (88°C) for optimal results. Oven times can vary, so keeping an eye on it helps.
What can I use instead of butter?
If you require a dairy-free option, olive oil, coconut oil, or any other vegetable oil will work well as a substitute for butter. This can also provide a slightly different flavor profile while ensuring the bread remains moist.
Conclusion:
This Soft and Fluffy Homemade Milk Bread recipe is not just a baking project; it’s about creating joyful memories and indulging in comforting flavors. The beauty of this bread lies in its versatility and simplicity, making it a must-try for everyone, from seasoned bakers to kitchen novices.
I encourage you to give this recipe a go and feel free to customize it or add a personal touch. Whether you’re making it for a family breakfast or just for yourself, the delightful aroma and taste will undoubtedly brighten your day. Don’t forget to share your baking experiences; it’s a delightful journey everyone should partake in!