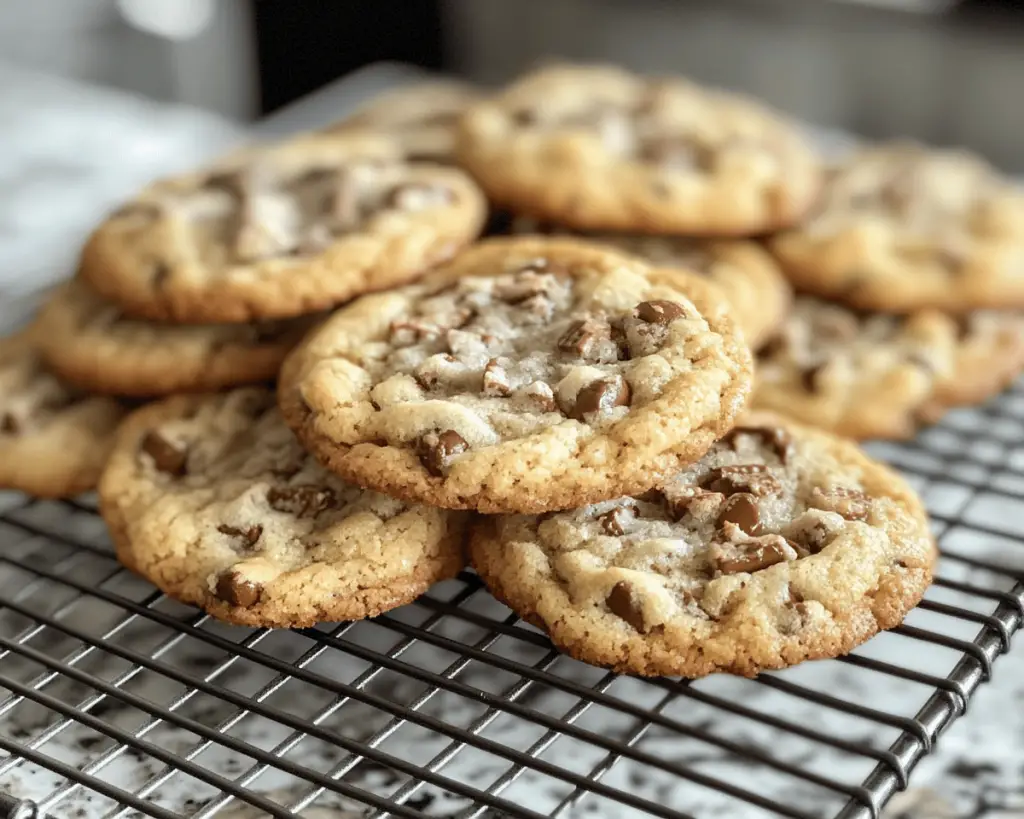
Let me set the scene for you: it’s a grey and drizzly day (because really, when isn’t it), and I’m cozied up in my kitchen, trying to figure out how to coax some cheer into my life. I mean, even the weatherman would agree that a little sweetness is just the antidote I need right now, you know? I can already hear the grumbling of my inner child: “Why didn’t you make these when we were kids?!” And here we are, diving straight into the realm of Southern Tea Cake Cookies, those little nuggety delights that, quite frankly, I’ve been craving since I tasted them at a friend’s house years ago.
Tea cake cookies—those buttery, tender morsels that remind you of simpler times, like swinging on a porch with sweet tea in hand (or wine, no judgment here). I’ve gotta confess: the first time I attempted these bad boys, I ended up with a soupy disaster that looked like it could’ve been a science project. But I persevered. And somehow, with each trial, I found the magic that makes these cookies iconic in Southern kitchens. They’re not just cookies; they’re a way of life. So, let’s get this party started!
Ingredients, Unfiltered
What’s Really in Southern Tea Cake Cookies?
Before we get our hands messy, let’s talk about what we’re putting into these wonderfully Southern bites of happiness.
All-Purpose Flour: This is the backbone of our cookies. You could try to make them with other flours, but let’s face it, we’re going classic here. I’m a *huge* fan of King Arthur Flour; it never lets me down, unlike that one guy at the bar last Friday.
Sugar: Sweetness, baby! Granulated sugar will do the job just fine. Remember what they say, you can never have too much sugar… although your dentist might take issue with that statement.
Baking Powder: We need some lift, and baking powder is the secret to keeping these cookies from feeling like bricks, which honestly, I once made. Yes, they were not good!
Salt: A pinch of salt is essential. It’s like a good friend who makes everything better. Just think of it as a flavor enhancer; it makes the sweetness sing!
Butter: Obviously, we’re talking about the *real deal* here. None of that margarine nonsense—have some respect for yourself and go for unsalted butter. I like to take mine out and let it soften on the counter because that’s the secret to creamy, dreamy dough.
Egg: Ah, the egg. It binds everything together. Let’s just say, in this cookie world, it’s the glue that keeps us together—similar to what that *one* friend does during group chats.
Vanilla Extract: If you’re not using pure vanilla extract, you’re doing it all wrong! The imitation stuff can just leave the scene entirely.
Nutmeg: A pinch is enough to sprinkle warmth and a hint of nostalgia. Nutmeg is like that cool cousin who shows up at family gatherings and instantly becomes the life of the party.
Milk: This is the dreamy addition that takes these cookies from ordinary to extraordinary. You can go with whole milk, because why not? You’re baking, and calories don’t count when it’s a special occasion (that’s an actual scientific fact!).
Let’s Talk Health (or Not)
Is This Even Healthy? Let’s Discuss
Alright, let’s get real for a sec—these cookies are not what you’d call health food. Sure, we have some wholesome ingredients, but mostly, we’re looking at sugar, butter, and all those delightful carbs. If you’re a clean eater, this may not fit your mantra. But you know what? Life is too short to skip on the cookies! As I always say, self-care sometimes means treating yourself to a cookie (or two… or six). Besides, sugar is what’s known as “soul food,” and your soul deserves to be fed well, after all!
So yes, there’s butter. And yes, I sleep just fine at night. I mean, have you seen how these cookies turn out? Worth it.
Your Grocery List
Here’s What You’ll Need
– 2 ½ cups all-purpose flour
– 1 cup granulated sugar
– 1 tablespoon baking powder
– ½ teaspoon salt
– 1 cup unsalted butter, softened (err on the side of too soft! We want buttery dreams)
– 1 large egg (medium if you feel like being rebellious)
– 1 tablespoon vanilla extract (don’t skimp!)
– ¼ teaspoon ground nutmeg
– ¼ cup milk (whole, skim, whatever floats your boat)
This will yield about 24 cookies (or 12, if you’re me and have a general inability to share).
The Actual Cooking Part
Okay, Let’s Make This
1. **Preheat Your Oven**: Grab your most fabulous oven mitts and preheat that baby to 350°F. I always debate whether my trusty old oven is too hot or too cold. But hey, we’re going to make it work!
2. **Mix It Up**: In a large mixing bowl, combine your flour, sugar, baking powder, and salt. Give it a little whisk like you’re auditioning for Top Chef. You only need to mix until it’s combined—don’t go overboard or you’ll end up with more chewy than tender. We’re aiming for light and fluffy, not a workout session for your forearms.
3. **Butter Time**: In your stand mixer (or a medium bowl if you don’t have one—God bless you for your arm muscles), cream the softened butter until it’s fluffy. And I mean fluffy like my aunt’s hairstyle from the ’80s. Once it’s looking good, slowly beat in the egg, vanilla, and enough milk to turn it into a creamy dream.
4. **Combine**: Now it’s time to meld our dry and wet ingredients. Pour the dry stuff into the wet stuff all at once and give it a mix until combined. You don’t want to overmix, remember? We want a sighing, happy cookie dough.
5. **Scoop ‘Em Out**: Using a medium cookie scoop (or a heaping tablespoon if you’re unsupervised), drop the dough balls onto parchment-lined baking sheets, giving them enough space to spread. It’s crucial not to overcrowd them; we’re building cookie castles here, not dough mountains.
6. **Sprinkle Magic**: It’s a pro tip and something I like to do to add that *extra something* — sprinkle a li’l nutmeg or sugar on top before baking. It’s like giving your cookies a hat. Fashionable and festive!
7. **Bake**: Throw those beauties in the oven for about 10–12 minutes, or until the edges are just lightly golden. Now, here’s where I occasionally screw up; set a timer because I have a knack for getting distracted by cat videos. Just don’t panic if they look a little puffy—they’ll settle once out of the oven!
8. **Cool and Nom**: Let them cool on the baking sheet for about five minutes before transferring them to a wire rack. I always find it nearly impossible not to snag a cookie during this process—those warm, fresh-from-the-oven cookies begging to be devoured? No willpower, here!
Side Notes & Sassy Hacks
Bonus Tips You Didn’t Ask For
Okay, let’s chat about some ways to jazz up your tea cakes — extensions to your Southern experience!
– **Flavor Add-ins**: You can always mix in some chocolate chips if you want to get wild. I’ve heard some folks add Lemon Zest or almond extract, too. Just figure out what makes you feel fancy.
– **Storage**: If you’re feeling like an overachiever, these can be stored in an airtight container for about a week. However, I know for a fact they’ll be gone before that.
– **Freezing**: Roll the dough into balls and freeze them before baking. When that 10 PM “I need cookies” craving strikes, just pop them into the oven straight from the freezer and adjust baking time. Bam! Cookies at convenience!
– **Decoration**: Try drizzling melted chocolate on top for a more decadent indulgence. Or dust with powdered sugar for that lovely retro vibe!
– **Tea Party**: Pair your cookies with a batch of sweet tea or coffee and sit down for your very own tea party, complete with imaginary friends. (Trust me, it’s a vibe!)
Final Words of (Culinary) Wisdom
These Southern Tea Cake Cookies have a way of warming the soul and lifting spirits, even if the weather outside is frightful! Every time you bite into their tender sweetness, remember that you’ve conjured up a little piece of tradition right in your own kitchen. If you try them, please tag me! Or just send me a mental high-five; I’ll take either.
Here’s to enjoying life’s little moments, one cookie at a time. So, go on, unleash your inner baker, get a little messy in the kitchen, and embrace the cookie-making chaos. Because, let’s be honest, what could possibly go wrong? (Cue my latest mishaps rushing back to me). Happy baking, friends!