Prep time: 10 minutes
Cook time: 25 minutes
Total time: 35 minutes
Servings: 8 servings
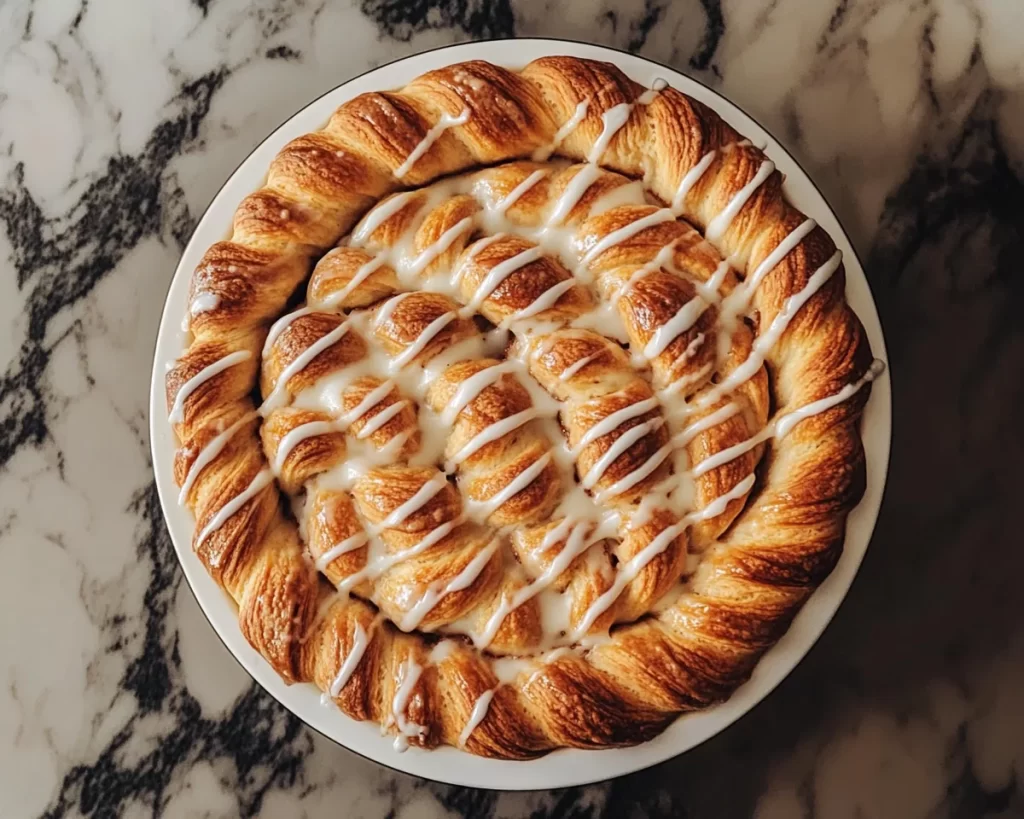
Spring is a time for renewal, and what better way to celebrate than with a delicious, beautifully braided cinnamon roll? This Cinnamon Roll Braid with Cream Cheese Glaze is perfect for a quick breakfast or a delightful afternoon snack. With just 35 minutes from start to finish, you can impress your family and friends without spending hours in the kitchen.
What Is Spring Baking: Cinnamon Roll Braid With Cream Cheese Glaze in 35 Minutes?
Spring Baking is more than just a seasonal trend—it’s an opportunity to create bright, fresh flavors in your treats. This Cinnamon Roll Braid combines classic cinnamon roll elements with a visually stunning braid that’s sure to be a hit. The soft dough is filled with a tantalizing blend of cinnamon and sugar, then braided to create an elegant presentation. Topped with a smooth cream cheese glaze, this dish is not only beautiful but delicious.
Why You’ll Love This
You’ll love this Cinnamon Roll Braid because it’s incredibly easy to make, requiring minimal ingredients and time. It’s perfect for busy mornings or last-minute brunch gatherings. The sweet aroma fills your home, embodying the essence of spring. The best part? You can enjoy this delightful treat warm out of the oven, making every bite taste fresh and delightful.
Ingredients You’ll Need
- 1 can of refrigerated crescent roll dough: This serves as the base of your braid, providing a flaky and buttery texture.
- 1/2 cup granulated sugar: This adds sweetness to the filling, enhancing the cinnamon flavor.
- 2 tablespoons ground cinnamon: A key ingredient that gives that warm, comforting flavor.
- 1/4 cup unsalted butter, softened: This helps to bind the filling together, providing moisture and richness.
- 1 cup powdered sugar: This is used in the cream cheese glaze for a sweet finish.
- 4 ounces cream cheese, softened: This forms the base of the glaze, adding creamy richness.
- 1 tablespoon milk or cream: This provides the right consistency for the glaze.
- 1 teaspoon vanilla extract: This adds a lovely background flavor to the glaze.
How to Make
- Preheat your oven to 350°F (175°C). This ensures your cinnamon roll braid bakes evenly and comes out perfectly golden.
- Unroll the refrigerated crescent roll dough and lay it out on a greased baking sheet. Be careful not to tear it, as you’ll use the whole sheet for your braid.
- In a small bowl, mix together the granulated sugar and ground cinnamon. This combination is the heart of your filling, giving the bread its signature flavor.
- Spread the softened butter evenly over the crescent roll dough. This step adds richness and helps keep the dough moist during baking.
- Sprinkle the cinnamon-sugar mixture evenly on top of the butter. Make sure to cover the dough thoroughly for the best flavor.
- Using a sharp knife or pizza cutter, slice the dough into strips that are about 1 inch wide on each side of the filling, leaving the center intact for the braid.
- Begin braiding the strips over the filling—start at one end and alternate bringing the left and right pieces over the filling, forming a twist. This creates that beautiful braided look.
- Once shaped, bake the cinnamon roll braid in the preheated oven for approximately 20-25 minutes, or until it’s golden brown. Keep an eye on it to avoid over-baking.
- While it’s baking, prepare the cream cheese glaze. In a mixing bowl, combine the softened cream cheese, powdered sugar, milk, and vanilla extract. Whisk until smooth and creamy.
- When the braid is done baking, allow it to cool slightly before drizzling the cream cheese glaze generously over the top. The warmth will cause it to melt slightly for added flavor.
Variations & Substitutions
Nutty Variation: For a delicious twist, add 1/2 cup of chopped pecans or walnuts to the cinnamon-sugar filling. The nuts give a delightful crunch that complements the soft dough. Simply mix them in when combining your filling ingredients.
Fruit-Infused Twist: Incorporate your favorite fruits, like diced apples or cherries, into the filling for a fruity note. Add around 1/2 cup of fresh or frozen fruit to the cinnamon sugar mixture, adjusting the sugar as needed to accommodate the natural sweetness.
Gluten-Free Option: If you’re gluten intolerant, use gluten-free crescent roll dough, which you can find at most supermarkets. Ensure all other ingredients are also gluten-free to avoid cross-contamination.
Spiced Variation: Experiment with different spices by adding nutmeg or cardamom to the filling. These spices can enhance the complexity of flavors and elevate this simple dish into something extraordinary.
Chocolate-Cinnamon Braid: For chocolate lovers, you can substitute the cinnamon-sugar mixture with a chocolate spread or add cocoa powder to the filling for a twist that offers both sweetness and a rich chocolate flavor.
Common Mistakes to Avoid
One common mistake is not sealing the edges of the braid properly. If your dough isn’t well sealed, the filling can leak out during baking, resulting in a less attractive braid. To avoid this, ensure that you press the seams firmly together after braiding.
Another frequent error is overbaking. Keep an eye on the dough as it bakes; it can go from perfect to overdone quickly. The braid should be golden brown, but check for doneness a few minutes early to ensure you don’t lose that soft, tender texture.
Additionally, don’t skip the cooling time before adding the glaze. If you apply the glaze too soon, it will melt and run off, instead of forming a beautiful coating on top of the braid. Allow it to cool for just a few minutes, then drizzle on the glaze for the best results.
Storage, Freezing & Reheating Tips
To store leftover Cinnamon Roll Braid, wrap it tightly in plastic wrap or place it in an airtight container. It can last at room temperature for up to 2 days or in the refrigerator for up to a week. If you choose the refrigerator route, the dough may dry out slightly, so consider heating it before serving.
For long-term storage, this braid can be frozen. Wrap it tightly in aluminum foil or use a freezer-safe container. It can be frozen for up to 3 months. To reheat, allow it to thaw in the refrigerator overnight and then warm it in a preheated oven at 350°F (175°C) for 10-15 minutes, until heated through.
Make sure to discard any leftover glaze if the braid is stored, as the glaze may not hold up well after being refrigerated.
Frequently Asked Questions
Can I make this braid ahead of time?
Yes, you can prepare the dough and filling the night before. Simply assemble the braid, cover it tightly, and store it in the refrigerator. Bake it in the morning for a fresh, warm breakfast that will impress everyone.
What can I serve with the cinnamon roll braid?
This delightful treat pairs wonderfully with freshly brewed coffee, tea, or even a fruit smoothie. The lightness of the braid complements these beverages beautifully, making it ideal for brunch gatherings or special occasions.
Can I use other types of dough?
Absolutely! You can explore using puff pastry or even homemade dough for a different texture. If you opt for homemade dough, a brioche or sweet bread dough would work wonderfully for added richness.
How do I prevent the filling from spilling out?
To minimize the risk of the filling leaking, ensure you seal the edges of the dough well. Additionally, don’t overload the filling—less is often more when it comes to keeping the braid intact.
Is this recipe kid-friendly?
Definitely! Kids will enjoy helping to mix the filling and braiding the dough. It’s a fun and interactive way to get them involved in the kitchen. Plus, they’ll love eating the sweet, gooey braid once it’s out of the oven.
Conclusion:
Creating a stunning Cinnamon Roll Braid with Cream Cheese Glaze in just 35 minutes is not only achievable but also a delight for both the cook and those who enjoy it. Whether you’re preparing breakfast for the family or looking to impress guests at a spring gathering, this fragrant, sweet treat is sure to please all palates. With its simple ingredients and clear steps, it reflects the fresh spirit of spring baking, making it a year-round favorite that you’ll want to revisit again and again.