Prep time: 30 minutes
Cook time: 45 minutes
Total time: 1 hour 15 minutes
Servings: 12
Spring Birthday Cake Aesthetic: 7 Tips for a Stunning Dessert is more than just a cake; it’s a celebration of life, color, and flavor that mirrors the beauty of springtime. With its layers of fluffy sponge cake, creamy frosting, and vibrant decorations, this cake is ideal for birthdays or any springtime gathering. Imagine the joy on everyone’s faces as they indulge in this delightful dessert, making it truly memorable. Whether you’re a seasoned baker or a kitchen novice, this recipe will guide you to create a masterpiece that not only tastes fantastic but also looks visually stunning.
What Is Spring Birthday Cake Aesthetic: 7 Tips for a Stunning Dessert?
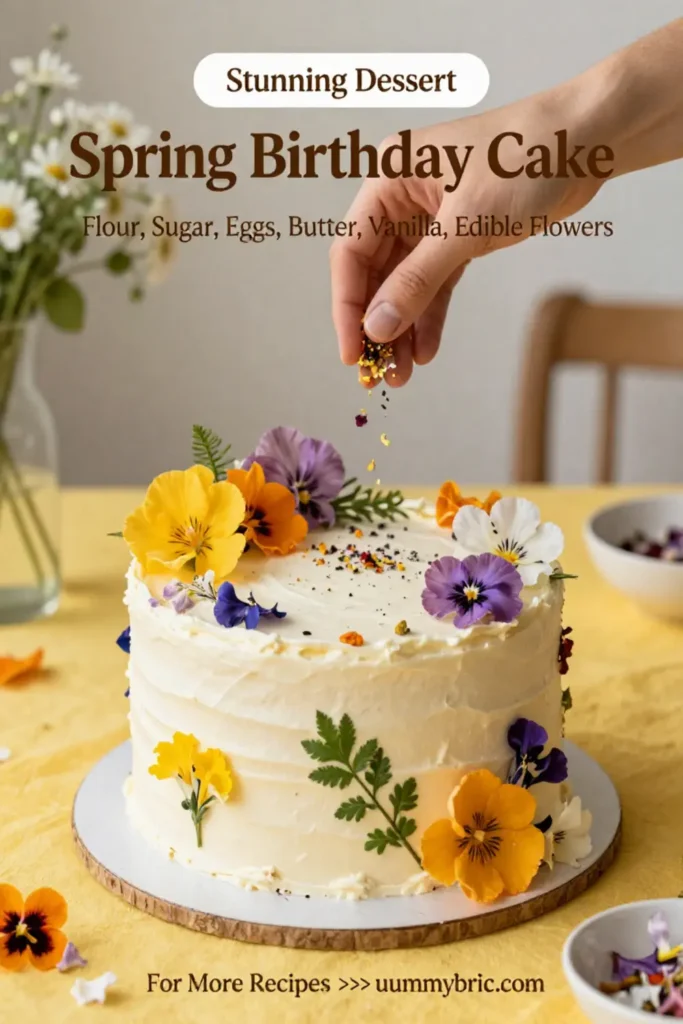
The Spring Birthday Cake is inspired by the blossoming flowers and bright colors of the season. This cake features layers of delicate vanilla sponge, rich buttercream, and is decorated with seasonal fruits and edible flowers, bringing a touch of elegance to any celebration. The beauty lies not only in its taste but also in the presentation, making it a showstopper at any birthday party.
Why You’ll Love This
This cake stands out for several reasons. First, it is layered with a wonderfully fluffy sponge that melts in your mouth, paired with a creamy frosting that holds its shape beautifully. Second, the addition of fresh fruits adds a natural sweetness and a vibrant pop of color that screams spring. Furthermore, it’s versatile enough for customization. You can mix and match flavors according to your preferences, whether you favor chocolate, vanilla, or something fruitier. Lastly, it fosters creativity—perfect for engaging the family in baking, making it a memorable activity.
Ingredients You’ll Need
To get started on your Spring Birthday Cake, gather the following ingredients:
- 2 ½ cups all-purpose flour: This forms the base of your cake, giving it structure.
- 2 ½ teaspoons baking powder: This helps the cake rise, creating a light and fluffy texture.
- 1 teaspoon salt: Enhances the flavor of the cake.
- 1 cup unsalted butter (room temperature): Adds richness and helps create a tender crumb.
- 2 cups granulated sugar: Sweetens your cake and contributes to its moistness.
- 5 large eggs: Provides binding and adds moisture.
- 1 tablespoon vanilla extract: Infuses the cake with a warm, inviting flavor.
- 1 cup whole milk: Helps in achieving the perfectly moist texture.
- 4 cups powdered sugar: For frosting, creating a sweet and creamy layer.
- ½ cup heavy cream: Used for a light and fluffy frosting consistency.
- Seasonal fruits (berries, peaches): For decoration, providing a fresh and vibrant touch.
- Edible flowers: These add a beautiful aesthetic, making your cake truly stand out.
How to Make
- Prepare your cake pans: Preheat your oven to 350°F (175°C). Grease and flour two 9-inch round cake pans to prevent sticking and ensure easy removal.
- Mix dry ingredients: In a bowl, whisk together the flour, baking powder, and salt until well combined. This ensures an even distribution of the leavening agent for a perfectly risen cake.
- Cream the butter and sugar: In a large mixing bowl, beat the butter and granulated sugar with an electric mixer on medium speed until the mixture becomes light and fluffy, about 5 minutes. This aerates the mixture, contributing to the cake’s light texture.
- Add eggs and vanilla: Beat in the eggs one at a time, ensuring each is fully incorporated before adding the next. Then mix in the vanilla extract. This adds flavor and moisture.
- Combine wet and dry ingredients: Gradually add the dry mixture and milk, alternating between the two and mixing until just combined. Be careful not to over-mix, as this could result in a dense cake.
- Bake the cakes: Divide the batter evenly between the prepared pans and smooth the tops with a spatula. Bake in the preheated oven for 25-30 minutes or until a toothpick inserted in the center comes out clean. This is crucial for ensuring that your cakes are perfectly baked.
- Cool the cakes: Let the cakes cool in the pans for 10 minutes before transferring them to wire racks to cool completely. This resting period allows the cakes to settle and makes removing them easier.
- Prepare the frosting: In a mixing bowl, beat the heavy cream until soft peaks form. Gradually add the powdered sugar until fluffy and spreadable, taking care not to over-mix which can lead to a grainy texture.
- Assemble the cake: Once the cakes are completely cooled, place one layer on your serving platter. Spread a generous amount of frosting on top, then place the second layer on top. Coat the entire cake with frosting, smoothing it out for a polished look.
- Decorate: Top the cake with seasonal fruits and edible flowers. The vibrant colors will enhance the visual appeal and bring a taste of spring into your celebration.
Variations & Substitutions
Chocolate Spring Birthday Cake: For chocolate lovers, substitute 1 cup of the all-purpose flour with cocoa powder. This will give a rich chocolate flavor while maintaining the light texture. Pair with a chocolate buttercream frosting for an indulgent treat!
Gluten-Free Spring Birthday Cake: For a gluten-free option, replace the all-purpose flour with a 1:1 gluten-free baking flour mix. Check that the baking powder is also gluten-free. Ensure all other ingredients are gluten-free certified for safety.
Fruit-Infused Cake: You can add lemon or orange zest to the cake batter for a citrus kick. Additionally, you could fold in fresh berries into the batter for an extra fruity flavor that enhances the spring aesthetic.
Vegan Spring Birthday Cake: Replace eggs with flaxseed meal mixed with water (1 tablespoon flaxseed meal + 3 tablespoons water per egg). Use vegan butter and plant-based milk for a completely vegan treat that everyone can enjoy!
Common Mistakes to Avoid
One common mistake is overmixing the batter. This can lead to a dense cake rather than the light and fluffy texture desired. Mix just until combined for the best results.
Another mistake is not letting the cakes cool properly. Removing them from the pans too soon can cause breakage, ruining the layers. Always allow them to sit in the pans before transfer.
Lastly, skipping the frosting chilling time can lead to a runny consistency, resulting in an improperly decorated cake. Make sure your frosting is thick enough for spreading and decorating beautifully.
Storage, Freezing & Reheating Tips
To maximize freshness, store leftover cake in an airtight container at room temperature for up to three days. If the kitchen is warm or if frosted, consider refrigerating it to maintain texture.
For longer storage, slice the cake and wrap each piece tightly in plastic wrap, then place them in a freezer-safe bag. The cake can be frozen for up to three months. When ready to eat, let it thaw in the refrigerator overnight.
Reheating isn’t usually necessary, but if desired, gently microwave individual slices for about 10-15 seconds. This warms the cake without compromising its texture, making it taste as fresh as when it was first baked.
Frequently Asked Questions
Can I make this cake in advance?
Yes, you can prepare the cake layers a day ahead. Just ensure they are completely cooled before wrapping them tightly in plastic wrap. You can also freeze them for longer storage and thaw them the day you plan to frost and serve.
Can I substitute the butter for margarine?
While you can use margarine, it may alter the texture and flavor of the cake. Butter gives the best taste and moisture. If you must substitute, choose a high-quality margarine.”
How do I prevent my cake from sticking to the pan?
To avoid sticking, use parchment paper on the bottom of the pan after greasing. Dust with flour to create a barrier, ensuring a smooth release. Additionally, let the cakes cool before attempting to remove them.
What type of frosting works best?
Buttercream is a classic choice due to its stability and versatility. You could also experiment with cream cheese frosting for a tangy flavor, or whipped cream for a lighter option, especially if topped with fresh fruits.
Conclusion:
In conclusion, the Spring Birthday Cake Aesthetic: 7 Tips for a Stunning Dessert combines flavor and beauty, making it the perfect centerpiece for any celebration. With careful preparation and personalization, this cake can be easily adapted to fit various occasions and tastes. Remember to have fun while baking and enjoy the process! Celebrating with delicious food creates lasting memories, and this cake will certainly enhance those special moments. Enjoy the process and celebrate spring with this delightful dessert!