Prep time: 30 minutes
Cook time: 30 minutes
Total time: 1 hour
Servings: 12 slices
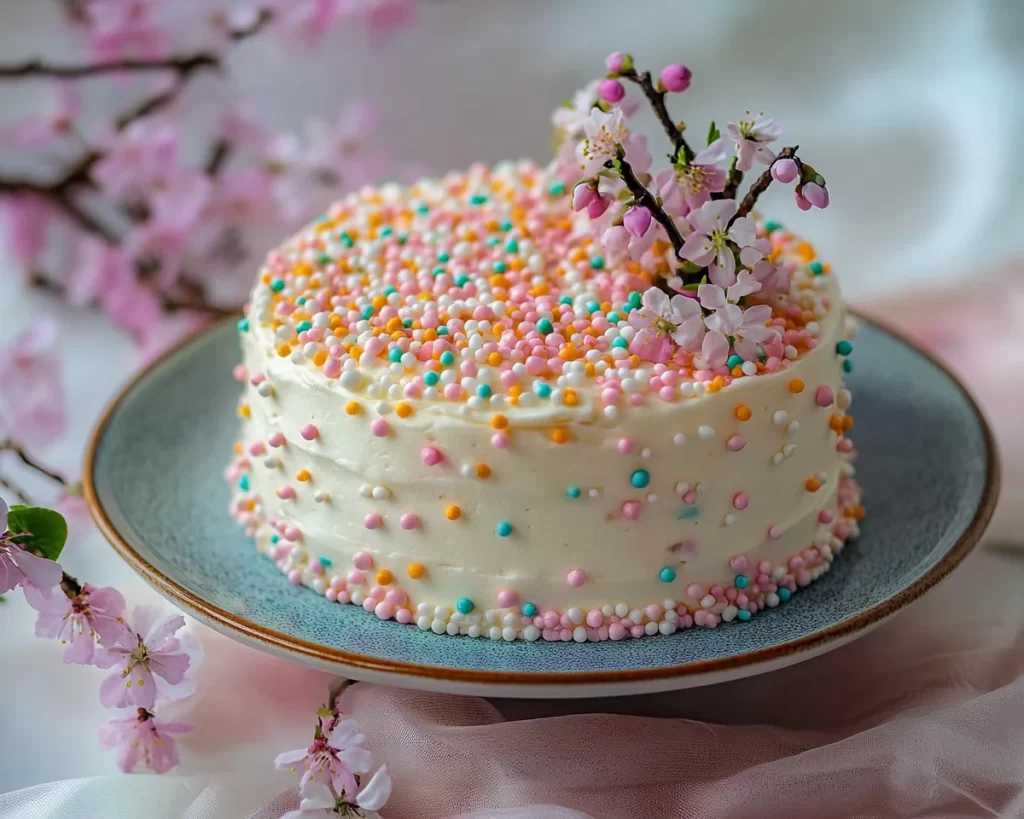
Creating a birthday cake that captures the essence of spring can be both a joyful and fulfilling endeavor. Imagine a light and fluffy cake adorned with pastel colors that evoke the beauty of blooming flowers and bright sunshine. This Spring Birthday Cake: Pastel Spring Birthday Cake is not just any ordinary cake; it’s a feast for both the eyes and the taste buds. With its delicate flavor, vibrant colors, and airy texture, this cake is perfect for celebrating the season or any special occasion.
In this article, you will discover how to make this gorgeous cake from scratch, along with tips for making it extra special. You will learn about the essential ingredients, step-by-step instructions, clever variations, and answers to common questions. By the end, you will be equipped to impress your friends and family with this spring-inspired treat.
What Is Spring Birthday Cake: Pastel Spring Birthday Cake?
Spring Birthday Cake: Pastel Spring Birthday Cake is a delightful dessert that combines the lightness of a sponge cake with the festive colors of spring. The origins of this cake can be traced back to traditional birthday cakes, designed to be both visually appealing and flavorful. This cake is typically layered and adorned with light frosting, often made from buttercream or cream cheese, giving it a rich yet airy feel.
The cake features a light vanilla or lemon flavor that perfectly complements its pastel colors, making it an enjoyable treat for people of all ages. The texture is soft and moist, thanks to a carefully measured balance of ingredients that allow it to rise beautifully in the oven. When you cut into it, the layers reveal a beautiful array of soft colors resembling a spring garden.
A typical Spring Birthday Cake is often decorated with fresh flowers or colorful sprinkles that replicate the vibrant atmosphere of the season. With its whimsical appearance and delightful taste, it stands as a centerpiece for any birthday celebration or spring gathering, offering a slice of joy with every bite.
Why You’ll Love This
There are countless reasons to adore this Spring Birthday Cake: Pastel Spring Birthday Cake. For starters, the taste is an absolute revelation! The combination of a soft cake and creamy frosting creates a harmonious symphony of flavors that delight your senses. It’s ideal for anyone who loves a sweet treat that is not overly rich, making it perfect for spring celebrations where lighter desserts are appreciated.
In addition to being a treat for the taste buds, this cake is also incredibly easy to make. Whether you are a seasoned baker or a beginner, the straightforward recipe ensures that you can create this masterpiece without feeling overwhelmed. Even busy parents can whip it up with minimal fuss while bonding with their children in the kitchen.
Cost-wise, making your own cake at home is often more economical than buying a custom cake from a bakery, particularly when you consider the high price of specialty cakes. Plus, you can choose high-quality ingredients that circumvent additives and preservatives found in store-bought varieties.
Lastly, the versatility of this cake is truly remarkable. You can change its flavors, fillings, and decorations to suit your preferences or dietary needs. If you want a completely gluten-free version, substitute with a gluten-free blend, or make it dairy-free with non-dairy butter and milk alternatives. The possibilities are infinite!
Ingredients You’ll Need
To create this beautiful Spring Birthday Cake: Pastel Spring Birthday Cake, you’ll need the following ingredients:
- 2 cups all-purpose flour: This is the foundation of your cake, giving it structure and stability. For a gluten-free version, use a gluten-free flour blend.
- 1 ½ cups sugar: This will add sweetness and help achieve that perfect fluffy texture.
- ½ cup unsalted butter: Make sure it’s softened to create a creamy mixture when creaming with sugar.
- 1 cup buttermilk: Provides moisture and contributes to the cake’s tenderness. You can substitute with milk mixed with a teaspoon of vinegar if you don’t have buttermilk on hand.
- 3 large eggs: These bind the ingredients and add richness. Ensure they are at room temperature for the best results.
- 1 tablespoon vanilla extract: This adds a warm flavor that complements the cake beautifully.
- 1 tablespoon baking powder: This ingredient is essential for leavening the cake, giving it the needed rise.
- ½ teaspoon salt: This balances the sweetness and enhances the overall flavor.
- Food coloring (pastel shades): Use your favorite colors to create the beautiful, vibrant layers that epitomize spring.
- Buttercream or cream cheese frosting: For decorating, you can either make homemade frosting or opt for store-bought. The creamy texture will pair perfectly with the cake.
- Fresh flowers or sprinkles: Optional for garnish to elevate the appearance and make the cake look extra festive.
Each ingredient plays a vital role in achieving the perfect flavor and texture of the cake. Be sure to measure accurately, and take note of each component’s purpose.
How to Make
Follow these step-by-step instructions to make your Spring Birthday Cake: Pastel Spring Birthday Cake:
- Preheat your oven to 350°F (175°C): Before you start mixing ingredients, preheating your oven ensures that your cake will cook evenly. Line two 9-inch round cake pans with parchment paper and grease the sides with butter.
- Cream the butter and sugar: In a large mixing bowl, using either a hand mixer or a stand mixer, cream together the softened butter and sugar until the mixture is light and fluffy. This step typically takes about 3-5 minutes. The creamy texture helps to incorporate air into the cake, contributing to its lightness.
- Add the eggs and vanilla: Beat in the eggs one at a time, ensuring each egg is fully incorporated before adding the next. Then, mix in the vanilla extract. The batter will become smoother and more homogeneous at this stage, indicating that you’re on the right track.
- Incorporate dry ingredients: In a separate bowl, sift together the all-purpose flour, baking powder, and salt. Gradually add this dry mixture to the wet ingredients, alternating with the buttermilk. Start and finish with the dry ingredients. Mix on low speed until just combined, being careful not to overmix, which can result in a dense cake.
- Divide and add color: Once the batter is well combined, divide it equally into several bowls, depending on how many colors you want to create. Add a few drops of food coloring to each bowl and mix until you achieve your desired pastel shades. Think about shades that reflect the spring season, like light pink, baby blue, soft yellow, and mint green.
- Pour into pans: Pour each colored batter into the prepared pans, making sure to gently spread it out evenly. Utilize a spatula for more control and aim for even spreading to ensure uniform baking.
- Bake: Place the cake pans in the preheated oven and bake for 25-30 minutes until a toothpick inserted in the center comes out clean. Avoid the temptation to open the oven door too early, as this could cause the cakes to sink in the middle.
- Cool: Once done baking, remove the cakes from the oven and let them cool in the pans for about 10 minutes. Then, transfer them to wire racks to cool completely. Cooling is crucial – frosting a warm cake can lead to melting frosting and a messy outcome.
- Make the frosting: In a separate bowl, prepare your frosting. If you are making buttercream, cream together softened butter with powdered sugar until fluffy, then add a splash of milk and vanilla for flavor. Adjust the consistency as needed, adding more milk for a thinner frosting or more sugar to thicken it.
- Assemble: Once the cakes have cooled completely, take the first layer and spread a generous layer of frosting on top. Place the second layer on top of the first and cover the entire cake with a layer of frosting. You can create a smooth finish or use a spatula for a textured look. For a festive touch, you can decorate with fresh flowers, sprinkles, or edible glitter, reflecting the beauty of springtime.
- Chill and serve: If time allows, refrigerate the cake for about 30 minutes to set the frosting before slicing. This will also make cutting easier. Once chilled, slice, serve, and enjoy this beautiful Spring Birthday Cake!
Variations & Substitutions
Gluten-Free Variation: If you or someone you know has gluten sensitivities, you can easily make this cake gluten-free. Swap the all-purpose flour for a gluten-free flour blend specifically designed for baking. Make sure to check whether the blend contains a leavening agent, as some gluten-free flour blends require additional adjustments. The flavor remains intact, and it allows everyone to partake in the joy of this birthday cake.
Lemon-Infused Cake: For a citrus explosion, you can add the zest of one lemon to the batter along with a bit of lemon juice. This adds a refreshing zing that pairs beautifully with the sweet frosting. It transforms the cake from just a regular birthday cake into something sophisticated and bright, perfect for those sunny spring days.
Vegan Version: To create a vegan-friendly alternative, substitute the eggs with an equivalent of unsweetened applesauce (1/4 cup per egg). Use coconut oil in place of butter, and opt for plant-based milk like almond or oat milk. Vegan butter can be used for the frosting, ensuring that no dairy is included. This variation keeps the richness intact while adhering to a vegan diet.
Chocolate Version: For chocolate lovers, incorporate cocoa powder into the batter. Replace 1/2 cup of flour with cocoa powder to achieve a decadent chocolate flavor. You could even switch up the frosting to chocolate buttercream for an indulgent cake experience. Garnish with chocolate shavings or cocoa dusting to amp up the chocolatey notes.
Seasonal Fruit Layer: Add elements from nature by including fruit layers such as fresh strawberries, raspberries, or even slices of peaches between the cake layers. This not only enhances the taste with a fruity burst but also gives a visually appealing touch when the cake is sliced. This variation adds a splash of freshness that complements the pastel aesthetic.
Common Mistakes to Avoid
When making the Spring Birthday Cake, there may be some pitfalls to watch out for to ensure success. One critical mistake is **overmixing the batter** once the dry ingredients are added. Overmixing can lead to a dense, tough cake rather than a light and fluffy one. To avoid this, mix until just combined, and be gentle.
Another common error is **not properly preparing the pans**. Ensure to grease and line your pans with parchment paper; cake layers can easily stick, leading to breaking when you try to remove them. Also, don’t skip the cooling process — frosting a warm cake can lead to a melted mess, ruining its beautiful appearance.
Lastly, many beginners struggle with **getting the right frosting consistency**. If your frosting is too stiff, it won’t spread easily, and if it’s too thin, it will run off the cake. Aim for a peanut butter-like consistency, which provides both stability and ease of use. Adjust as needed by adding more powdered sugar for thickness or milk for thinning.
Storage, Freezing & Reheating Tips
Proper storage of your Spring Birthday Cake is essential to maintain its moistness and flavor. After the cake has cooled completely and the frosting has set, cover it loosely with plastic wrap or store it in an airtight container. This will protect it from drying out. The cake can be stored at room temperature for up to three days, or in the refrigerator for up to a week.
For longer storage, you can freeze the cake. Cut it into slices or keep it whole, wrap it tightly with plastic wrap, and then place it in an airtight container or freezer bag. The cake can be frozen for up to three months. When you are ready to enjoy it, simply remove it from the freezer, unwrap it, and allow it to thaw in the refrigerator or at room temperature before serving.
As for reheating, there’s no need to reheat a cake unless you want it warm for serving purposes. If you decide to warm the cake, place it in the microwave for a few seconds, checking carefully to avoid overheating, as this can dry it out.
Frequently Asked Questions
Can I make this cake ahead of time? Absolutely! You can bake and frost the Spring Birthday Cake up to two days in advance. Just ensure that you store it properly in the fridge to preserve its freshness.
What can I use instead of buttermilk? If you don’t have buttermilk on hand, a simple substitute is to use regular milk mixed with a teaspoon of vinegar or lemon juice. Let it sit for about 5-10 minutes before adding it to your mixture, and you will achieve a similar tangy effect.
How do I get the cake layers even? One helpful tip is to weigh the batter in each bowl to ensure even division, or use an ice cream scoop for consistent measurements. Another method is to use a toothpick for leveling off the batter in the pans.
Can I use a different frosting? Yes, you can certainly use different types of frosting other than buttercream or cream cheese. Whipped cream or ganache could offer a lighter option if you want to keep it simple. Just make sure whatever frosting you choose complements the cake flavor.
Can I make this cake in a different shape or size? Yes! While this recipe is for round layers, you could easily make it in a rectangular shape or even cupcakes. The baking time may differ, so check for doneness based on the specific size and shape.
Conclusion:
This Spring Birthday Cake: Pastel Spring Birthday Cake is not only a visual delight but also a scrumptious treat that is perfect for celebrating any occasion. From its light and fluffy texture to its stunning pastel colors, this cake captures the essence of spring beautifully. With straightforward instructions and various options for variations, there’s no reason not to give it a try. Whether you’re crafting it for a birthday, a spring celebration, or simply because you want to indulge yourself, this cake is bound to become a favorite. So go ahead, get into the kitchen, and create your masterpiece. Your family and friends will thank you for this delicious slice of joy!
For more delightful dessert ideas, be sure to check out [Read also: Easy Dessert Recipes for Beginners].


