Prep time: 20 minutes
Cook time: 0 minutes
Total time: 20 minutes
Servings: 6-8
Spring is a season that invites us to refresh our palates and embrace vibrant colors with fresh produce. What better way to celebrate this season than with a stunning **charcuterie board**? It’s a delightful way to indulge in an assortment of flavors and textures, making it perfect for gatherings, picnics, or simply an elevated snack at home. In this guide, you’ll learn how to create a lovely Spring Charcuterie Board paired with delightful Spring Veggie Cups in just five steps. Elegant and simple, this pairing is a crowd-pleaser with something for everyone—fresh, crunchy veggies, and delightful pairings with savory meats and cheeses.
What Is Spring Charcuterie Board Ideas with Spring Veggie Cups in 5 Steps?
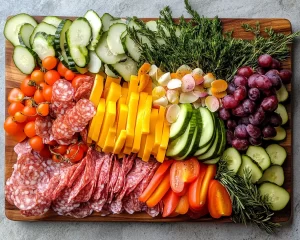
A Spring Charcuterie Board is an aesthetic arrangement of cured meats, cheeses, fruits, nuts, and vegetables. The term “charcuterie” originates from the French word for cured meats, but today it encompasses a variety of delicious options. Paired with Spring Veggie Cups, this arrangement becomes even more enticing, inviting you to dive into a delightful experience of fresh flavors and shareable bites. Vegetable cups filled with your favorite dip offer a crunchy contrast to the rich and savory elements of the charcuterie spread. This entire assembly showcases the essence of Spring—fresh, colorful, and packed with flavor.
Why You’ll Love This
You’ll adore this Spring Charcuterie Board for several reasons. First, it’s incredibly versatile; you can customize it based on your personal tastes or seasonal availability. The visual appeal is undeniable; a well-arranged board becomes a show-stopping centerpiece at any gathering. Furthermore, it requires no cooking, making it ideal for busy weekdays or hastily planned get-togethers. Lastly, the **variety** ensures everyone can find something they love, igniting conversations and bringing people together around the **joy of food**.
Ingredients You’ll Need
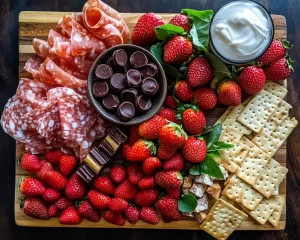
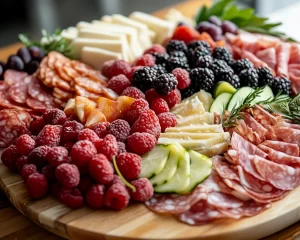
– **Cured meats** (such as salami, prosciutto, or chorizo) – Aim for 4 to 6 ounces total. These meats provide a savory, flavorful base for your board.
– **Cheeses** (like brie, cheddar, and goat cheese) – Choose 2 to 3 varieties totaling around 8 ounces. Soft and hard cheeses add different textures to your board.
– **Fresh vegetables** (carrots, cucumbers, bell peppers, radishes) – Prepare 1 cup of each, cut into bite-sized pieces. Fresh veggies add crunch and color.
– **Crackers and breads** – Offer an assortment, approximately 8 to 12 ounces. These serve as a perfect vehicle for meats and cheeses.
– **Fresh fruits** (grapes, strawberries, or apple slices) – Include 1 cup of a mix for sweetness and brightness.
– **Nuts** (such as almonds or walnuts) – Use about ½ cup for added crunch and nutritional benefits.
– **Dips** (hummus or tzatziki) – Provide about 1 cup, served in small bowls or cups.

How to Make
- Gather your ingredients: Begin by collecting all your ingredients. Ensure everything is fresh, as the vibrancy of your board will depend significantly on the quality of each item. Lay them out on a clean surface for easy assembly.
- Prepare the veggies: Cut the vegetables into sticks or rounds. For instance, slice the cucumbers into rounds, cut carrots into thin strips, and halve bell peppers. Arrange these colorful veggies in small cups, filling the bottom with a generous portion of dip. This not only keeps them crisp but also adds an inviting appearance.
- Assemble the charcuterie board: Start with larger items, like cheeses and meats. Arrange the meats in folds or curls for an interesting texture. Place each cheese in different sections of the board, allowing guests to explore different flavors.
- Add fruits and nuts: Fill in gaps with fresh fruits, providing a beautiful splash of color. Incorporate nuts around the board to add a rustic touch and enhance the visual appeal. Each component contributes to a stunning aesthetic, drawing the eye as people approach.
- Finish with crackers: Scatter crackers and slices of bread around the board. Consider providing a small knife for creamy cheeses, allowing guests to spread them on their chosen vehicle. Finally, garnish the board with fresh herbs or edible flowers if desired, adding an extra layer of elegance to your creation.
Variations & Substitutions
Vegetarian Charcuterie Board: For those adhering to a vegetarian diet, swap out the cured meats for a variety of marinated olives, roasted red peppers, and artichoke hearts. Adding items like smoked tofu or plant-based cheeses can also create depth in flavor. Try incorporating different nuts and a variety of cheeses, such as a tangy feta or creamy mozzarella. This option keeps the essence of a charcuterie board but remains aligned with vegetarian dietary preferences.
Gluten-Free Charcuterie Board: To cater to gluten-sensitive guests, replace traditional crackers with gluten-free options such as rice cakes or veggie chips. Fresh fruits, nuts, and a selection of cheeses still work well with this type of board. Be mindful of any dips that may contain gluten and ensure everything is clearly labeled to keep everyone safe.
Kid-Friendly Charcuterie Board: Create a playful version by including fun shapes and colors. Use cookie cutters to create star-shaped sandwiches or cheese. Utilize baby carrots, cherry tomatoes, miniature pickles, and a selection of fruits like blueberries and watermelon cubes. Offer dips that are appealing to kids, like ranch or a sweet yogurt dip, ensuring the board looks both fun and exciting.
Seasonal Charcuterie Board: Embrace seasonal produce by adding items that reflect the time of year. During Fall, incorporate roasted squash, figs, or apple slices. In Winter, consider include pomegranates, citrus fruits, and heartier nuts. Changing items based on the season not only keeps the board fresh but also celebrates what each season has to offer.
Common Mistakes to Avoid
When creating a charcuterie board, one common mistake is overcrowding. Ensure to leave space between items for an organized look, which also invites exploration. Another pitfall is using only one texture; aim to incorporate a variety of textures, from creamy cheeses to crispy crackers and crunchy nuts for a balanced palate experience. Additionally, be cautious not to forget proper food safety; avoid leaving the board out for too long without adequate refrigeration, especially in warmer months. Lastly, neglecting to label items can lead to confusion; always include labels for dips and cheeses to inform guests of any allergens.
Storage, Freezing & Reheating Tips
Storing leftovers from your charcuterie board can be simple. If there are leftover cheeses, wrap them in parchment paper, followed by plastic wrap, and refrigerate. Most cured meats can be stored tightly in the freezer for future snacking but should be consumed within a few days of being opened. Fresh vegetables should be kept in the refrigerator in airtight containers, ensuring they remain crunchy. Dips like hummus can typically last around a week in the fridge, while yogurt-based dips should be consumed within a few days. Always be mindful of portion sizes to minimize food waste, allowing you to enjoy the full flavors of your charcuterie board.
Frequently Asked Questions
How can I make a charcuterie board for a large crowd? It’s all about scaling up! When preparing for large gatherings, consider creating multiple boards arranged in different areas to encourage mingling and movement. Increase the quantities of each ingredient and arrange them elegantly to catch the eye. You can also serve additional items, such as freshly baked bread or unique dips to offer variety. Don’t forget to include some sweet elements like dark chocolate or gourmet cookies to make it even more memorable.
Can I create a charcuterie board in advance? Yes, preparing components in advance is always a great idea. You can cut vegetables and fruits a day beforehand and store them in airtight containers in the fridge. Assemble the board a couple of hours before serving to allow the flavors to meld without risking freshness. Keep meats and cheeses wrapped until the last moment for optimal flavor and texture. Just make sure to store the board in the refrigerator if you’re making it too far ahead.
What’s the best cheese for charcuterie boards? The best cheeses blend flavor and texture. Varieties like aged cheddar, brie, and pepper jack offer diverse tastes that please many palates. Additionally, aim for soft and hard textures, like creamy blue cheese or fresh goat cheese to add dimension to your board. Aim to have at least three different cheese types to available to cater to different preferences.
How long should a charcuterie board sit out? A charcuterie board can typically sit out for about 2 hours at room temperature before it should be brought back into a cooling environment. In warmer climates, consider reducing this time to maintain proper food safety. It’s always best to keep an eye on the board, particularly when meats and cheeses are involved.
Can I use frozen vegetables in my charcuterie board? While frozen veggies can work in some contexts, they are generally not recommended for a fresh charcuterie board. The freezing process changes the texture, making them mushy upon thawing. However, consider roasting or cooking them as a separate side dish to complement your charcuterie offerings. Freshness plays a significant role in the overall success and appeal of the board, so opt for the freshest produce available.
Conclusion: Getting to enjoy a homemade Spring Charcuterie Board with Vegetable Cups is a delightful experience perfect for any gathering or weekend indulgence. The sheer beauty of arrangement, combined with the fresh flavors of Spring, promises an enjoyable culinary adventure. Each step is straightforward, making it accessible for anyone, regardless of kitchen experience. Whether tailored for friends, family, or personal enjoyment, this guide ensures you’re set to create an unforgettable experience. So gather your ingredients and start experimenting with flavors to discover your favorite combinations today!