Prep time: 20 minutes
Cook time: 15 minutes
Total time: 35 minutes
Servings: 24 cookies
Spring is in the air, and what better way to celebrate than with cheerful, festive cookies? These Spring Cookies Decorated Simple for a Cheerful Celebration are not only easy to make but also a joy to decorate! Perfect for gatherings, family treats, or just to brighten your day, these cookies harness the essence of the season with vibrant colors and delightful flavors.
What Is Spring Cookies Decorated Simple for a Cheerful Celebration?
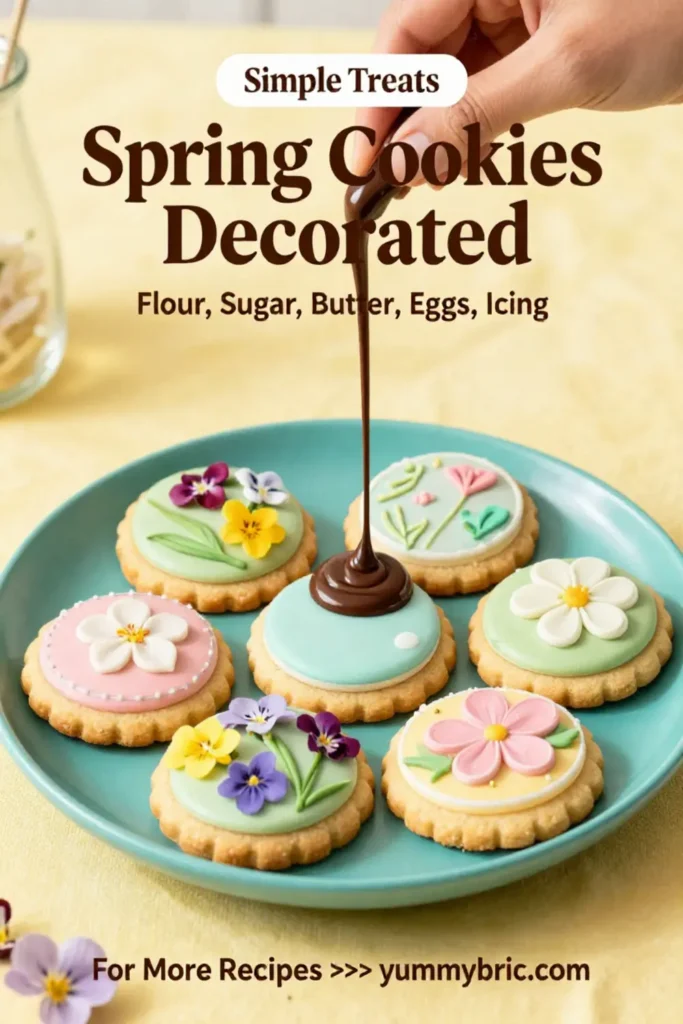
Spring Cookies Decorated Simple for a Cheerful Celebration are delightful, buttery sugar cookies customized with colorful icing and toppings. They are soft, sweet, and absolutely irresistible, making them a favorite for both kids and adults. The best part is that you can unleash your creativity in decorating. Whether you’re looking for pastel hues, floral designs, or seasonal motifs, these cookies allow for endless customization, making each batch a unique masterpiece.
Why You’ll Love This
There are countless reasons to cherish these Spring Cookies. To begin with, they are incredibly versatile and can complement any spring celebration, from Easter to birthday parties. The cookie dough is uncomplicated, relying on everyday ingredients that you likely already have in your pantry. Additionally, decorating these cookies can be an engaging activity for families or friends, creating memorable moments as you bond over sprinkles and icing. The delicious aroma that fills your kitchen while they bake will surely evoke the feelings of warmth and happiness associated with the spring season.
Ingredients You’ll Need
- Butter: 1 cup, softened to room temperature. This is the base for your cookies, providing a rich flavor and tender texture.
- Granulated Sugar: 1 cup. This sweetens the cookies and helps create a delightful crispness.
- Egg: 1 large. Acts as a binding agent, ensuring all ingredients hold together.
- Vanilla Extract: 2 teaspoons. Adds depth and enhances the sweet flavor of the cookies.
- All-purpose Flour: 3 cups. The primary component that gives structure to the cookies.
- Baking Powder: 1 teaspoon. Helps the cookies rise and achieve the perfect texture.
- Salt: ½ teaspoon. Balances the sweetness, elevating flavors in the cookies.
- Powdered Sugar: 2 cups. For the icing, providing sweetness and a smooth texture.
- Milk or Water: 3 tablespoons (for icing). Used to achieve the desired consistency for decorating.
- Food Coloring: Optional. To add vibrant colors to your icing for decoration.
How to Make
- In a large mixing bowl, cream together the butter and granulated sugar until the mixture is light and fluffy. This usually takes about 3-4 minutes. A properly creamed mixture will have a smooth consistency without any lumps, which is essential for fluffy cookies.
- Beat in the egg and vanilla extract until well combined. You want to ensure that these ingredients are fully integrated to avoid any pockets of egg when baking.
- In a separate bowl, whisk together the all-purpose flour, baking powder, and salt. Gradually add this dry mixture into the wet ingredients, mixing until just combined. Be careful not to overmix; this can lead to tough cookies. A gentle mix will keep them tender and soft.
- Once the dough comes together, cover the mixing bowl with plastic wrap and refrigerate for at least 30 minutes. Chilling the dough helps maintain its shape while baking and enhances the flavors.
- Preheat your oven to 350°F (175°C). Line a baking sheet with parchment paper or a silicone mat, which will prevent the cookies from sticking.
- Using a tablespoon, scoop portions of the chilled dough onto the prepared baking sheet, spacing them about 2 inches apart as they will spread slightly while baking.
- Bake in the preheated oven for 10-15 minutes or until the edges are lightly golden. Make sure to keep an eye on them as baking times can vary based on oven differences. Remove from the oven and let them cool on the baking sheet for 5 minutes before transferring to a wire rack to cool completely.
- While cooling, prepare the icing by mixing the powdered sugar with milk or water until you achieve a smooth, pourable consistency. If desired, divide into bowls and add food coloring for vibrancy.
- Once the cookies are cooled, decorate them with the icing using piping bags, spoons, or even dipping. Allow the icing to set before serving.
Variations & Substitutions
Chocolate Chip Spring Cookies: For a delightful twist, add 1 cup of mini chocolate chips to the dough before chilling. This will create a gooey, chocolatey surprise with each bite, balancing the sweetness of the cookie nicely.
Gluten-Free Version: Substitute the all-purpose flour with a gluten-free all-purpose blend, ensuring that it contains xanthan gum for texture. This allows those with gluten sensitivities to enjoy these cookies without compromising on taste.
Decorative Themes: The beauty of these cookies lies in their decorative versatility! Try using cookie cutters to create different shapes, such as flowers, butterflies, or even Easter eggs. Once baked, use different colored icings and edible glitters for a festive look.
Fruity Spring Cookies: Incorporate lemon or orange zest into the dough to add a refreshing citrus flavor. This brightens the overall taste and pairs wonderfully with the sweetness of the icing.
Common Mistakes to Avoid
One common mistake is not chilling the dough. Skipping this step may lead to overly spread cookies that lose their shape. Always allow sufficient time for chilling!
Another mistake is overbaking. Keep an eye on your cookies, and notice color changes. Remove them when they’re just turning golden around the edges for a soft, chewy center.
Additionally, be cautious with ingredient measurements, particularly with flour. Too much flour can create dry cookies. Always spoon flour into a measuring cup and level off with a knife instead of scooping directly from the bag.
Storage, Freezing & Reheating Tips
These cookies can be stored in an airtight container at room temperature for up to a week. To maintain freshness, ensure they are fully cooled before sealing. If you plan to store them for a more extended period, place cookies in a single layer between sheets of parchment paper in an airtight container, which helps prevent them from sticking together.
For freezing, wrap each cookie in plastic wrap, then place them in a freezer-safe bag. They can be frozen for up to 3 months. When you’re ready to enjoy, simply remove from the freezer and let them thaw at room temperature. You can also enjoy them slightly warmed in the microwave for a few seconds.
Frequently Asked Questions
Can I use margarine instead of butter?
While margarine can be used, it may impact the cookies’ flavor and texture. Butter offers a distinct richness that margarines typically lack. If you must use margarine, choose one that is high in fat content.
How can I make the icing thicker?
To achieve a thicker icing, increase the amount of powdered sugar gradually, mixing until you get the desired consistency. If you’re aiming for a thinner icing suitable for drizzling, add a little more milk or water.
What can I do if my cookies turn out too hard?
If your cookies came out harder than expected, they may have been overbaked. To prevent this in the future, keep an eye on them in the oven and take them out as soon as the edges are lightly golden. You can also try adding a bit of milk to the dough to keep them softer.
Can I add sprinkles to the cookies?
Definitely! Sprinkles can be added directly on top of the icing while it’s still wet for a festive look. Alternatively, you can mix them into the dough before baking for an added crunch.
What if I have leftover icing?
Leftover icing can be stored in an airtight container in the refrigerator for up to one week. Just give it a good stir before using it again, as it may thicken when stored.
Conclusion: Baking these Spring Cookies Decorated Simple for a Cheerful Celebration brings joy not only through their delicious taste but also through the lovely memories created in the kitchen. With simple ingredients and adorable decorations, they are perfect for sharing and celebrating the joyful moments of spring. Whether you’re preparing for a festive occasion or simply treating yourself and your family, these cookies will certainly add a sweet touch to your celebration. Get ready to enjoy each delightful bite that encapsulates the essence of the vibrant season!