Prep time: 20 minutes
Cook time: 25 minutes
Total time: 45 minutes
Servings: 12
Baking a sweet treat can often bring a smile to our faces, especially when you’re crafting something as delightful as Spring Cookies: Mini Egg Cookie Bars. As the sweet aroma fills your kitchen, these chewy bars loaded with colorful mini chocolate eggs evoke not only the festive spirit of Easter but also childhood memories of hunting for hidden treats. Imagine gathering around the table with family, sharing laughter, and enjoying these delicious bars that capture the essence of spring.
What makes this recipe truly special is its combination of convenience and joy. You don’t need to be a professional baker to create a delicious dessert that everyone will love. The vibrant mini eggs not only add a pop of color but also provide bursts of sweetness in each bite. In this article, you will learn how to prepare these scrumptious bars that are simple yet incredibly satisfying. We’ll explore tips and tricks to enhance your baking experience, delicious variations to accommodate different preferences, and all the essentials you’ll need to become a master of this delightful treat.
What Is Spring Cookies: Mini Egg Cookie Bars (Easter)?
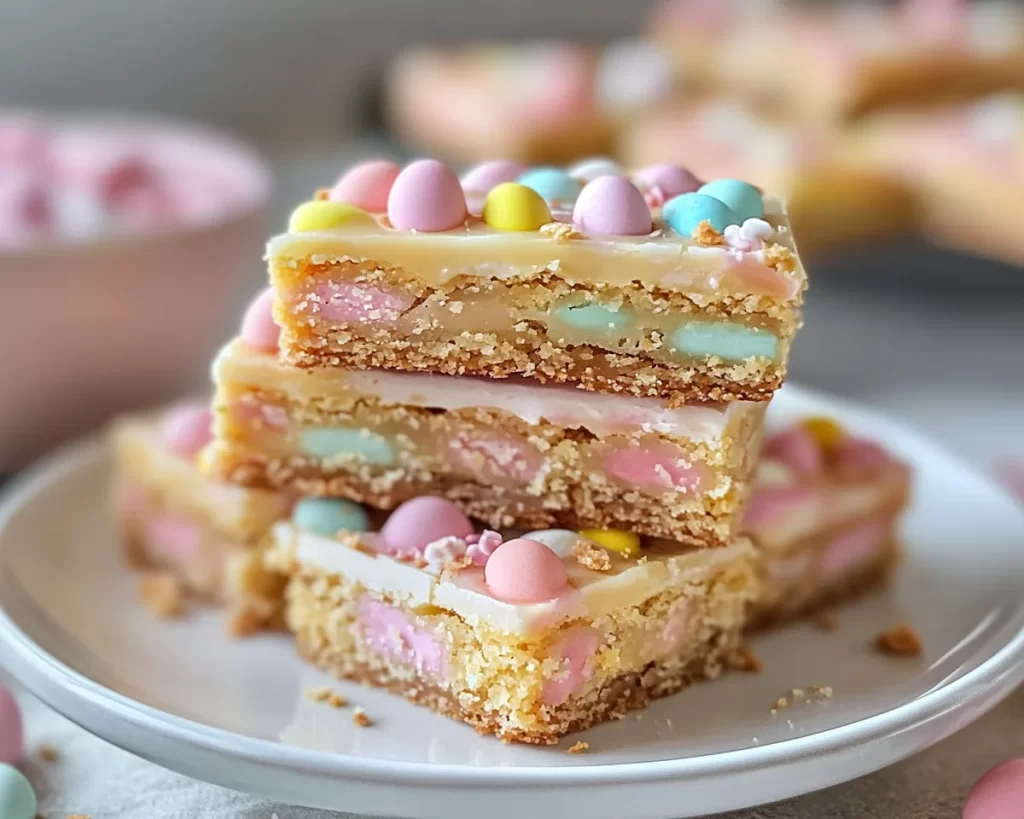
Spring Cookies: Mini Egg Cookie Bars are decadent, chewy cookie bars that are perfect for celebrating Easter and the arrival of spring. These bars are made with a buttery cookie base and studded with mini chocolate eggs, which give them a festive look and a satisfying crunch. The beauty of these bars lies in their texture; they are slightly crispy on the edges, yet soft and chewy in the center, ensuring every bite is delightful. As the mini eggs melt slightly during baking, they create pockets of sweetness that will charm your taste buds and keep you reaching for more.
The concept of cookie bars has its origins in the classic cookie, yet the versatility of bars makes them even more appealing. They are easy to prepare, requiring just a few mixing bowls and a baking pan, which means less cleaning up afterward—perfect for busy home cooks. Each bar is also easy to cut and serve, making them an excellent choice for gatherings, parties, or simply enjoying at home with loved ones. The combination of flavors from the vanilla, the butter, and the chocolate eggs captures the essence of spring and the joy of sharing sweet treats.
Why You’ll Love This
You’ll adore these Mini Egg Cookie Bars for numerous reasons. First and foremost, their flavor profile is an absolute crowd-pleaser. The bars combine the rich, buttery flavor of traditional cookies with the delightful sweetness of chocolate, creating a treat that appeals to both children and adults alike. Plus, the ease of preparation—just mix, bake, and serve—makes them an accessible recipe for both seasoned bakers and newbies alike.
Furthermore, these cookie bars are budget-friendly. The ingredients are pantry staples that won’t break the bank, making them an excellent option for those who love to bake on a budget. Whether you are making them for a family gathering, a potluck, or simply as an after-school snack, the cost-effectiveness combined with the joyful presentation makes them the ideal choice for any occasion. Mistakes in the baking process are negligible in this recipe, which makes them perfect for beginners who might be intimidated by more complicated desserts.
For those who might think that they can’t make this treat due to dietary restrictions, fear not! There are variations to accommodate different dietary preferences, ensuring anyone can enjoy these delicious bars. For instance, you can easily make them gluten-free or use dairy-free alternatives, allowing you to include everyone in the festivities.
Ingredients You’ll Need
To make these delightful cookie bars, you will need the following ingredients:
- 2 cups all-purpose flour
- 1 teaspoon baking soda
- 1/2 teaspoon salt
- 1/2 cup unsalted butter, softened
- 1 cup brown sugar, packed
- 1/2 cup granulated sugar
- 2 large eggs
- 1 teaspoon vanilla extract
- 1 1/2 cups mini chocolate eggs, chopped if desired
- 1/2 cup chocolate chips (optional)
Each ingredient plays a vital role in creating the perfect texture and flavor profile. The combination of all-purpose flour and baking soda creates a solid base for the cookie bars, while the salt enhances the overall sweetness. The unsalted butter contributes to the rich flavor and chewy texture, while brown sugar adds a lovely depth of sweetness and moisture.
Eggs bind everything together, ensuring your bars hold together perfectly upon baking. Vanilla extract is crucial, as it infuses the bars with a warm, inviting aroma. The mini chocolate eggs— the star of the show— add a burst of color and sweetness, making each bite delightful. Feel free to substitute with other chocolates, but remember, the essence of the recipe is to celebrate the whimsical feel of Easter, which mini eggs do wonderfully.
How to Make
Here’s how to create your own batch of Spring Cookies: Mini Egg Cookie Bars in just a few simple steps:
- Preheat your oven to 350°F (175°C) and line a 9×13-inch baking pan with parchment paper, leaving some overhang for easy removal later. This will ensure your cookie bars come out perfectly without sticking to the pan.
- In a mixing bowl, combine the flour, baking soda, and salt. Whisk the dry ingredients together until fully combined. This step is vital as it ensures your leavening agent is evenly distributed throughout the flour, leading to consistent baking.
- In another bowl, beat the butter with both sugars (brown sugar and granulated sugar) using an electric mixer until the mixture is light and fluffy—around 3-4 minutes. This aeration will lead to lighter and more tender cookie bars.
- Next, add the eggs one at a time, beating well after each addition. Follow with the vanilla extract and mix just until combined. You don’t want to over-mix at this stage, as it can lead to tough cookie bars.
- Gradually add the dry ingredient mixture into the wet ingredients. Mix until just combined—be careful not to overmix here. You should see some streaks of flour remaining. This helps to maintain that chewy texture.
- Lastly, stir in the mini chocolate eggs (and optional chocolate chips) with a spatula until evenly distributed. At this point, take a moment to marvel at the vibrant colors of the mini eggs; it’s heartwarming to see how they will transform into a lovely batch of cookie bars.
- Spread the dough evenly into the prepared baking pan, smoothing the top with your spatula. Bake in the preheated oven for 20-25 minutes or until the edges are golden brown and a toothpick inserted in the center comes out mostly clean. The center will continue to cook as it cools, keeping it soft and chewy.
- Once done, remove from the oven and allow the cookie bars to cool in the pan for about 10-15 minutes before using the overhanging parchment paper to lift them out onto a wire rack. Allow to cool completely before cutting into squares.
Remember, patience is key while waiting for them to cool. The first bite will be well worth this wait as you savor the delightful aroma wafting through your kitchen.
Variations & Substitutions
Gluten-Free Variation: If you or your loved ones are sensitive to gluten, you can easily make these bars gluten-free by substituting the all-purpose flour with a gluten-free flour blend. It’s important to check that the blend contains xanthan gum, which will mimic the texture of traditional flour. Keep an eye on the baking time as gluten-free flours can sometimes require slight adjustments.
Vegan Variation: For a plant-based adaptation, you can replace the butter with a vegan alternative and the eggs with flax eggs (1 tablespoon of ground flaxseed mixed with 2.5 tablespoons of water, set it aside for about 5 minutes). Ensure that your mini chocolate eggs are dairy-free to stay true to the vegan guidelines. This version will give you the same delightful cookie bars while accommodating dietary preferences.
Nutty Add-In Variation: If you enjoy the taste and texture of nuts, consider adding 1/2 cup of chopped walnuts or almonds to the mixture. It adds a wonderful crunch and enhances the richness of the cookie bars. However, if you are catering to children or guests with nut allergies, you may want to skip this variation.
Different Chocolate Variations: Instead of using mini chocolate eggs, you could experiment with different chocolate candies such as M&M’s or even dried fruit for a chewy, fruity addition. Each variation brings a unique flair to the texture and taste of the final product, allowing you to customize your bars to suit any occasion or palate.
White Chocolate Variation: For a different flair, you can substitute the chocolate chips with white chocolate chips. The sweet, creamy flavor contrasts beautifully with the saltiness of the buttery base and provides a festive look when combined with colored candies like mini eggs.
Common Mistakes to Avoid
One of the most common mistakes when making cookie bars is over-mixing the batter. Over-mixing can lead to tough cookie bars, which are not desirable. To achieve that soft and chewy texture, mix until just combined, leaving slight streaks of flour in the batter.
Another issue can arise from incorrect measuring of ingredients. Flour is particularly notorious for this—using too much will dry out the cookie bars and make them crumbly. Measure carefully by spooning flour into your measuring cup without packing it down.
Also, be mindful of baking time. Over-baking cookie bars will lead to a dry final product. Keep an eye on them towards the end of the baking time; it’s always better to take them out a little underbaked, as they’ll continue to cook on the baking sheet once out of the oven.
Lastly, avoid rushing the cooling process by trying to cut them too early. Cutting too soon can cause the bars to crumble and lose that beautiful shape. Allow adequate time for the bars to set and cool completely before slicing.
Storage, Freezing & Reheating Tips
To ensure the freshness of your Mini Egg Cookie Bars, store them in an airtight container at room temperature for up to a week. If you have leftovers (which is often unlikely with a treat this delicious), you can also refrigerate them for up to two weeks. Just remember to let them come to room temperature before serving again, as the flavors are best enjoyed fresh.
If you’d like to prepare in advance, you can freeze these cookie bars! Cut them into squares and place parchment paper between layers in a freezer-safe container. They will keep in the freezer for up to three months. When you’re ready to enjoy them, let them thaw in the refrigerator overnight or at room temperature for a few hours, and they’ll taste just as good as the day they were baked!
Frequently Asked Questions
Can I use other types of chocolates in this recipe?
Absolutely! While mini chocolate eggs give these bars a festive touch, you can use other types of chocolates such as M&M’s, white chocolate, or even dark chocolate. The key is to keep the total amount of chocolate similar to the recipe, ensuring a balanced flavor in every bite.
What can I serve with these cookie bars?
These Mini Egg Cookie Bars pair wonderfully with a glass of cold milk, a warm cup of coffee, or even a scoop of vanilla ice cream. They make a delightful addition to any dessert platter, whether it’s for an Easter gathering or just a cheerful afternoon snack with family and friends.
How can I make these bars healthier?
You can enhance the nutritional value by substituting some ingredients: use whole wheat flour instead of all-purpose flour, and reduce the sugar amount slightly without compromising the taste. Adding nuts may also provide additional health benefits, though be cautious if allergies are a concern.
Can I make the dough in advance?
Yes, you can prepare the dough a day ahead. Simply refrigerate it in an airtight container. When you are ready to bake, allow it to sit at room temperature for about 10-15 minutes before transferring it to the baking pan for even baking.
What if I want to make a larger batch of these cookie bars?
If you wish to increase the batch size, it’s quite simple to do so! Double the ingredients and use a larger baking pan. Just keep in mind to adjust the baking time accordingly, as a deeper batter may require a few extra minutes in the oven.
Conclusion:
These Spring Cookies: Mini Egg Cookie Bars are a perfect blend of flavor, simplicity, and festivity, making them an ideal springtime treat. You can enjoy them fresh from the oven or customize them to cater to a variety of dietary needs. Whether you’re baking for family, friends, or even just yourself, these bars offer a delightful way to celebrate the season. Don’t hesitate to try your hand at this easy recipe, and feel free to get creative with the variations. We encourage you to share the joy and sweetness of these cookie bars with your loved ones. Happy baking!


