Prep time: 30 minutes
Cook time: 15 minutes
Total time: 45 minutes
Servings: 8
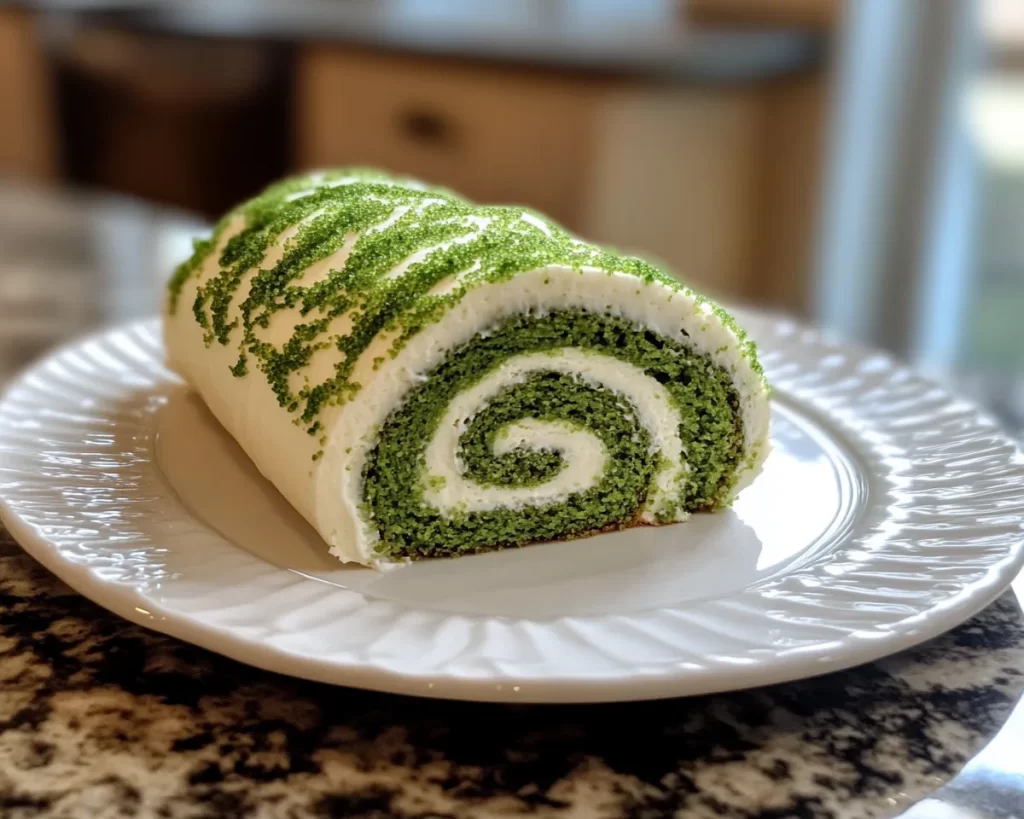
Nothing brings the spirit of St. Patrick’s Day into your home quite like a slice of rich, sweet, and utterly delightful St. Patrick’s Day Green Velvet Cake Roll. The unique charm of this dessert lies in its vibrant green color—a dazzling spectacle that not only looks festive but also tantalizes your taste buds. If you’ve ever felt the tug of nostalgia around the holiday, perhaps remembering the delicious baked goods your family would whip up, you will find that this cake roll captures that essence perfectly.
In this recipe, you’ll learn all about creating this classic roll, complete with its luscious cream cheese filling and the signature velvety texture. Your kitchen will be filled with the aroma of baking cake, and those around you will be delighted as they get to savor a slice. This cake roll is not just easy to prepare; it’s also a versatile dessert that can be customized to suit various tastes and preferences.
What Is St Patrick’s Day Green Velvet Cake Roll?
St. Patrick’s Day Green Velvet Cake Roll is a festive twist on the traditional red velvet cake, celebrated for its vibrant color and delicate texture. The flavor profile is not just limited to chocolate; rather, it combines buttermilk and cocoa to create a moist, flavorful cake. This cake is rolled and filled with a creamy mixture that typically consists of cream cheese and sugar, making each bite a rich and fulfilling experience.
The origins of the velvet cake date back to the 1800s and are enveloped in delightful history. The cake was initially made with cocoa, yielding a soft crumb and a unique appearance. When made into a roll, it showcases a stunning swirl of green and white, making it an ideal centerpiece for any St. Patrick’s Day gathering. Your guests will be mesmerized not only by its look but also by the delightful balance of sweetness and richness.
As you prepare this recipe, you’ll find that it is not only about the taste but also about the joy of creating something memorable for you and your loved ones. While green food coloring gives it that festive hue, the reliability of the cake base allows for exciting adaptations—making this dessert a staple for those who appreciate both tradition and innovation.
Why You’ll Love This
This St. Patrick’s Day Green Velvet Cake Roll is loved for several reasons. Firstly, the pairing of flavors creates an indulgent experience; the chocolate notes from the cocoa powder blend perfectly with the slight tanginess from the cream cheese filling. Secondly, the texture is everything you could desire in a dessert—moist, soft, and easy to cut into delightful slices.
Let’s address some common misconceptions. Many believe that rolling a cake might be difficult or labor-intensive, but I assure you that with a few simple tips and a bit of practice, anyone can master the technique. This recipe is designed for both beginners and seasoned bakers alike. It requires minimal ingredients, making it budget-friendly, yet sacrifices none of the flavor or charm.
This cake roll also serves as a fantastic platform for creativity. You can easily adjust flavors and colors to suit your taste or occasion. Whether you need a gluten-free version or want to incorporate different flavors into the filling, this adaptable recipe will guide you through it.
Ingredients You’ll Need
- All-Purpose Flour: The base of your cake, providing structure. Feel free to substitute with gluten-free flour if needed.
- Cocoa Powder: Gives the cake its signature chocolate flavor. Use Dutch-processed cocoa for a richer taste.
- Granulated Sugar: Adds sweetness and moisture to the cake. You can use coconut sugar for a healthier alternative.
- Buttermilk: This ingredient makes the cake super moist and adds a slight tang. If you don’t have buttermilk, a mixture of milk and vinegar can work as a substitute.
- Baking Powder: Important for leavening the cake. Ensure it’s fresh for the best rise.
- Baking Soda: Activates with the buttermilk to help the cake rise. Check the expiration date to ensure effectiveness.
- Vegetable Oil: Keeps the cake tender. You can also use melted butter for a richer flavor.
- Eggs: Provides moisture and binds everything together. For a vegan option, consider using flax eggs.
- Green Food Coloring: Essential for that festive look. Gel coloring is recommended for vibrant color without altering the cake’s texture.
- Cream Cheese: This will be your filling, adding richness and a creamy texture. Ensure it’s softened for easy mixing.
- Powdered Sugar: Sweetens and thickens the cream cheese filling. You can adjust the amount to your taste.
- Vanilla Extract: Enhances the flavor of both the cake and the filling. Use pure extract for the best taste.
How to Make
- First, preheat your oven to 350°F (175°C) and line a baking sheet with parchment paper. Greasing the parchment lightly will ensure that the cake rolls out easily.
- In a large mixing bowl, combine the all-purpose flour, cocoa powder, baking powder, baking soda, and salt. Whisking these dry ingredients together will ensure they are evenly distributed in the final batter.
- In another bowl, beat together the granulated sugar, eggs, and vegetable oil until light and fluffy. This process aerates the mixture, making your cake super light.
- Next, mix in the buttermilk and green food coloring. You can add more or less food coloring to achieve your desired shade of green, but don’t overdo it! One or two teaspoons should be plenty.
- Gradually incorporate the dry ingredients into the wet mixture, stirring until just combined. Take care not to overmix, as this can lead to a dense cake.
- Pour the batter into the prepared baking sheet and spread it out evenly. A spatula works well for this, ensuring that the batter is smooth and fills all corners of the pan.
- Bake for 12 to 15 minutes or until a toothpick inserted into the center comes out clean. Keep an eye on it; overbaking can lead to a dry texture.
- Once baked, remove the cake from the oven and immediately turn it out onto a clean kitchen towel dusted with powdered sugar. This step is crucial to prevent sticking.
- Carefully roll the cake up with the towel, starting from one of the short sides. Allow it to cool completely while rolled to help it maintain its shape.
- While cooling, prepare the cream cheese filling. In a medium bowl, combine softened cream cheese, powdered sugar, and vanilla extract. Beat until smooth and creamy, making sure there are no lumps.
- Once the cake is completely cool, unroll it carefully and spread the cream cheese filling evenly over the cake’s surface.
- Roll the cake up again without the towel, and wrap it in plastic wrap or parchment paper to maintain its shape. Refrigerate for at least 30 minutes to set and make slicing easier.
- Finally, slice the cake roll into even sections and serve. Optional: dust with powdered sugar for an elegant touch.
Variations & Substitutions
Gluten-Free Variation: For those who are gluten-sensitive, you can easily swap out the all-purpose flour for gluten-free flour blends available in stores. Ensure the blend contains xanthan gum for added structure. Your cake will maintain its delightful texture while being suitable for a gluten-free diet.
Chocolate Mint Variation: If you adore the combination of chocolate and mint, consider adding peppermint extract to your cream cheese filling. A couple of drops will suffice to create a refreshing flavor that dances on your palate. You could also decorate the top with crushed mint candies or chocolate shavings for an extra touch.
Red Velvet Alternative: While this recipe is for a green velvet cake, the same techniques can be used to create a classic red velvet cake roll. Simply swap the green food coloring for red, and enjoy a taste of this beloved classic. The flavor will remain rich and delightful.
Fruit-Infused Filling Variation: For a lighter take, you can add fresh berries or fruit puree to your cream cheese filling. This will introduce an additional flavor dimension and create a visually stunning dessert when sliced. Consider strawberries or raspberries for their tartness to balance out the sweetness.
Dairy-Free Version: If you’re adhering to a dairy-free diet, substitute the cream cheese with a dairy-free cream cheese alternative. You can also use almond milk or coconut milk as a replacement for buttermilk. Make sure to check labels for added sugars and ingredients, as there can be variations in quality and taste among brands.
Common Mistakes to Avoid
One common mistake is not allowing the cake to cool enough before unrolling it, which can lead to cracks. Always ensure that your cake is completely cool (but not cold) before you attempt to roll it up. Another issue could be using too much flour, resulting in a dense cake. Be sure to measure your ingredients accurately; fluff the flour first before scooping to achieve the right amount.
Another significant point is the rolling technique. If the cake starts to crack while rolling, it could be due to overheating or not being wrapped tightly enough. Always roll gently and avoid forcing the cake to bend in unnatural ways. When you spread the filling, don’t overdo it; too thick of a layer can make rolling difficult.
Finally, be cautious with the baking time. Overbaking will cause the cake to become dry and less enjoyable. Keep an eye out for the toothpick test; pulling the cake out while it’s still slightly underbaked will yield a more moist and tender product.
Storage, Freezing & Reheating Tips
Once your St. Patrick’s Day Green Velvet Cake Roll is prepared, you can store it in the refrigerator for up to 3 days. Wrap it tightly in plastic wrap or aluminum foil to prevent it from drying out. If you’re planning to prepare the dessert in advance, you can freeze the unfilled cake roll for up to 3 months. Before serving, thaw it in the refrigerator overnight for best results.
When it comes to reheating, it’s best to consume the cake cold or at room temperature as reheating might change its texture. If you must reheat, do so gently in the microwave for just a few seconds, being careful not to overdo it. Always check for freshness; if the cake has been stored for an extended time, consult your senses—look for changes in color or smell that could suggest it’s best discarded.
Frequently Asked Questions
Can I make the cake roll ahead of time?
Absolutely! You can make the cake roll up to a day in advance. Just store it wrapped in plastic in the refrigerator to keep it fresh until you’re ready to serve it. This is an excellent option if you’re planning a gathering or special occasion; it allows you to focus on other preparations.
What if I don’t have buttermilk?
If you run out of buttermilk, creating a quick substitute is easy. Simply add one tablespoon of white vinegar or lemon juice to a cup of milk and let it sit for about 10 minutes. This will create a similar acidic reaction, helping your cake rise beautifully.
What is the best way to slice a rolled cake?
To slice your St. Patrick’s Day Green Velvet Cake Roll neatly, use a serrated knife. This type of knife helps to gently cut through the soft cake without squishing it. Make sure to clean the knife between cuts for beautifully even slices.
How can I customize the flavors?
Customization is one of the fantastic aspects of this recipe! You can infuse different flavors into the cream cheese filling, such as almond extract or a splash of liqueur for an adult twist. Additionally, you can experiment with various fillings like whipped cream or ganache for a rich flavor profile.
Can I use a different frosting instead of cream cheese?
Yes, while cream cheese is traditionally used, you can opt for a whipped cream or buttercream frosting based on your preference. A light whipped cream filling would balance nicely with the dense cake, especially during warmer weather. Just be mindful of the sweetness level as different frostings can have varying degrees of sweetness.
Conclusion:
In conclusion, the St. Patrick’s Day Green Velvet Cake Roll stands out as not only a delicious dessert but also a memorable visual centerpiece for your celebrations. The playful hint of green adds festive spirit, while the rich flavors satisfy diverse palates. I encourage you to give this recipe a try and consider personalizing it to your liking. Whether you stick with the classic or venture into various adaptations, you’ll find that it’s easily achievable and gratifying. So gather your ingredients, dive in, and bring a delightful, homemade touch to your St. Patrick’s Day festivities!


