Prep time: 20 minutes
Cook time: 20 minutes
Total time: 40 minutes
Servings: 12 cupcakes
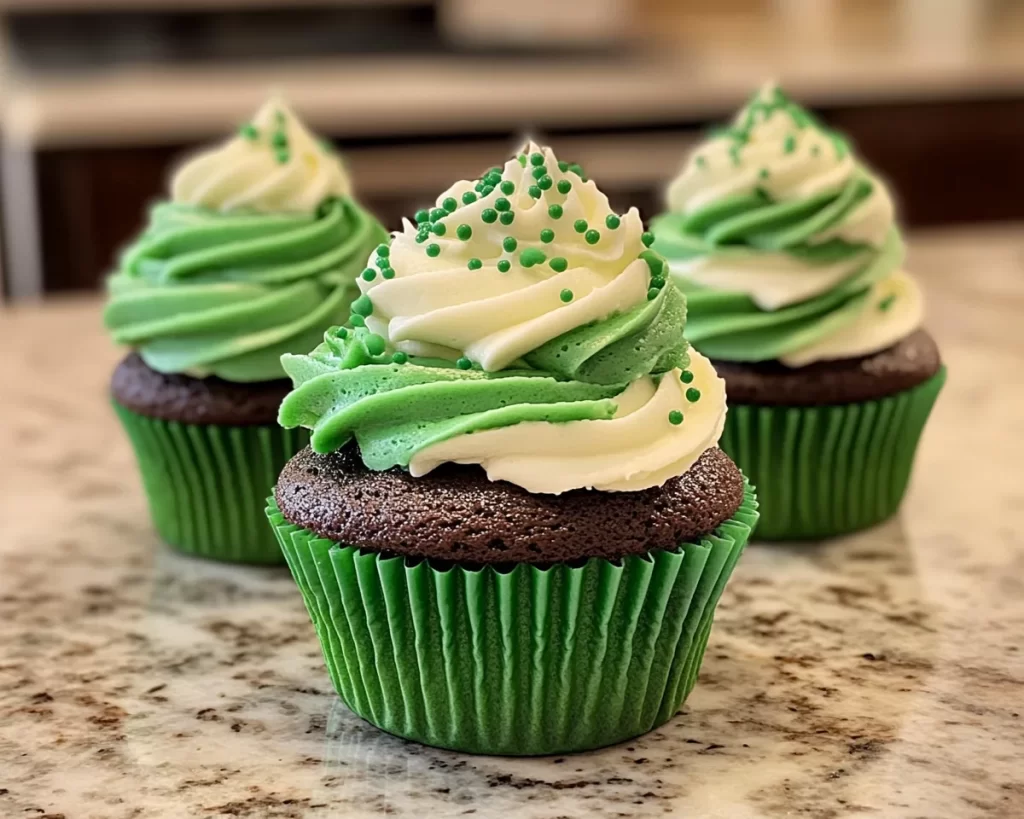
There’s something magical about the prospect of St. Patrick’s Day, a holiday that brings a splash of color, exuberance, and a chance to indulge in delicious treats. If you’re seeking a delightful way to celebrate this festive occasion, look no further than St. Patrick’s Day Green Velvet Cupcakes. These vibrant cupcakes not only charm with their lush green hue, but they also deliver a moist, decadent texture and a subtle cocoa flavor that’s hard to resist. Gather your ingredients and prepare for a fun baking experience that’s perfect for all ages.
What makes this recipe special is that it combines the richness of classic red velvet cupcakes with a playful twist that’s perfect for St. Patrick’s Day. You’ll learn how to create these gorgeous treats while mastering some valuable baking techniques along the way. Whether you’re a seasoned baker or a novice, you will appreciate how straightforward the process is, and how rewarding it is to see your finished cupcakes come to life. Let’s dive in!
What Is St Patrick’s Day Green Velvet Cupcakes?
St. Patrick’s Day Green Velvet Cupcakes are a delightful twist on the classic red velvet cupcakes, known for their rich flavor and velvety texture. Originating from Southern U.S. baking traditions, velvet cakes are recognized for their tender crumb and unique melding of buttermilk and cocoa. When the color red is swapped for a striking green, you have a festive dessert that celebrates the spirit of St. Patrick’s Day, making it perfect for parties, classroom celebrations, or simply indulging at home.
The flavor profile of these cupcakes is a beautiful combination of **subtle cocoa** and the richness of **buttermilk**. The green tint—achieved with food coloring—adds an attractive pop that will catch your eye and excite the taste buds. Imagine biting into a soft, moist cupcake topped with a lush, creamy frosting. Each bite is not just a treat for the palate but also a visual delight, making them an ideal offering for celebrations or gatherings.
These cupcakes typically offer a balance of sweetness, coupled with a hint of cocoa, resulting in a delicious dessert perfect for any occasion. Besides their flavor and vibrant color, they are incredibly easy to make, which is especially welcoming for beginners in the kitchen. Get ready to impress your friends and family with a delectable treat that looks as good as it tastes.
Why You’ll Love This
You will love this St. Patrick’s Day Green Velvet Cupcakes recipe for several reasons. First, the taste! The rich, velvety texture combined with the subtle cocoa flavor offers a delightful treat that’s hard to resist. Contrary to what you might think, making these cupcakes is straightforward and doesn’t require any advanced baking skills, making it perfect for beginner cooks as well as experienced bakers looking for a fun, festive recipe.
This recipe also offers great value. With basic ingredients that are commonly found in most kitchens, you’ll be whipping up a dozen gorgeous cupcakes without breaking the bank. They are versatile too; you can create different flavors by switching out the vanilla frosting for chocolate or cream cheese frostings, allowing you to customize this recipe to your taste preferences.
Furthermore, St. Patrick’s Day Green Velvet Cupcakes can be made in advance and stored for later enjoyment; this can be especially helpful for busy parents and those planning for potlucks or parties. Another common misconception is that cupcakes are difficult to make; however, these cupcakes will convince you otherwise. You’ll find success with every batch, making it an experience worth sharing with family and friends.
Ingredients You’ll Need
To create these delightful St. Patrick’s Day Green Velvet Cupcakes, you’ll need the following key ingredients:
- All-purpose flour: This provides the structure for your cupcakes. You can substitute with gluten-free flour if needed.
- Cocoa powder: A crucial ingredient that adds depth to the flavor. Opt for unsweetened cocoa powder for the best results.
- Granulated sugar: This sweetens the cupcakes and balances out the cocoa flavor.
- Baking soda: This helps the cupcakes rise and gives them a light texture.
- Salt: Enhances the flavors of the other ingredients.
- Vegetable oil: This keeps the cupcakes moist. You can also use melted coconut oil or melted butter as a substitute.
- Eggs: Provides binding and richness. For a vegan option, you can use flaxseed or applesauce.
- Buttermilk: Adds moisture and tanginess. If you don’t have buttermilk, mix milk with a tablespoon of vinegar or lemon juice to mimic the acidity.
- Green food coloring: The star of the show, giving these cupcakes their vibrant green hue. Feel free to adjust the quantity based on your color preference.
- Vanilla extract: Enhances the flavor of the cupcakes. Opt for pure vanilla for the best taste.
- Powdered sugar: For the frosting, it provides sweetness and creaminess when combined with other frosting ingredients.
- Butter: Needed for a rich and creamy frosting. Use unsalted butter for the best flavor.
- Milk or cream: This helps in achieving a smooth frosting consistency.
Each ingredient plays a vital role in constructing not just the flavor and texture of your cupcakes, but also their overall aesthetic appeal.
How to Make
Creating these St. Patrick’s Day Green Velvet Cupcakes requires a few simple steps. Follow this easy recipe to enjoy delicious results:
- Preheat your oven: Start by preheating your oven to 350°F (175°C). This will ensure that your cupcakes begin baking as soon as they’re poured into the pan, helping to create that perfect dome shape.
- Prepare your cupcake pan: Line a 12-cup muffin tray with cupcake liners. This not only makes for an attractive presentation but also ensures easy removal after baking.
- Mix the dry ingredients: In a large mixing bowl, combine 1½ cups of all-purpose flour, 1 tablespoon of cocoa powder, 1 teaspoon of baking soda, and ½ teaspoon of salt. Whisk these together until well blended; this will ensure an even distribution of ingredients throughout the batter.
- Combine wet ingredients: In another bowl, beat together 1 cup of granulated sugar and ½ cup of vegetable oil until fully combined. Add 2 large eggs and beat again until smooth. Then, mix in 1 cup of buttermilk, 1 teaspoon of vanilla extract, and sufficient green food coloring (usually 1–2 teaspoons, depending on the desired vibrancy). The mixture should be a nice green hue, creating a lively visual that hints at the excitement to come.
- Combine dry and wet mixtures: Gradually add the dry ingredients to the wet mixture. Use a spatula or wooden spoon to gently fold them together until just combined. Be careful not to overmix; a few lumps are okay. The goal is a smooth batter with a vibrant green color.
- Fill the cupcake liners: Use a cookie scoop or a measuring cup to evenly distribute the batter into the prepared cupcake liners, filling each about 2/3 full. This allows room for the cupcakes to rise without overflowing.
- Bake the cupcakes: Place the cupcake tray in the oven and bake for about 18-20 minutes, or until a toothpick inserted in the center comes out clean. As they bake, you’ll notice a delightful aroma fill your kitchen, enhancing the anticipation for your tasty creations.
- Cool the cupcakes: Once baked, remove the cupcakes from the oven and let them cool in the pan for about 5 minutes. Then, transfer them to a wire rack to cool completely—this will ensure a better frosting application and keep them fluffy.
- Prepare the frosting: While the cupcakes are cooling, you can prepare your frosting. In a mixing bowl, cream together ½ cup of unsalted butter until fluffy. Gradually add in 2 cups of powdered sugar, switching between adding a tablespoon of milk as needed until the mixture reaches a smooth, spreadable consistency. Once your frosting is prepared, set it aside.
- Frost the cupcakes: Once the cupcakes are completely cool, use a piping bag or a spatula to apply the frosting generously on top of each cupcake. You can make it swirl or go for a more rustic look—whatever you prefer!
- Decorate (optional): For extra festivity, consider topping your cupcakes with green sprinkles, edible glitter, or small shamrock decorations, which add a lovely finishing touch.
Your St. Patrick’s Day Green Velvet Cupcakes are now complete! This easy-to-follow method will produce delightful results, and the texture will have everyone wanting just one more.
Variations & Substitutions
Chocolate Mint Variation: If you’re a fan of mint, consider adding mint extract to your batter and frosting for a refreshing twist. Swap out vanilla for peppermint extract in the frosting and top with chocolate shavings or mint leaves. This variation is perfect for mint lovers and offers a refreshing flavor that captures the spirit of spring.
Vegan Green Velvet Cupcakes: To make a vegan version, replace the eggs with 1/4 cup of unsweetened applesauce or 1 tablespoon of ground flaxseed mixed with 3 tablespoons of water per egg. Use a non-dairy milk such as almond or soy milk in place of buttermilk and vegan butter for the frosting. This makes these scrumptious cupcakes accessible to those following a vegan lifestyle, without compromising on flavor.
Red Velvet Cupcakes: If your heart is set on the traditional, consider making red velvet cupcakes instead. Simply replace the green food coloring with red, and follow the same process. This may not suit the St. Patrick’s theme, but the base recipe remains the same, allowing for great flavor.
Gluten-Free Option: For those with gluten intolerances, substitute the all-purpose flour with a gluten-free flour blend or almond flour. It is essential to ensure that all other ingredients used are labeled gluten-free. This variant will still deliver rich flavor and excellent texture when done correctly.
Common Mistakes to Avoid
One common mistake when making cupcakes is overmixing the batter. This can lead to dense cupcakes rather than light and fluffy ones. Instead, mix until just combined, even if a few lumps remain. Another critical tip: always measure your ingredients correctly. Using too much flour, for instance, can create a heavy texture that lacks the desired fluffy quality.
Additionally, make sure to check your oven temperature with an oven thermometer to avoid underbaking or overbaking your cupcakes. An oven that runs hot or cold can significantly impact the baking results. Also, be cautious when adding food coloring; start with less and gradually increase until you reach the desired shade. Remember, too much can affect the flavor or even the batter’s consistency.
Lastly, ensure that the cupcakes are completely cooled before frosting. If not, the frosting may melt down the sides, leading to unattractive, sticky results. Patience in letting the cupcakes cool not only enhances the frosting’s appearance but improves the overall taste as well.
Storage, Freezing & Reheating Tips
To store leftover cupcakes, place them in an airtight container at room temperature for up to 3 days. If you wish to keep them longer, consider freezing them. To do so, place completely cooled cupcakes in a single layer in a freezer-safe container or bag. They can be frozen for up to 3 months. When ready to enjoy, simply thaw them at room temperature and frost them anew for the best flavor.
If you have frosted cupcakes and want to store them, the best approach is to refrigerate them for up to a week. However, be cautious with frosting types; cream cheese frosting is best consumed sooner rather than later, while buttercream can safely last longer.
When reheating, warm the cooled cupcakes in a microwave for about 10-15 seconds if you prefer them slightly warm. Ensure not to overheat as this can dry them out. Alternatively, you can serve them at room temperature for a soft and fluffy texture to enjoy.
Frequently Asked Questions
Can I use a different color besides green for St. Patrick’s Day?
Of course! While green is traditional for St. Patrick’s Day, you can experiment with other colors based on your themes or preferences. Use blue, pink, or even purple food coloring for other festive occasions or unique personal flair.
Can I make these cupcakes ahead of time?
Absolutely! You can make the cupcakes a few days in advance. If you want to make them even earlier, consider freezing them without frosting. This way, all you need to do is thaw and frost them on the day you intend to serve.
What frosting pairs best with these cupcakes?
The most classic pairing is a simple vanilla buttercream, but feel free to get creative! Cream cheese frosting complements the flavors beautifully, while chocolate frosting offers a rich contrast that many enjoy. Mint frosting is an excellent alternative if you prefer a refreshing taste.
Are these cupcakes suitable for people with dietary restrictions?
Yes, this recipe can be easily adapted to fit various dietary needs, including gluten-free and vegan options. Be sure to use the suitable substitutions for your specific restrictions to ensure everyone can enjoy them.
How can I make these cupcakes healthier?
To make them healthier, consider reducing the sugar while substituting with natural sweeteners like honey or maple syrup. Incorporating whole grain flour or almond flour will also add nutritional benefits while keeping them fluffy. You can swap out some butter in the frosting for Greek yogurt to retain creaminess but reduce fat content.
Conclusion:
St. Patrick’s Day Green Velvet Cupcakes offer the perfect balance of indulgence and fun, making the holiday spirit even more enjoyable with their delightful appearance and taste. This recipe is not only easy to follow but adaptable to fit various tastes and dietary needs. So gather your ingredients, let your creativity flow, and celebrate this vibrant day with a batch of stunning cupcakes. Don’t hesitate to share your creations or variations with family and friends; after all, these little green wonders are best enjoyed together! Happy baking!