Prep time: 20 minutes
Cook time: 30 minutes
Total time: 50 minutes
Servings: 16 brownies
When you think of the perfect treat for Valentine’s Week, what comes to mind? For many, it’s the dreamy indulgence of chocolate brownies. Imagine biting into an ultra gooey chocolate brownie, dense yet perfectly soft, with a rich flavor that dances on your taste buds. This recipe is designed to create just that—a batch of brownies that not only satisfies your chocolate cravings but also provides an intimate touch for your loved ones.
These brownies are special not only because they are delicious; they evoke feelings of warmth and nostalgia, reminiscent of baking with family during the chilly winter months. As you cook, you’ll learn tips and tricks that make the process straightforward, whether you are a beginner or someone simply looking to impress. Get ready to unleash the magic of chocolate in your kitchen!
What Is Ultra Gooey Chocolate Brownies Made for Valentine’s Week?
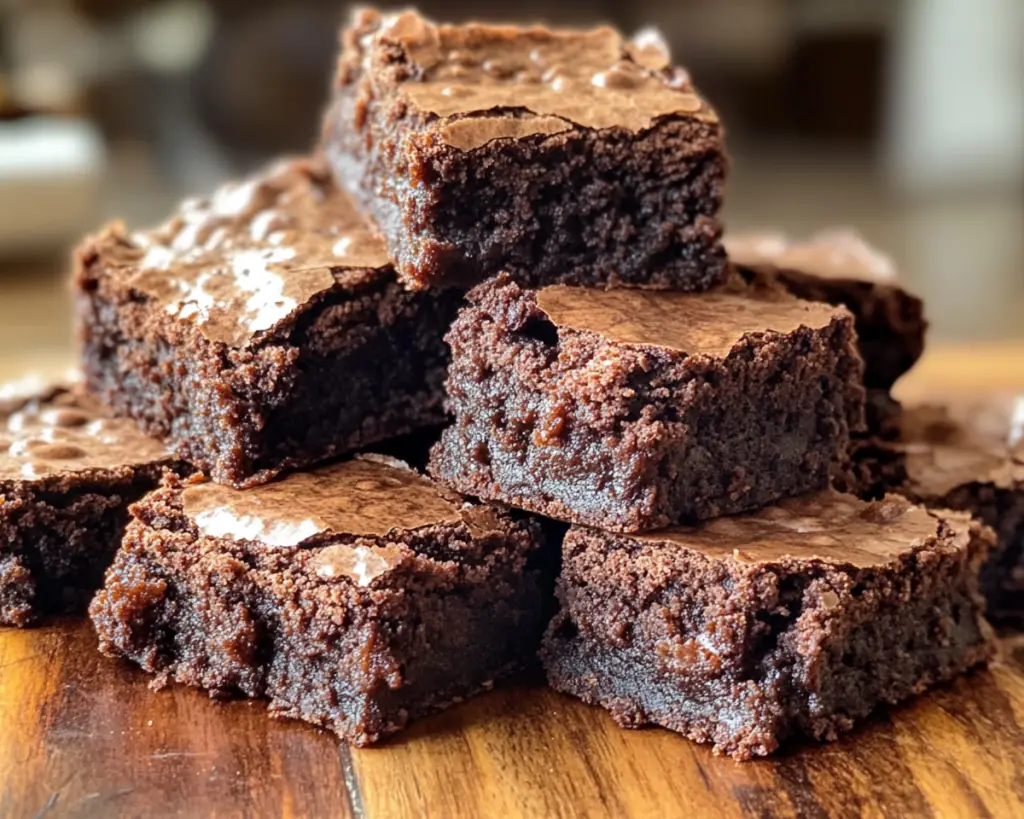
Ultra gooey chocolate brownies are a unique spin on the classic dessert that elevates the traditional brownie to sumptuous heights. Originating in the United States during the late 19th century, brownies have undergone significant evolution. This version leans heavily into the *gooey* and *rich* texture, achieved through the alchemy of chocolate, butter, and a careful balance of sweeteners. The extraordinary results come from using good-quality chocolate, ensuring that every inch of the brownie is infused with deep cocoa flavor.
The texture is a key element—these brownies should be fudgy and soft. Unlike cake-like brownies, the ultra gooey version should feel almost *decadent* as you take a bite, melting in your mouth with richness. The *flavor profile* combines the sweetness of sugar with the bitterness of dark chocolate, creating a perfect harmony that convinces you to reach for one more piece. Whether you’re spending Valentine’s with someone special or simply treating yourself, these brownies bring joy and sweetness into any occasion.
Why You’ll Love This
You’ll love these ultra gooey chocolate brownies not only for their incredible flavor but also for their ease of preparation. With minimal ingredients and straightforward steps, these brownies are perfect for busy parents who want to whip up a quick dessert without fussing with complicated techniques. You’ll uncover how this recipe is cost-effective, using basic pantry staples that you likely already have at home.
There are also some misconceptions around baking brownies—many people fear that achieving the perfect texture is difficult or that they will somehow mess it up. However, this recipe simplifies the process, making it attainable even for beginners. Additionally, no complicated equipment is required, so everyone can enjoy these brownies, regardless of their kitchen setup. Imagine indulging in a treat that not only delights your senses but is also light on your wallet—a dessert win!
Ingredients You’ll Need
- Unsalted butter: 1 cup (melted, for a rich, creamy base)
- Granulated sugar: 2 cups (for sweetness and texture)
- Brown sugar: 1 cup (adds moisture and gives a deeper flavor)
- Large eggs: 4 (for structure and richness)
- Vanilla extract: 2 teaspoons (enhances the flavor)
- All-purpose flour: 1 cup (gives structure; do not over mix)
- Cocoa powder: 1 cup (for that quintessential chocolatey flavor)
- Salt: 1/2 teaspoon (balances sweetness)
- Optional chocolate chips: 1 cup (for added gooeyness)
Each ingredient plays a unique role in the final product, culminating in a luscious brownie experience. For instance, using *unsalted butter* allows for better control over the saltiness of the brownies, which can vary by brand if using salted butter. Brown sugar and granulated sugar together create the perfect sweetness balance, enhancing the *moisture* and *chewiness*. Remember, you can always substitute the chocolate chips with nuts or leave them out entirely if you prefer a less sweet experience.
How to Make
1. **Prepare your oven and baking pan.** Preheat your oven to 350°F (175°C). Grease a 9×13-inch baking pan with butter or line it with parchment paper for easy removal. This step is crucial, as the right baking vessel ensures even cooking and prevents your brownies from sticking.
2. **Melt the butter.** In a medium saucepan, melt the unsalted butter over low heat. Stir occasionally until fully melted. This should take about 5 minutes. Be careful not to burn the butter; you want it just melted, not bubbling.
3. **Combine sugars and butter.** Remove the melted butter from heat, and immediately stir in the granulated sugar and brown sugar until well combined. The mixture should feel smooth and glossy. This step not only adds flavor but also helps to create that incredibly chewy texture we’re after.
4. **Add eggs and vanilla extract.** Allow the mixture to cool slightly before adding the eggs, one at a time. Mix well after each addition, then stir in the vanilla extract. This careful mixing helps incorporate air into the batter, giving it that delightful gooeyness and structure.
5. **Incorporate dry ingredients.** In a separate bowl, whisk together the flour, cocoa powder, and salt. Gradually fold the dry ingredients into the wet mixture using a spatula. Be gentle! Overmixing can lead to tough brownies, which is a big no-no.
6. **Add chocolate chips (if desired).** If you choose to include chocolate chips, fold them in gently until they are evenly distributed throughout the batter. This step is optional but highly recommended for added gooeyness and chocolatey goodness.
7. **Spread in the pan.** Pour the brownie batter into the prepared baking pan, using a spatula to smooth the top evenly. Remember, don’t over-spread—keep the texture fluffy by being gentle.
8. **Bake in the oven.** Place the pan in the preheated oven and bake for 25 to 30 minutes. Check for doneness with a toothpick; it should come out with a few moist crumbs, not clean. This indicates that your brownies are *perfectly gooey*.
9. **Cool before cutting.** Once removed from the oven, allow the brownies to cool in the pan for about 15 minutes before transferring to a wire rack. This resting period helps set the brownies, making them easier to cut into squares later.
10. **Serve and enjoy!** Cut into squares, serve, and relish the gooey deliciousness. These brownies are fantastic warm with a scoop of vanilla ice cream or at room temperature—however you enjoy them, they are bound to leave you satisfied.
Variations & Substitutions
Nutty Chocolate Brownies: If you’re a fan of textures, consider adding chopped nuts, such as walnuts or pecans, to the brownies. This variation not only enhances the crunch factor but adds a savory depth to the sweetness, balancing the overall flavor. Just about a cup of your favorite nuts mixed into the batter will do the trick. They also provide a delightful contrast to the gooey softness of the brownie, catching you off guard with crunchy bites throughout.
Gluten-Free Brownies: For those needing a gluten-free option, you can substitute all-purpose flour with a gluten-free flour blend. It’s essential to ensure that the blend contains xanthan gum or another binding agent to mimic the texture of regular flour. These brownies won’t lose their loved gooeyness; instead, they will surprise everyone with their rich flavor and planet-on texture.
Vegan Brownies: If you are looking for a plant-based alternative, swap the eggs with flax eggs. To create a flax egg, combine 1 tablespoon of ground flaxseed with 2.5 tablespoons of water; let it sit until it becomes gel-like. Replace the butter with coconut oil or a vegan butter substitute. This variation maintains the texture and flavor, allowing everyone to enjoy a bite of these luscious brownies while being entirely plant-based.
Mint Chocolate Brownies: For a special twist that’s perfect for Valentine’s Day, add a few drops of peppermint extract to the batter. The refreshing taste of mint paired with rich chocolate creates a delicious experience you wouldn’t want to miss. Topping with crushed peppermint candies or a drizzle of white chocolate can elevate this to a festive dessert.
Common Mistakes to Avoid
One of the most common pitfalls when baking brownies is overmixing the batter. This can lead to tough, dry brownies instead of ultra gooey ones that melt in your mouth. When you combine the dry and wet ingredients, mix just until everything is combined. Also, watch your baking time—check for doneness a few minutes early. If the toothpick comes out with too many crumbs, it may not be baked long enough; if it comes out completely clean, you might end up with cake-like brownies.
Another critical point to note is the temperature of the ingredients. If the butter is too hot when eggs are added, it can cook them and result in a grainy texture. Let the butter cool to room temperature before incorporating the eggs. This simple step makes a significant difference in achieving that famous gooey consistency.
Storage, Freezing & Reheating Tips
To store your ultra gooey chocolate brownies, cut them into squares and place them in an airtight container. They can sit at room temperature for about 3 days; however, for longer freshness, refrigerate them, where they will last for up to a week. For those who want to enjoy them at a later date, freezing is an excellent option. You can wrap each brownie individually in plastic wrap and place them in a freezer-safe bag. They can last up to three months frozen!
When you’re ready to enjoy your frozen brownies, remove them from the freezer and allow them to sit at room temperature for about 30 minutes before digging in. For an added treat, warm them up in the microwave for about 10-15 seconds; this restores their soft gooey texture. Always remember, food safety is vital—don’t leave brownies sitting out unrefrigerated for too long, especially if they contain eggs or dairy.
Frequently Asked Questions
Can I use dark chocolate instead of cocoa powder?
Absolutely! Substituting cocoa powder with dark melted chocolate creates an intensely rich flavor. When doing this, reduce the amount of sugar slightly since dark chocolate tends to be sweeter.
How do I know when my brownies are done baking?
The best way to check for doneness is to insert a toothpick into the center. It should come out with moist crumbs, not clean. However, the baking time might vary, so it is essential to start checking around the 25-minute mark.
Can I make these brownies ahead of time?
Yes! These brownies are perfect for making ahead of time. You can refrigerate or freeze them if you want to enjoy them later. Just remember to let them cool completely before cutting and storing.
Can I double the recipe?
Absolutely! If you want to make a larger batch, simply double all the ingredients. Just ensure that you use a larger pan or bake them in batches for the best results.
What can I serve with brownies?
Brownies are delicious on their own, but you can enhance the experience by serving them with a scoop of vanilla ice cream, a drizzle of hot fudge, or even fresh berries. These additions provide a lovely contrast to the rich chocolate.
Conclusion:
In summary, these ultra gooey chocolate brownies are a must-try for anyone looking to indulge their sweet tooth, especially during Valentine’s Week. With their rich flavor, delightful texture, and straightforward preparation, they are everything a brownie should be and more. Feel free to customize the recipe with variations that suit your taste or dietary needs.
So why not gather your ingredients and start creating a mouthwatering dessert that you can share with friends and family? The warmth and joy these brownies bring will surely make any occasion special. Don’t forget to share your creation and experiences with others—baking is always better when shared!


