It all started one chilly evening when I stumbled upon the idea of spatchcocking a chicken. Honestly, I had no clue what that even meant—spatchcock? It sounded like a fancy term for a dance move or maybe a strange animal. It wasn’t until I watched a cooking show where the chef effortlessly sliced the backbone out of a whole chicken and flattened it, that my interest piqued. The mere sight of that gloriously golden bird, crisping up beautifully in a cast iron skillet, was enough to renew my love for cooking.
That night, I decided to try it myself. The first attempt was, well, let’s say it was full of heart (if not technique). I was armed with kitchen shears that were probably older than my youngest child, and, let’s just say, there was a bit of wrestling involved. I had visions of me, cloaked in a white apron, gracefully handling poultry like a master chef. Instead, I ended up with chicken bits flying everywhere—so much for elegance! But guess what? The final result, despite resembling a slight disaster, was something so richly delicious that it converted my kitchen into a haven of delightful aromas. It was a moment of culinary chaos that transformed into comfort, and that, dear friends, is the magic of cooking.
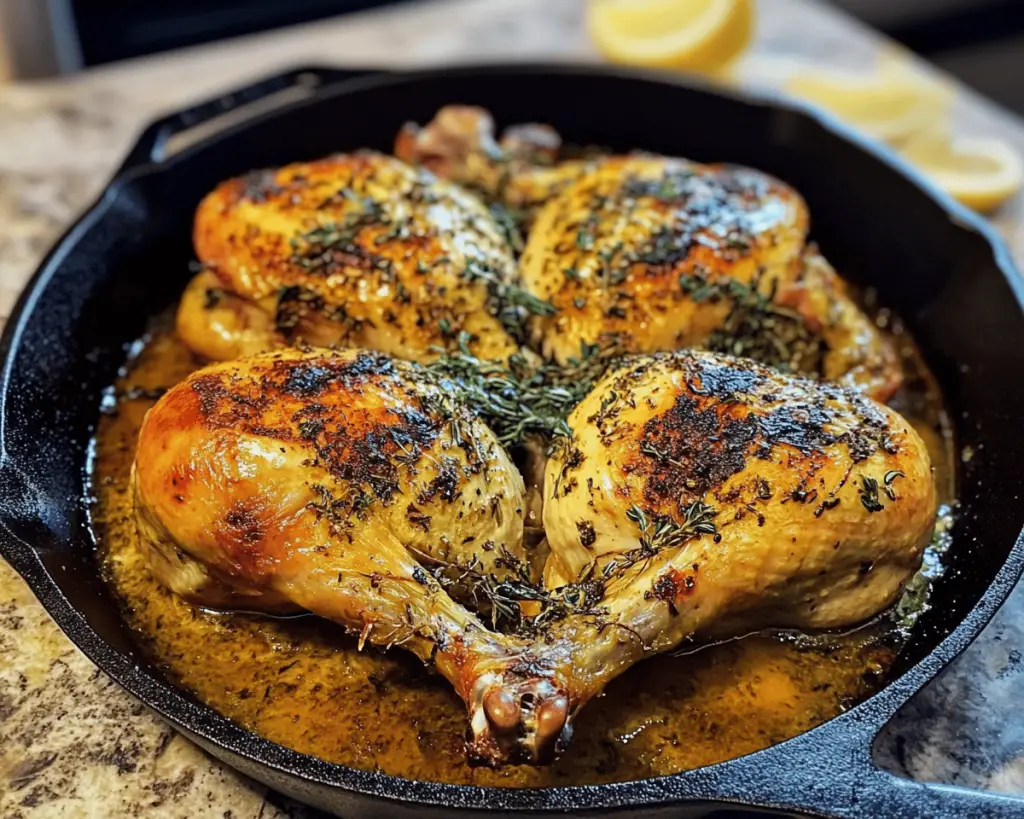
The second time around, I had my game face on and my trusty cast iron skillet ready. That skillet has been with me through thick and thin. From breakfast frittatas to the most decadent blueberry pies, it has seen (and tasted) it all. It cradles the flavors and gives them the ability to shine like nobody’s business. When you cook a spatchcock chicken in a cast iron skillet, that sear, that golden brown crispiness—it’s pure, unmatched bliss.
So, let me take you on a delicious journey of how to make the perfect spatchcock chicken in a cast iron skillet. Grab your apron, and get ready for some kitchen shenanigans—I promise you, it’ll be worth it!
What Goes Into Perfect Spatchcock Chicken?
Before we dive into the nitty-gritty of cooking, let’s chat about what goes into this fabulous dish. It’s all about quality ingredients and a few key players that work together for absolute greatness.
Whole Chicken: A good size is about 4 to 5 pounds, but honestly, you can’t go wrong. I often buy organic when I can—there’s something about knowing the chicken was raised well that makes my heart (and stomach) feel good.
Olive Oil: This is where the magic begins! I use a good quality extra virgin olive oil because, you know, flavor. It gives the chicken that luscious, moist texture and helps with that beautiful crisp. When I was in Italy, I discovered this little olive oil that changed my life. I still hoard a bottle or two!
Fresh Rosemary and Thyme: Fresh herbs are everything! If I could marry fresh herbs, I would have a wedding every week. The aroma that fills your kitchen while roasting is like walking through a herb garden after it rains. If you don’t have fresh herbs, dried will do, but trust me, you’ll thank yourself for splurging a little.
Garlic: A definite must! I mean, do I need to say more? It adds a depth of flavor that is simply to die for. I prefer using whole cloves that roast alongside the chicken—nothing beats biting into a sweet, caramelized clove.
Lemon: Ah, the zesty, fresh kick! I squeeze half a lemon over the chicken before roasting and toss the other half into the skillet while it cooks. It adds a brightness that cuts through the richness—trust me, you don’t wanna leave this out.
Salt and Pepper: I always say it’s not just salt and pepper; it’s the seasoning that brings everything together. I tend to be generous with my salt, and a good sprinkle of fresh cracked black pepper never hurt anyone!
Optional (but I highly recommend): A dash of paprika or cayenne for a little heat, and maybe some honey for a hint of sweetness if you want a more complex flavor profile. Just make sure not to overdo it—there’s beauty in simplicity!
Is Spatchcock Chicken Actually Good for You?
Alright, let’s have a real talk here. Spatchcock chicken is indulgent and glorious, but does it mean you have to feel guilty? Here’s the thing: life is too short to leave out the delicious parts. It’s packed with protein which is great for your muscles (not that I’m lifting weights anytime soon, but I do need that energy for chasing after my kids!).
The use of olive oil means there are healthy fats involved, and don’t get me started on those fresh herbs—they’re packed with antioxidants! Plus, when you roast it at home, you know exactly what’s going in. You can control the salt and avoid any weird preservatives that come in pre-marinated or grocery store options.
But if we’re being honest, is it an everyday dish? Not unless you have an unreal metabolism! But hey, enjoy it guilt-free for that cozy Friday night dinner or Sunday family feast! Balance is key, right?
Here’s What You’ll Need
– 1 whole chicken (about 4 to 5 pounds)
– 2 tablespoons of good quality olive oil
– 1 teaspoon of salt (or more to taste)
– 1/2 teaspoon of black pepper
– 4 cloves of garlic, peeled
– 1 lemon, halved
– A handful of fresh rosemary and thyme (or dried if you don’t have fresh)
– Optional: A sprinkle of paprika or cayenne for some heat
– Optional: A drizzle of honey for sweetness
How to Make Perfect Spatchcock Chicken Step-by-Step
Okay, here we go! Let’s take it step-by-step so that you can feel like a rockstar in your kitchen.
1. **Preheat Your Oven:** Start by preheating your oven to 450°F (232°C). Trust me, this high heat is where the magic happens for that crispy skin.
2. **Prepare Your Chicken:** Pat your chicken dry with paper towels—I know, it seems unnecessary, but we want crispiness, not sogginess! Lay the chicken breast-side down on a cutting board.
3. **Spatchcock Time:** Using kitchen shears (or a sharp knife if you’re feeling brave), cut along each side of the backbone to remove it completely. It’s a bit of a workout, but hey, those wings are getting swole! Flip the chicken over and press down on the breastbone to flatten it. You might hear a little crack, but that’s good!
4. **Season It Up:** Drizzle the chicken with the olive oil, then season liberally with salt and black pepper—don’t be shy! Make sure you rub it all over, getting into those crevices. Insert the garlic cloves under the chicken, and tuck in a few sprigs of rosemary and thyme.
5. **Lemon Love:** Squeeze half of the lemon juice over the chicken, and then toss the halves into the pan.
6. **Fire It Up:** Place your beautifully seasoned chicken skin-side up in a preheated cast iron skillet. Pop it in the oven and let it work its magic for about 45 minutes, or until the skin is golden brown and perfect. You might want to check it halfway through; if it looks like it’s browning too quickly, cover it with some foil to avoid burning.
7. **Finishing Touch:** When it’s done, let it rest for about 10 minutes before carving. This is where you can finally get a good sniff of the amazing aroma that’s engulfed your kitchen.
8. **Serve It Up:** Carve it, plate it, and don’t forget to drizzle some of those delicious pan juices over the chicken. It’s so enticing, your family will hover like a pack of vultures!
Little Extras I’ve Learned Along the Way
– **Herb Variations:** While rosemary and thyme are my go-tos, you can totally switch things up. I’ve made it with sage, and it gave the chicken this warm, earthy tone.
– **Add Veggies:** Don’t hesitate to throw in some root vegetables like carrots and potatoes around the chicken—why not have a one-pan meal? They soak up all that delicious chicken flavor.
– **Marinate It:** If you have extra time, let the chicken marinate in the olive oil, lemon juice, and herbs a few hours (or even overnight) in the fridge. It takes it to a whole new level!
– **Leftover Ideas:** If you have leftover chicken (that’s a big if in my house), shred it up for flavorful chicken tacos or toss it in a salad—so many options!
If all else fails, just remember that cooking is about having fun and finding what works for you. Embrace the imperfections, laugh it off, and keep experimenting! You’ll get there.
This one means a lot to me. There’s something deeply satisfying about the crunch of the skin and the tender, juicy meat. Plus, the memories tied to cooking this dish make it feel even more special. Give it a try, and let me know how yours turns out—I’d love to hear your twist! Happy cooking!