Let’s Get Real
Okay, so let’s just address the elephant in the room right away: macarons are like the divas of the dessert world. They strut around with their colorful shells, delicate etiquette, and seemingly impossible standards. Honestly, I used to hate them. Like, with a passion. As a kid, I thought they were the kind of fancy cookies you see in movies, the ones nobody really enjoys eating but just admire in a glass case like a piece of abstract art. I mean, who needs that pressure when you can have a good old-fashioned chocolate chip cookie? But oh, how the tides have turned! Now, I can’t get enough of these cute little sandwich cookies, especially when it comes to my homemade Vanilla Macarons. They’ve become my obsession, and lucky for you, I’m about to share my journey into the wonderful and chaotic world of macaron-making.
The weather this week has been pure torture—hotter than a sauna in the Sahara, and yet I decided that it was the perfect opportunity to craft these little gems. (Spoiler alert: my kitchen looked like a tornado hit it, and I might’ve shed a small tear when some of my shells cracked.). But hey, perfection is overrated, right? Sometimes the best moments in the kitchen are the messy, chaotic ones—moments when the timer goes off, and you realize you forgot to turn the oven on *facepalm*. But after a few attempts and a lot of flour-covered hope, I finally dialed in a recipe that yielded perfectly airy, sweet, and satisfying Vanilla Macarons. Join me as we embark on this sweet journey—mishaps and all!
Ingredients, Unfiltered
What’s Really in Vanilla Macarons
Let’s break down the star-studded cast of ingredients in this recipe because every superstar has a story.
Almond Flour: This is basically the foundation of our delightful little cookies. I prefer using the finely ground variety because, let’s be real, no one likes a gritty macaron. It should be smooth and melty on the tongue, not crash-land on your palate like a rogue asteroid.
Powdered Sugar: Sweetness is key, and powdered sugar is our trusty sidekick! It blends seamlessly into the almond flour, ensuring that our macarons have a light, delicate texture. Just remember to sift this bad boy together with the almond flour. Seriously, don’t skip the sifting—it’s like taking care of that pesky little detail that makes everything work perfectly together.
Egg Whites: Alright, here’s where we get a little emotional. I know that egg whites can be kind of a hassle (separating them can turn into a scene from a horror movie if you get yolk into your whites), but they’re what gives our macarons their meringue-like fluffiness. Trust me, no egg whites, no macarons. They’re essential. Plus, you want to follow the classic method of aging them. Leave the egg whites out overnight or use the freezer method like I do if you forget. There’s nothing more chaotic than a last-minute egg white separation!
Granulated Sugar: Not only does this add sweetness (duh), but it also stabilizes our whipped egg whites. When you whip these guys, you’re essentially giving them a pep talk. And sugar is that motivational speaker delivering all the right messages.
Vanilla Extract: It’s the highlight of this recipe. I’m talking the best part! Please, for the love of all that is delicious, don’t waste your time with the imitation stuff. Get the real vanilla extract because it’s like the difference between a luxurious spa day and a subpar budget massage. Quality matters here!
Butter: We can’t forget the filling! I use unsalted butter for making a rich vanilla buttercream filling. You’d think using salted would be better, but we want to control the flavor here. Salted butter in the filling can really just mess with the whole vibe we’ve got going on.
Heavy Cream: This is how we transform our butter into a smooth, velvety filling. It adds richness and helps with the consistency so you can pipe it onto your macarons without it looking like a Jackson Pollock painting (an experience I know all too well).
Let’s Talk Health (or Not)
Is This Even Healthy? Let’s Discuss
Okay, let’s get down to the nitty-gritty of health. Are Vanilla Macarons healthy? Ah, well. *Cue the dramatic music.* Sure, we’ve got our almond flour and egg whites, which are certainly better than, say, a deep-fried Snickers bar. But let’s be honest: we also have plenty of sugar and butter at play here. And you know what? I sleep just fine at night, thank you very much!
Baking should be a joyous occasion, not a guilt trip. If you’re looking for kale chips, you’ve come to the wrong place. These little bites of heaven aren’t meant to be health food. They’re indulgent and rich—just the way a treat should be. So, if you’ve got a sweet tooth (and let’s be real, who doesn’t?), embrace it! Just eat in moderation—unless you want to go full-on cookie monster, and who am I to judge?
Your Grocery List
Here’s What You’ll Need
– 1 cup (100g) almond flour
– 1 3/4 cups (200g) powdered sugar
– 3 large egg whites, aged (or frozen & thawed method)
– 1/4 cup (50g) granulated sugar
– 1 tsp pure vanilla extract (not that fake stuff)
– Pinch of salt
– 1/2 cup (1 stick) unsalted butter, softened
– 1 cup heavy cream
– Additional vanilla extract for the buttercream filling (about 1 tsp)
This recipe makes about 24 sandwich cookies, depending on how generous you are with your filling (I won’t judge if you heap it on!).
The Actual Cooking Part
Okay, Let’s Make This
Now, before we dive in, let me just say this: if you try making macarons and totally bomb it, you’ve officially joined an elite club of fabulous culinary disasters. You are not alone, my friend!
Step 1: Preheat and Prep
First things first, preheat your oven to 285°F (140°C). Now that I’ve said that, don’t panic if you get sidetracked and it ends up at 300°F—macarons can be forgiving if you don’t take them to the brink of caramelization. While that’s heating up, grab two baking sheets and line them with parchment paper. You can even use a silicone baking mat if you want to be extra fancy. Pro tip: Use a ruler to make your circles! Or if you’re like me, just wing it—and pray you’re in the company of forgiving friends.
Step 2: Sift & Mix
In a large bowl, whisk together your almond flour and powdered sugar. Trust me; the sifting is non-negotiable. Think of it as a little spa day for those ingredients to mingle. *Sift, sift, sift!* Look—it’s like confetti!
Step 3: Whip It Good
In a separate bowl, whip your egg whites using a stand mixer or hand mixer on medium speed. Once they start to froth, add a pinch of salt and gradually sprinkle in the granulated sugar. Turn that mixer up to high and whip until you get stiff peaks. This should take about 4-5 minutes. (And if you think you’ve hit the right consistency but it looks like whipped cream, you are very wrong. Keep going!)
Step 4: Fold Like a Pro
Now comes the folding. This step is critical and involves a gentle balance of strength and finesse. Pour your sifted almond flour and powdered sugar mixture into the whipped egg whites. With a rubber spatula, carefully fold the dry ingredients into the meringue. Don’t mix aggressively—otherwise, you’ll end up with disaster macarons.
The goal is to have a thick batter that falls from the spatula in ribbons. You should be able to create a figure-eight shape without it breaking. But trust me, I’ve messed this up a few times, so don’t be too hard on yourself if it looks more like abstract art.
Step 5: Pipe & Rest
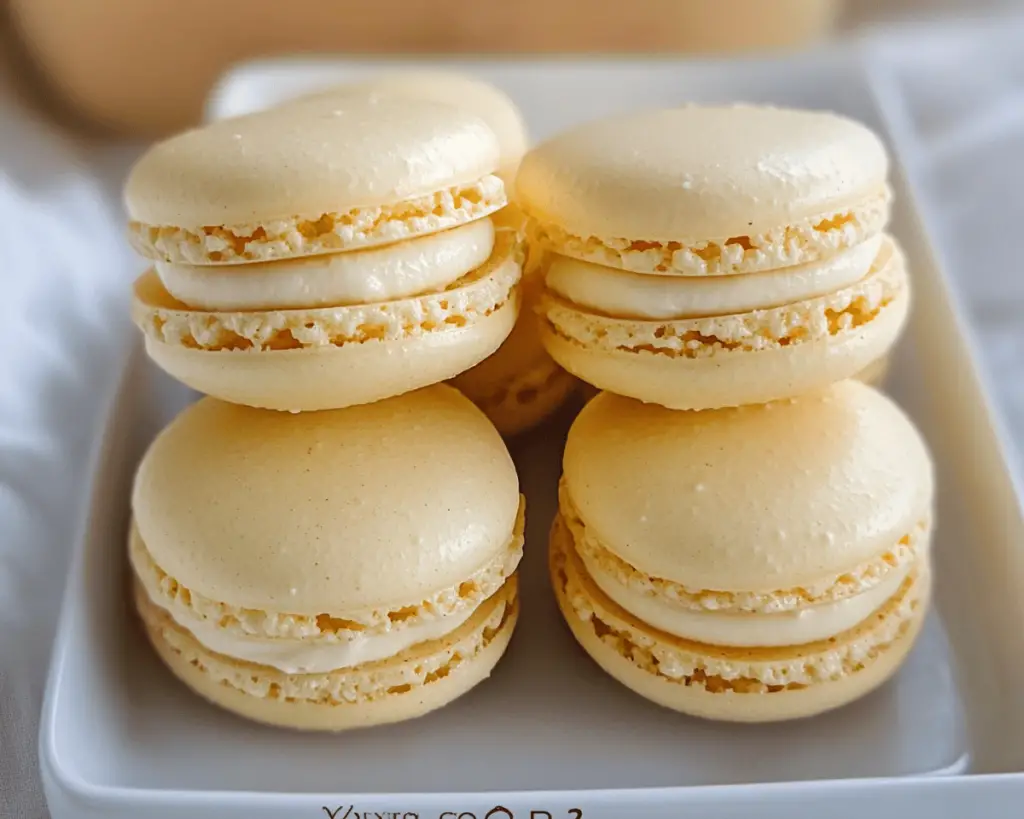
Pour the batter into a piping bag fitted with a round tip (or just cut the corner if you’re feeling reckless). On your lined baking sheets, pipe small circles (about 1.5 inches in diameter—again, don’t worry too much about perfection) and let them sit for 30-60 minutes. This drying time is essential for that lovely “foot” you want on your cookies.
Step 6: Bake
Pop those sheets into the oven and let them bake for 12-15 minutes. Don’t open the oven door during this process; it’s rude to interrupt the baking magic. If you get a little ping of urge to check, just imagine those little macarons looking up at you and saying, “Hey, do you mind? We’re busy having an architectural moment here!” When they’re finished, let them cool completely.
Step 7: Make the Filling
While your shells cool down, it’s time for the buttercream filling! In a bowl, cream your softened butter until light and fluffy (about 3-5 minutes). Gradually add in the powdered sugar and vanilla extract. Then, add a bit of heavy cream to make it fluffy—this stuff is magic, folks. Beat until everything comes together in a fluffy cloud of deliciousness! Taste it, and if it makes you swoon, it’s ready!
Step 8: Assemble
Scoop a generous amount of buttercream onto the flat side of one macaron shell, then top it with another. Gently press to squish the filling towards the edges. It should be “squishy” enough that you know it’s a macaron but not so much that it collapses like your will to get out of bed on Mondays.
Step 9: Let’s Chill
Final step—let your macarons sit in the fridge for a few hours (or overnight if you can resist). Aging allows those flavors to mingle and the texture to get even better. This part is essential but also the hardest because waiting is not something I excel at.
Side Notes & Sassy Hacks
Bonus Tips You Didn’t Ask For
Okay, so before you hop in to become the next macaron master, here are some random tips I learned through a mix of trial and error (read: lots of failed attempts).
– **Don’t Skimp on the Aging:** I know, it’s the worst. Just when you’re ready to devour your creations, you have to wait longer! But trust me—aging your egg whites makes a world of difference in the result. It helps create that beautiful foot and boosts the macaron’s puffiness.
– **Use Gel Food Color:** If you want to turn your macaron game up a notch, consider adding color. Use gel food coloring—not liquid! Liquid changes the consistency of your batter, and that’s just a recipe for an ugly macaron.
– **Fail/Flail with Grace:** If you have a few cracked shells, don’t sweat it! Just call them “rustic.” We’re going for a homemade vibe, remember?
– **Savory Swaps:** If you’re feeling particularly rebellious, you could always ditch the vanilla and experiment with flavors! How about a matcha macaron or a pistachio one? Just don’t blame me if things go awry—consider it an adventure!
– **Hosting Like a Pro:** Want to impress your friends? Plate your macarons on a fancy cake stand and watch the compliments roll in! It’s all about the presentation! Plus, you’ll get to soak up the adorable “oooooohs” and “aaaaahhhs.”
Final Words of (Culinary) Wisdom
So, there you have it—my chaotic love letter to Vanilla Macarons. Yes, they can be finicky little buggers, but there’s something so rewarding about finally getting it right. Homemade macarons are not just a dessert; they’re an experience. So when you take that first bite and the flavor explodes in your mouth, it’ll all be worth it. If you try this recipe, tag me on Instagram or just send me a mental high-five! I want to hear all about your journey through the colorful world of macarons—cracks, spills, triumphs, and all. Keep your head high and your piping bag ready; you’ve got this! Happy baking!


