Prep time: 20 minutes
Cook time: 5 minutes
Total time: 25 minutes
Servings: 24 truffles
There’s something undeniably alluring about chocolate truffles. Imagine a smooth, rich, and decadent treat that melts in your mouth, a genuine explosion of chocolate flavor. Whether you’re celebrating a special occasion or merely indulging a sweet craving, these chocolate truffles are the perfect remedy. The beauty of this recipe lies in its simplicity—just a few basic ingredients come together to create an irresistible dessert that becomes an instant favorite. Today, you’ll learn how to master the art of making chocolate truffles, as well as discover tips, variations, and common pitfalls to avoid.
What Is What Makes These Chocolate Truffles So Irresistibly Easy?
Chocolate truffles have a fascinating history that dates back to the late 19th century in France. They are named after a type of fungus known as “truffle,” which resembles the chocolate confections in appearance. The traditional truffle is made from a filling of chocolate ganache that is rolled into balls and coated in cocoa powder, nuts, or coconut, resulting in a luxurious exterior. The contrast in textures—rich and creamy on the inside, with a slightly firmer exterior—creates a delightful experience with every bite.
This recipe for chocolate truffles simplifies the process, making it accessible even for those who may not consider themselves experienced bakers. With just a handful of ingredients, you can create these delightful treats in less than half an hour. The truffles can be flavored in various ways or customized to your liking, giving you the opportunity to experiment with different ingredients and create your very own signature truffle. From classic chocolate ganache to unique flavor combinations, the options are endless, making it an ideal recipe for aspiring home cooks.
Why You’ll Love This
First off, let’s talk about taste—these chocolate truffles are a chocolate lover’s dream come true. The smooth, creamy ganache practically melts in your mouth, delivering pure chocolate bliss. Not only do they taste incredible, but they are also surprisingly easy to make. No need for elaborate baking techniques or fancy kitchen gadgets; the process is straightforward, allowing even novice cooks to create impressive results.
Moreover, chocolate truffles are incredibly budget-friendly. The main ingredients—chocolate, cream, and butter—are often pantry staples, and you can make a large batch for a fraction of the cost of store-bought chocolates. If you love homemade gifts, these truffles make for a thoughtful, personalized present for friends, family, or coworkers. You could even dress them up with beautiful packaging, adding an extra touch of love and care.
It’s also worth mentioning that these truffles are versatile. You can easily adapt them to cater to dietary needs or preferences. Create a dairy-free version using coconut cream or substitute regular chocolate with high-quality dark chocolate for a more intense flavor. Regardless of the adaptation, each bite will deliver the sensation of decadence without the inconvenience.
Ingredients You’ll Need
- Chocolate: Choose high-quality chocolate, preferably 60-70% cocoa for a rich flavor. Dark chocolate tends to have a deeper, more complex taste, which enhances the overall truffle experience. You can also experiment with milk or white chocolate for different flavor profiles.
- Heavy cream: This is crucial for making the ganache rich and creamy. The cream adds a luscious texture that pairs beautifully with chocolate. If you’re looking for a lighter option, you can use half-and-half, but the truffles may not be as rich.
- Unsalted butter: Adding butter to the ganache gives it a silky texture and enhances the flavor. If you’re dairy-free, you can leave it out or use a plant-based butter substitute.
- Cocoa powder: Used for dusting the truffles, cocoa powder adds a sophisticated bitterness that balances the sweetness. Opt for unsweetened cocoa powder for the best flavor.
- Flavorings (optional): You can enhance your truffles with various flavorings like vanilla extract, sea salt, or even liqueurs. These can add depth and personality to your truffles.
Each ingredient plays a vital role in achieving the perfect chocolate truffle. By choosing high-quality products, you set the foundation for a delightful and memorable treat.
How to Make
1. **Chop your chocolate:** Begin by finely chopping your chocolate into small, uniform pieces using a sharp knife. This step ensures that the chocolate melts evenly when combined with the hot cream. If you prefer, you can use chocolate chips, though they might not melt as smoothly.
2. **Heat the cream:** In a small saucepan, gently heat the heavy cream over medium heat until it’s just about to boil. You’ll notice small bubbles forming around the edges of the pan. Remove it from heat right before it reaches a full boil to avoid scorching. This is a crucial step; overheating can affect the ganache’s smoothness.
3. **Combine the chocolate and cream:** Pour the hot cream over the chopped chocolate in a mixing bowl. Let it sit for about 5 minutes; this allows the chocolate to soften and melt. After 5 minutes, use a spatula to gently stir the mixture in circular motions. Continue stirring until it’s beautifully smooth and glossy.
4. **Add the butter:** Once the ganache is smooth, add the unsalted butter to the mixture. Stir thoroughly until the butter is fully melted and incorporated. The ganache will become more velvety at this stage and will set up beautifully once cooled.
5. **Chill the mixture:** Cover the bowl with plastic wrap and refrigerate the ganache for about 1 to 2 hours, or until it’s firm enough to scoop. Be careful not to leave it too long, as it can become too solid and difficult to work with.
6. **Shape the truffles:** After chilling, use a melon baller or a teaspoon to scoop out small amounts of ganache. Quickly roll the ganache between your palms to form smooth balls. If the mixture is too soft, you can chill it briefly again before rolling.
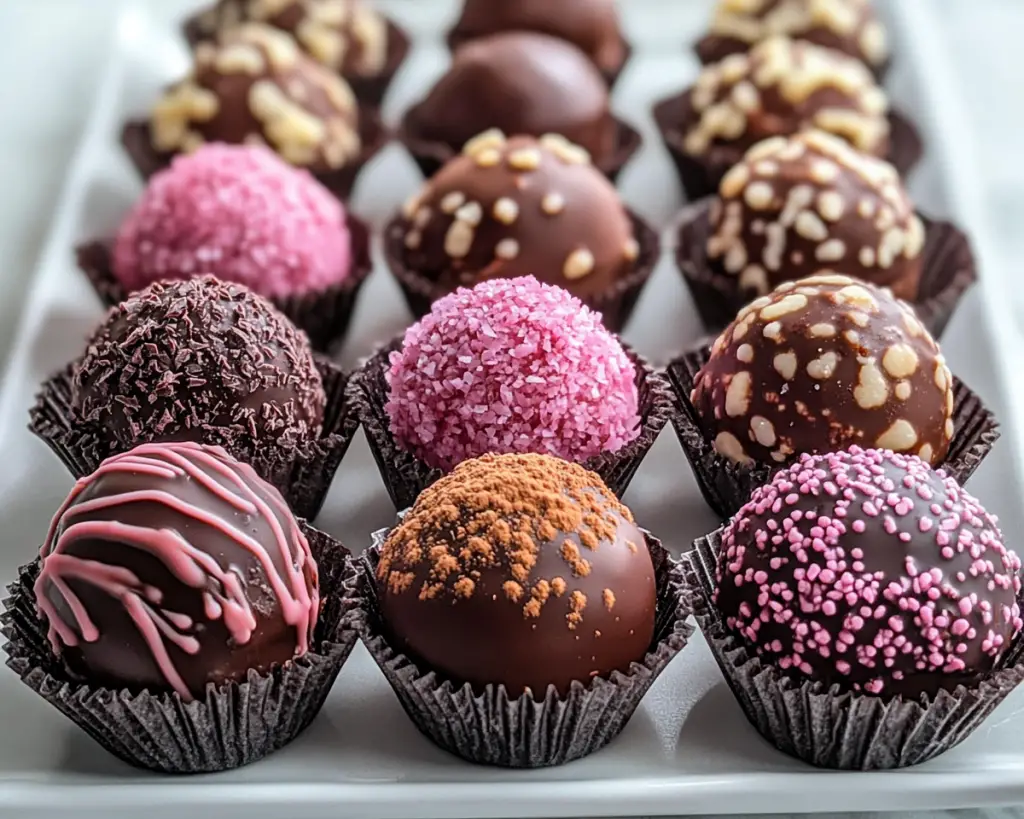
7. **Coat the truffles:** Roll the formed truffles in unsweetened cocoa powder to coat them evenly. If you prefer different coatings, you can use crushed nuts, shredded coconut, or chocolate sprinkles. Each coating adds a unique flavor and texture that can elevate your truffles.
8. **Chill again:** Place the coated truffles on a baking sheet lined with parchment paper and chill them in the refrigerator for another 30 minutes to firm them up before serving.
9. **Serve:** Once chilled, your truffles are ready to be enjoyed. They pair beautifully with coffee, tea, or a glass of dessert wine. For presentation, consider serving them on a decorative plate or in small cupcake liners.
Making these chocolate truffles is not only easy, but it’s also a fun activity, especially if you have kids or friends to join you. They’ll be in awe as they witness the transformation from mere ingredients to heavenly morsels.
Variations & Substitutions
Nutty Delight: If you want a delightful crunch to your truffles, consider adding finely chopped nuts like hazelnuts or almonds to the ganache. This variation not only enhances the flavor but also gives your truffles an appealing texture. Simply fold in the chopped nuts after mixing the chocolate and cream, and then shape the mixture into balls. This version is ideal for nut lovers and offers a gourmet touch that elevates the classic truffle.
Mint Chocolate Truffles: For a refreshing twist on the classic recipe, try adding peppermint extract to your ganache. About a teaspoon added to the hot cream before combining it with the chocolate should do the trick. This variation perfectly balances the rich chocolate with a cool mint flavor that feels especially festive during the holidays. You might even consider adding a sprinkle of crushed peppermint candy for garnish!
Vegan Chocolate Truffles: Adapting this recipe for a plant-based diet is easy. Substitute heavy cream with full-fat coconut milk and use dairy-free chocolate. The coconut milk will give a rich flavor and texture similar to traditional ganache. This variation is perfect for vegans or those with dairy sensitivities, ensuring that everyone can indulge in these delightful treats.
Spicy Chocolate Truffles: For those who enjoy a kick, try adding cayenne pepper or chili powder to the ganache. Just a pinch will add warmth and depth to your truffles. Pair this flavor with a dusting of cocoa powder or crushed dark chocolate for an aesthetically pleasing contrast. This variation is great for adventurous eaters looking to surprise their taste buds.
Fruit-infused Truffles: Incorporate pureed fruits like raspberry or orange zest into your ganache for a fruity twist. This variation adds a delightful unexpected burst of flavor that complements the richness of the chocolate beautifully. Opt for freeze-dried fruit for a natural sweetness without extra moisture that could cause issues with ganache consistency. This version is refreshing and is especially ideal for warm-weather gatherings.
Experimenting with these variations allows you to find the perfect combination that excites your palate while ensuring versatility in accommodating various tastes and preferences.
Common Mistakes to Avoid
One common mistake when making chocolate truffles is **overheating the cream**. If the cream boils over, it can scorch, resulting in a burnt flavor that will ruin the delicate chocolate ganache. Always keep an eye on the cream while it’s heating, turning down the heat if you see it starting to bubble too vigorously.
Another pitfall arises when rolling the truffles. It’s essential to **work quickly**; if the ganache becomes too warm in your hands, it may become sticky and unmanageable. If you find that the mixture is too soft, don’t hesitate to chill it briefly before rolling; this will make the process much easier.
Additionally, ensure you’re using **high-quality chocolate**. Cheap chocolate can lead to a gritty texture, which detracts from the wonderfully smooth experience that chocolate truffles are known for. Always opt for chocolate with a high cocoa content for the best results.
Finally, consider storage after making your truffles. If not stored properly, they can absorb unwanted odors from the fridge. Make sure to keep them in an **airtight container** to maintain their freshness and flavor integrity.
Storage, Freezing & Reheating Tips
Storing chocolate truffles is relatively straightforward. Place them in an **airtight container** and store them in the refrigerator. They will last up to two weeks if properly stored, which makes them an ideal treat for meal prep or advance gifting. Additionally, if you’re planning to serve them later, take them out of the fridge about 15 minutes prior to serving. Allowing them to come to room temperature will enhance their flavor and texture, making them even more delectable.
If you have an abundance of truffles and want to prepare them in advance, consider **freezing**. Place the truffles on a baking sheet lined with parchment paper and freeze them for about 30 minutes until solid. Then, transfer them to a freezer-safe bag or container. Properly stored, they can last up to three months in the freezer. Just remember that when it’s time to enjoy them, let them thaw slowly in the fridge before serving, as this prevents condensation from ruining their texture.
As for reheating, chocolate truffles are best enjoyed as is; there’s no need to reheat them. Instead, focus on how to incorporate them into other desserts or pairings if necessary. Crumbling them over ice cream or using them in a chocolate fondue can create exciting new dessert experiences.
Frequently Asked Questions
Can I use different types of chocolate for the truffles? Yes! You can use any type of chocolate you prefer—dark, milk, or white chocolate. Each type will yield different flavors and textures so feel free to experiment. However, keep in mind that the cream to chocolate ratio may need adjusting depending on the chocolate’s cocoa content, as milk chocolate may require slightly less cream.
Are these chocolate truffles gluten-free? Yes! As long as you use gluten-free chocolate and coatings, these truffles can be safely enjoyed by those following a gluten-free diet. Always double-check the ingredients if you’re purchasing pre-made options to ensure they don’t contain gluten.
Can I make these in advance for an event? Absolutely! Chocolate truffles are perfect for making ahead of time. They can be easily stored in the refrigerator or freezer until you’re ready to serve them. This feature makes them excellent for parties, gatherings, or special occasions.
What can I use to coat the truffles besides cocoa powder? You have plenty of options for coating truffles! Try using crushed nuts, shredded coconut, powdered sugar, or chocolate sprinkles. Each option provides a different visual appeal and flavor profile, making your treats unique.
How do I know when the ganache is ready to be rolled? The ganache is ready when it’s firm enough to hold its shape but still soft enough to be easily rolled. If it’s too sticky, continue chilling it in the fridge for a little while longer. It should have a similar consistency to play-dough when you’re ready to scoop and roll.
Conclusion:
In summary, making chocolate truffles is an accessible and rewarding experience that brings joy to your kitchen and delight to your taste buds. With their rich, creamy texture and customizable flavors, these irresistible treats are perfect for any occasion, from festive celebrations to simple everyday indulgences. I encourage you to try this delightful recipe, experiment with various fillings and coatings, and share your creations with loved ones. Whether you keep them all to yourself or give them as gifts, chocolate truffles are sure to bring a smile. So roll up your sleeves, gather your ingredients, and enjoy the process of creating something sweet!